
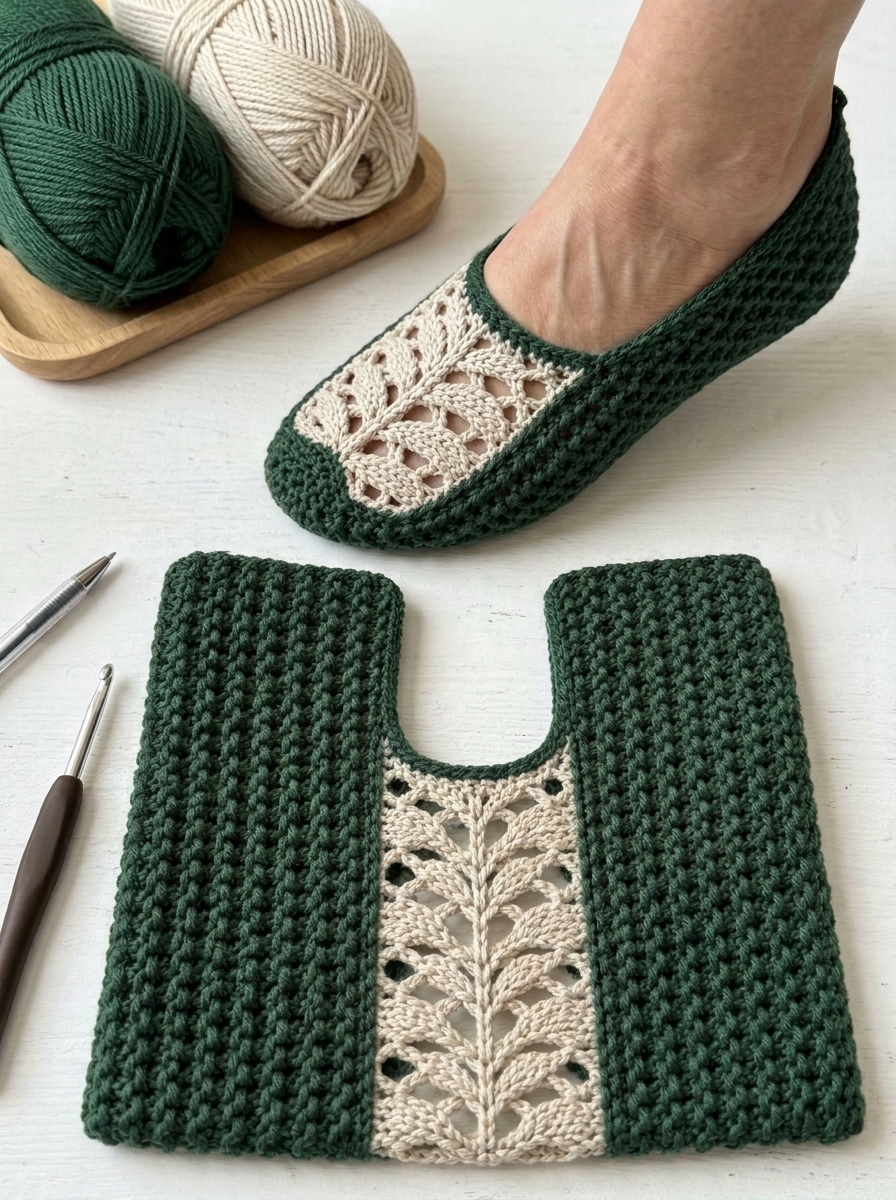
These forest green and cream slipper socks are a beautiful handmade project for anyone who loves cozy footwear with a touch of elegance. The deep green crochet texture creates a warm, cushioned look, while the cream lace panel adds a delicate decorative detail that makes these slippers stand out.
In this tutorial, you will learn how to make your own pair of textured house slippers, including the sole, side panels, decorative lace upper, and finishing details.
Whether you are making them for yourself, preparing a thoughtful handmade gift, or adding a new project to your crochet collection, these slippers are a lovely way to combine comfort and creativity.
Why You Will Love These Handmade Slippers
- Beautiful two-color design: Forest green and cream create a timeless, elegant combination.
- Textured crochet fabric: The raised stitches give the slipper body a cozy appearance.
- Decorative lace panel: The cream center panel adds a delicate, handmade finish.
- Customizable fit: Adjust the length and width to suit your feet.
- Great handmade gift: These slippers are ideal for birthdays, holidays, and cozy winter evenings.
Materials and Supplies
- Medium-weight yarn in forest green (approximately 100–150 g)
- Medium-weight yarn in cream (approximately 30–50 g)
- 4.0 mm crochet hook, or the size needed to achieve a firm fabric
- Yarn needle for sewing and weaving in ends
- Stitch markers
- Scissors
- Measuring tape
- Optional: non-slip fabric paint or slipper sole grips
Choose a soft, washable yarn that feels comfortable against your feet. A wool blend offers warmth, while acrylic yarn is often easy to care for.
Skill Level
Advanced beginner to intermediate
You should be comfortable making chain stitches, single crochet, half double crochet, slip stitches, and working in rounds. The lace panel uses chain spaces and simple shell-like stitches.
Finished Size
The instructions are written for an average adult foot approximately 24–25 cm (9.5–10 inches) long.
To customize the size, measure the foot from heel to longest toe. Adjust the sole length to approximately 0.5 cm shorter than the foot for a snug fit, depending on the yarn’s stretch.
The final fit will depend on your yarn, hook, and stitch tension.
Crochet Abbreviations
The pattern uses standard US crochet terminology.
- ch – chain
- sl st – slip stitch
- sc – single crochet
- hdc – half double crochet
- dc – double crochet
- sk – skip
- sp – space
- st(s) – stitch(es)
- rep – repeat
- RS – right side
- WS – wrong side
Pattern Overview
You will make three main elements:
- A forest-green sole.
- A textured green slipper body.
- A cream lace panel attached along the top.
Finally, you will shape the toe opening, seam the heel, and add a neat green edging.
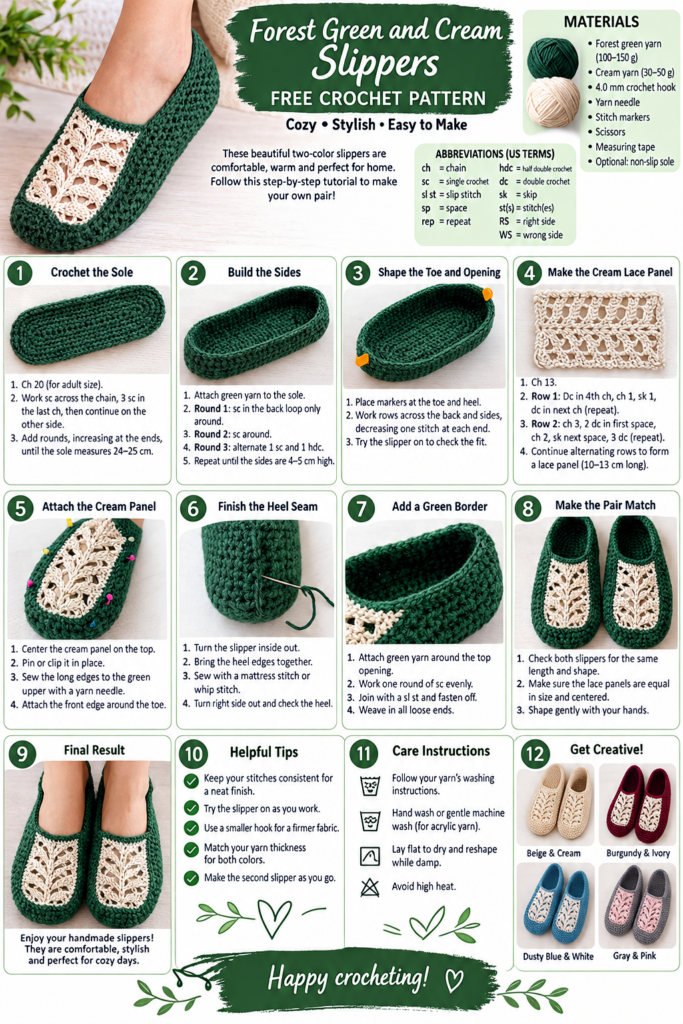
Step 1: Crochet the Green Sole
Start with forest-green yarn.
Foundation: Ch 20 for an average adult size.
Round 1
Sc in the second ch from the hook and in the next 17 chains. Work 3 sc in the final chain. Continue along the opposite side of the foundation chain, working 1 sc in each of the next 17 chains. Work 2 sc in the final chain. Join with a sl st to the first sc.
Round 2
Ch 1. Work 2 sc in each of the next 3 stitches at the rounded end. Sc along the straight section until you reach the opposite end. Work 2 sc in each of the next 3 stitches at that end, then sc along the remaining straight section. Join with a sl st.
Round 3
Ch 1. Work 1 sc in each stitch, increasing at both rounded ends as needed to keep the sole flat. Join with a sl st.
Continue adding rounds until the sole measures approximately 24–25 cm long and is wide enough for your foot.
Tip: Try the sole against your foot before continuing. If it curls, you may need more increases. If it waves, reduce the increases.
Step 2: Build the Textured Green Sides
Keep the forest-green yarn attached.
Round 1
Ch 1 and work 1 sc in the back loop only of every stitch around the sole. Join with a sl st.
This creates a clear ridge between the sole and the sides.
Round 2
Ch 1. Sc in each stitch around. Join.
Round 3
Ch 1. Alternate 1 sc and 1 hdc around the slipper, repeating the sequence evenly. Join.
Rounds 4–8
Repeat Round 3, or continue until the sides reach approximately 4–5 cm above the sole.
For a more raised texture like the reference photo, work the stitches firmly and consistently. Keep the opening wide enough for your foot to slide in comfortably.
Step 3: Shape the Toe and Opening
Place stitch markers at the center of the toe and at the center of the heel.
Continue working the green texture over the heel and side sections, leaving the top-front area open for the cream lace panel.
Work back and forth in rows across the back and sides if necessary, decreasing one stitch near each end of a row to gently shape the opening.
Try the slipper on frequently. The sides should hold the foot securely without squeezing it.
Step 4: Make the Cream Lace Panel
The cream panel is the decorative feature of the slipper. It should form a narrow strip that runs from the toe area toward the instep.
With cream yarn, ch 13.
Row 1
Dc in the fourth ch from the hook. Ch 1, sk 1 ch, dc in the next ch. Repeat across, ending with a dc. Turn.
Row 2
Ch 3. Work 2 dc in the first chain space. Ch 2, sk the next chain space, and work 3 dc in the following space. Repeat across, finishing with a dc in the turning chain. Turn.
Row 3
Ch 3. Work 1 dc in the first space, ch 2, and work 1 dc in the next space. Continue alternating dc stitches and chain spaces to form an open mesh. Turn.
Row 4
Ch 3. Work 2 dc in each larger chain space across, separating the groups with ch 2. Turn.
Row 5
Repeat Row 3.
Continue alternating the shell-like row and the open-mesh row until the panel is long enough to cover the top of the slipper, from the toe toward the ankle.
For an adult slipper, begin with a panel approximately 10–13 cm long, then adjust it to your foot.
Important: This is a simple lace-panel interpretation rather than a stitch-for-stitch reproduction of the photograph. The panel may need extra rows or a different width depending on your gauge and the shape of your slipper.
Step 5: Attach the Cream Panel
Lay the cream lace panel over the top of the slipper.
Center it carefully, leaving an even border of green crochet on both sides. Pin or clip it in place.
Using cream yarn and a yarn needle, sew the long edges of the panel to the green upper with small, even stitches. Avoid pulling too tightly, as the lace should remain flexible.
Attach the front edge neatly around the toe area. Leave the back end open until you are satisfied with the fit.
Repeat the same process for the second slipper, making sure both panels are the same length and width.
Step 6: Finish the Heel Seam
Turn the slipper inside out.
Bring the heel edges together and sew them with a mattress stitch or whip stitch. Keep the seam flat and secure, with no bulky knot pressing against the heel.
Turn the slipper right side out and check the heel shape.
Try the slipper on again. If the heel slips off, make the heel seam slightly deeper. If the slipper feels too tight, undo a few stitches and reshape the opening.
Step 7: Add a Neat Green Border
Attach forest-green yarn around the top opening.
Work one round of sc evenly around the edge, spacing the stitches so the border lies flat without puckering.
Join with a sl st and fasten off. Weave all loose ends into the fabric using a yarn needle.
Repeat for the second slipper.
Step 8: Make the Pair Match
Before wearing your slippers, compare the two finished pieces.
Check that both soles have the same length, the green sides have the same height, and the cream panels are centered and equal in size.
Gently shape the slippers with your hands. If necessary, lightly block the lace panel according to the yarn manufacturer’s care instructions.
For extra grip, apply suitable non-slip sole products according to their instructions. Ordinary crochet fabric can be slippery on smooth floors.
Helpful Tips for the Best Results
Keep your stitches consistent. Tight, even stitches help the slipper hold its shape.
Check the fit as you work. Foot width and instep height vary, so trying the slipper on is more reliable than following stitch counts alone.
Use a smaller hook if needed. If the fabric is too loose, try a smaller hook to create a firmer texture.
Match your yarn carefully. Use yarns of similar thickness for the green body and cream panel so the lace does not pull or distort the upper.
Make the second slipper as you go. Record your measurements and row counts from the first slipper to help the pair match.
How to Care for Your Handmade Slippers
Follow the washing instructions for your yarn. Many acrylic blends can be gently machine washed, while wool may require hand washing.
Lay the slippers flat to dry and reshape them while damp. Avoid high heat, which can distort the stitches or shrink some fibers.
Frequently Asked Questions
Are these slippers suitable for beginners?
They are best for advanced beginners who know basic crochet stitches. The sole and textured body are straightforward, while attaching the lace panel requires a little more patience.
Can I make these slippers in other colors?
Absolutely! Try beige and cream for a neutral look, burgundy and ivory for a rich winter palette, or dusty blue and white for a softer style.
Can I adjust the pattern for a larger foot?
Yes. Increase the length of the foundation chain and add sole rounds until you reach the required measurements. Adjust the lace panel to fit the new upper length.
Can I make the slippers warmer?
You can use a slightly thicker yarn, add a fabric lining, or wear the slippers with thin socks. Make sure any lining does not make the slippers too tight.
How can I make the soles less slippery?
Add a suitable non-slip sole coating or attach a purpose-made slipper sole. Test the finished slippers on the floor where you plan to wear them.
Final Thoughts
These forest green and cream slipper socks bring together cozy texture and delicate lace in one charming handmade design. The rich green body looks beautiful beside the cream decorative panel, making this project a lovely addition to your collection of handmade gifts and cozy home accessories.
Take your time with the sole, check the fit as you work, and enjoy creating a pair that feels personal and special. Once you have mastered the construction, you can experiment with new colors, different lace panels, and custom sizes.
Happy crocheting!