
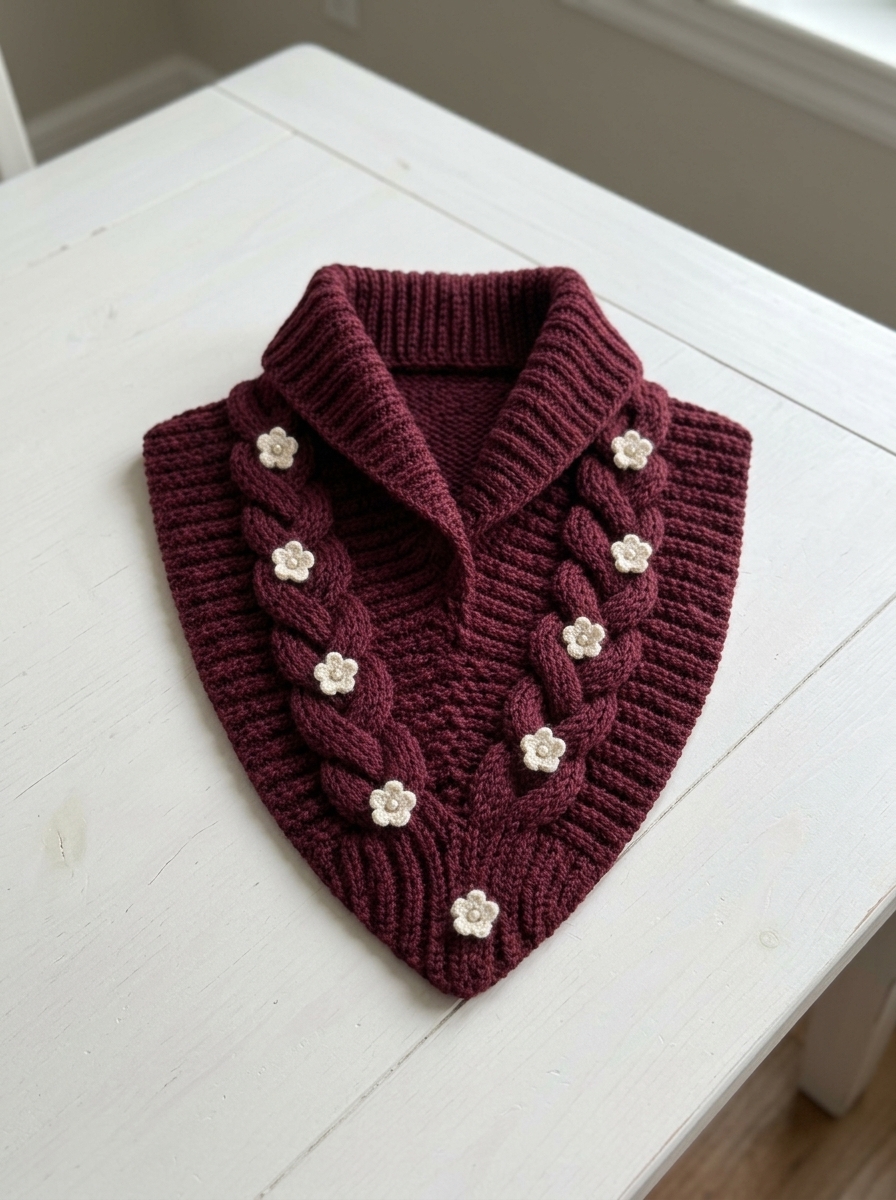
This crochet braided cowl is a beautiful handmade accessory that combines cozy warmth with delicate floral details. Made with rich burgundy yarn, chunky braided cables, and tiny cream-colored flowers, this cowl has a lovely textured look that makes even a simple winter outfit feel special.
If you love crochet accessories with a little vintage charm, this crochet braided cowl pattern is a wonderful project to try. The wide ribbed collar sits comfortably around the neck, while the decorative braids create a thick, eye-catching texture down the front. Small crocheted flowers add the perfect finishing touch.
You can make this cowl for yourself, give it as a thoughtful handmade gift, or customize it in your favorite colors. Choose burgundy and cream for a classic look, dusty pink and ivory for a softer style, or forest green and beige for a cozy autumn accessory.
This tutorial explains the materials, stitches, construction, and finishing process step by step.
About This Crochet Braided Cowl Pattern
- Skill level: Advanced beginner to intermediate
- Project type: Crochet neck warmer or cowl
- Construction: Ribbed collar, textured body, braided cable panels, and separate crochet flowers
- Suggested yarn: Medium-weight or bulky yarn, depending on your preferred thickness
- Main color: Burgundy or wine red
- Accent color: Cream or ivory
- Pattern style: Cozy, textured, floral, and vintage-inspired
The pattern below is an original written approximation based on the appearance of the reference photo. The exact stitch counts and measurements may differ from the pictured item.
Materials You Will Need
Before starting, gather the following supplies:
- Burgundy yarn for the main cowl
- Cream yarn for the decorative flowers
- Crochet hook suitable for your yarn, usually 5 mm for medium-weight yarn or 6 mm for bulky yarn
- Tapestry needle for sewing the pieces together
- Stitch markers
- Scissors
- Measuring tape
Yarn tip: Choose a soft yarn with good stitch definition so the ribbing and braided cables stand out clearly. A wool-acrylic blend is a practical choice for a warm accessory that is easy to care for.
Crochet Abbreviations
This pattern uses US crochet terminology.
- ch: Chain
- sl st: Slip stitch
- sc: Single crochet
- hdc: Half double crochet
- dc: Double crochet
- FPdc: Front post double crochet
- BPdc: Back post double crochet
- st(s): Stitch(es)
- rep: Repeat
- RS: Right side
- WS: Wrong side
Special Stitches Explained
Front post double crochet (FPdc)
Yarn over, insert your hook from front to back and then back to front around the post of the indicated stitch, yarn over, and pull up a loop. Complete the double crochet normally.
This stitch creates raised vertical ridges that help give the cowl its dimensional texture.
Back post double crochet (BPdc)
Yarn over, insert your hook from back to front and then front to back around the post of the indicated stitch. Complete the double crochet normally.
Alternating front post and back post stitches creates a stretchy ribbed fabric.
Crochet braid effect
The braided panels are created using raised stitches and overlapping strands. The pattern uses two narrow cable strips that are worked separately and crossed over each other before being secured to the front of the cowl.
This gives the finished accessory the appearance of thick knitted braids.
Finished Size
The following measurements are suggested starting dimensions. Adjust them to fit comfortably around your neck.
- Neck opening: Approximately 38–44 cm (15–17 inches) around
- Front height: Approximately 30–36 cm (12–14 inches)
- Collar height: Approximately 8–10 cm (3–4 inches)
The finished size will depend on your yarn, hook, stitch tension, and the amount of shaping you add.
Step 1: Make a Gauge Swatch
Start by crocheting a small swatch using the main stitch pattern.
Work several rows of half double crochet or your chosen textured stitch. Measure the swatch without stretching it.
Check whether your yarn and hook produce a fabric that is soft, warm, and flexible. If the fabric is too stiff, try a larger hook. If it is too loose, try a smaller hook.
A gauge swatch helps you create a cowl that fits comfortably rather than feeling tight around your neck.
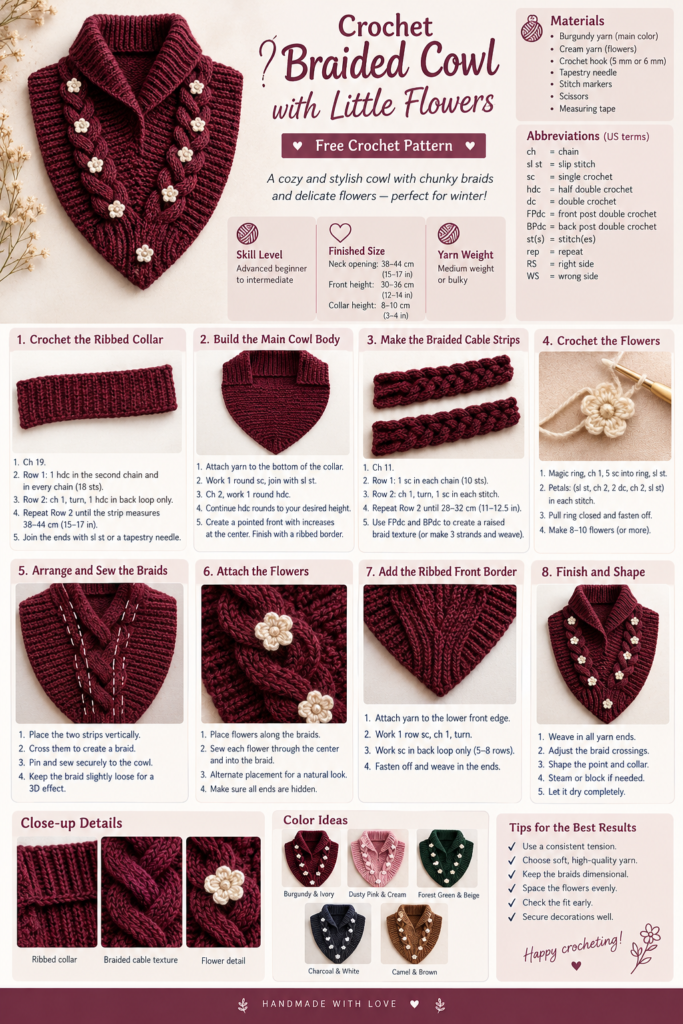
Step 2: Crochet the Ribbed Collar
The collar forms the upper section of the cowl. It should be tall enough to fold over gently, as shown in the reference image.
Foundation:
- With burgundy yarn, chain 19.
- Row 1: Work 1 hdc in the second chain from the hook and in every remaining chain. You will have 18 stitches.
- Row 2: Chain 1, turn, and work 1 hdc in the back loop only of every stitch.
- Repeat Row 2 until the ribbed strip measures approximately 38–44 cm (15–17 inches), or fits comfortably around your neck.
Fold the strip with the short ends together and join them using slip stitches or a tapestry needle.
You now have a ribbed collar that can be folded over to create the thick neckline.
Helpful tip: Keep the ribbing relaxed. A collar that is too tight may be uncomfortable, especially when folded.
Step 3: Build the Main Cowl Body
Attach the burgundy yarn to the lower edge of the collar.
- Work a round of single crochet evenly around the bottom edge.
- Join with a slip stitch, taking care not to twist the work.
- Chain 2 and work one round of half double crochet.
- Continue working rounds of half double crochet until the cowl body reaches your desired height.
For the triangular front shape shown in the photograph, you can work the front section in rows instead of rounds.
Creating the pointed front
- Mark the center front of the cowl.
- Work across the front section in half double crochet.
- At the center stitch, work 3 hdc into the same stitch to create a small increase.
- On the next row, work increases at the center again.
- Continue until the front section reaches the desired length.
- Finish with a ribbed border worked in alternating front post and back post double crochet, or in back-loop-only single crochet.
Keep the upper edge wide enough to sit beneath the folded collar. The lower edge should taper gradually into a soft point.
For a more fitted neck warmer, make the back section shorter and keep the extra length at the front.
Step 4: Crochet the Braided Cable Strips
The prominent burgundy braids are the main decorative feature. Make two matching strips and attach them to the front of the cowl.
Make two cable strips
Using burgundy yarn:
- Chain 11.
- Row 1: Work 1 sc in the second chain from the hook and in every chain across. You will have 10 stitches.
- Row 2: Chain 1, turn, and work 1 sc in each stitch.
- Repeat Row 2 until the strip is approximately 28–32 cm (11–12.5 inches) long, or matches the front height of your cowl.
- Make a second strip of the same length.
For a thicker braid, make the strips wider or use a slightly larger hook.
Shape the raised braid texture
To make the strips look more like the chunky cables in the photo, work a raised stitch pattern over the center stitches.
- Work a foundation row of double crochet.
- On the next row, work front post double crochet stitches around selected stitches.
- Work ordinary double crochet stitches between the raised stitches.
- Repeat the raised pattern on subsequent rows to create rounded, rope-like sections.
Keep the outer edges neat so the strips are easy to sew onto the cowl.
Arrange the braid
Lay the two strips side by side on a flat surface.
- Position the strips vertically on the front of the cowl.
- Cross one strip over the other near the top.
- Continue alternating the overlap down the front to create a loose braided effect.
- Adjust the crossings until both sides look balanced.
- Pin the strips in place.
- Sew the ends securely to the cowl using matching burgundy yarn.
Do not pull the strips too tightly while sewing. The braid should have enough dimension to stand out from the body of the cowl.
Important construction note: The reference photo shows pronounced, rounded cables. For a closer match, use a dedicated crochet cable stitch pattern or make three separate narrow strands and weave them together before attaching them. A simple flat strip will create a subtler braid.
Step 5: Crochet the Small Cream Flowers
The tiny cream flowers make this cowl especially charming. Crochet several flowers separately and sew them onto the braid.
Simple five-petal flower
Using cream yarn:
- Make a magic ring.
- Chain 1.
- Work 5 sc into the ring.
- Join with a slip stitch to the first sc.
You now have a small center ring.
Make the petals
Repeat the following sequence in each of the five stitches:
- Slip stitch into the next stitch.
- Chain 2.
- Work 2 dc into the same stitch.
- Chain 2.
- Slip stitch into that same stitch.
Repeat for all five stitches to create five rounded petals.
Pull the magic ring closed securely and fasten off, leaving a long tail for sewing.
For a more delicate flower, use a smaller hook and fine cotton yarn. For a puffier flower, use a slightly thicker yarn.
Make the flowers stand out
If you want the flowers to resemble the raised ivory blossoms in the reference photo, add a tiny cream knot or a small French knot at the center using a tapestry needle.
Make approximately 8–10 flowers, depending on the length of the cowl and how many decorations you prefer.
Step 6: Attach the Flowers to the Braids
Lay the cowl flat and arrange the flowers before sewing them down.
- Place the first flower near the upper part of the left braid.
- Add more flowers at regular intervals down the braid.
- Repeat on the right braid, alternating the placement so the flowers do not line up exactly.
- Add one final flower near the lower pointed front.
- Sew each flower securely through its center and into the underlying braid.
Use small, neat stitches and matching cream yarn.
Check the back of each flower to make sure there are no long loose strands that could catch on clothing.
For a more understated style, use fewer flowers. For a playful floral look, add extra flowers in different sizes.
Step 7: Add the Ribbed Front Border
A ribbed border gives the lower front of the cowl a neat, finished appearance.
- Attach burgundy yarn to the lower front edge.
- Work a row of single crochet evenly along the edge.
- Chain 1 and turn.
- Work single crochet stitches in the back loop only.
- Repeat for 5–8 rows, depending on how thick you want the border.
- Fasten off and weave in the ends.
If your cowl already has a firm ribbed lower edge, you can skip this step.
Make sure the border lies flat and does not pull the pointed front out of shape.
Step 8: Finish and Shape Your Cowl
Finishing makes a big difference in the final appearance.
- Weave in all yarn ends with a tapestry needle.
- Check the seams around the collar and cable strips.
- Adjust the braid crossings so they look even.
- Gently shape the pointed front with your hands.
- Lightly steam or wet-block the cowl if your yarn label allows it.
Avoid pressing directly on the raised cables or crocheted flowers. You want to preserve their three-dimensional texture.
Let the cowl dry completely before wearing it.
Tips for the Best Results
- Use a consistent tension: Even stitches make the ribbed sections look more professional.
- Choose soft yarn: A comfortable yarn is essential for an accessory worn close to the neck.
- Keep the braids dimensional: Avoid flattening the cable strips when sewing them down.
- Space the flowers evenly: Lay out the decorations before attaching them.
- Check the fit early: Try the collar around your neck before completing the body.
- Secure decorations carefully: If making this accessory for a young child, avoid small detachable decorations and use securely attached, child-safe embellishments.
Color Ideas for Your Crochet Cowl
The burgundy and cream combination gives this design a rich, romantic appearance, but you can easily personalize it.
- Burgundy and ivory: Classic, elegant, and close to the pictured design.
- Dusty pink and cream: Soft and feminine.
- Forest green and beige: Perfect for autumn and winter.
- Charcoal and white: A modern, high-contrast look.
- Camel and chocolate brown: Warm and neutral.
You can also replace the flowers with tiny leaves, crochet berries, or small matching buttons for a different style.
Frequently Asked Questions
Is this crochet cowl suitable for beginners?
The ribbed collar and flower motifs are beginner-friendly with basic stitch knowledge. Creating the shaped front and dimensional braided cables is more suitable for advanced beginners or intermediate crocheters.
Can I use a different yarn weight?
Yes. Medium-weight yarn creates a lighter cowl, while bulky yarn produces a thicker, warmer accessory. Adjust the hook size and stitch counts to achieve your desired fit.
How do I make the braid look thicker?
Use wider cable strips, create raised post stitches, or crochet three separate strands and weave them together. A slightly thicker yarn can also make the braid more prominent.
Can I make the cowl without the flowers?
Absolutely. The burgundy cables are attractive on their own. You can leave the cowl plain or add only a few flowers for a more subtle design.
How do I wash my finished cowl?
Follow the care instructions on your yarn label. Hand washing in cool water is a good option for many handmade accessories. Gently squeeze out excess water without wringing, then lay flat to dry.
Final Thoughts
This crochet braided cowl with little flowers is a lovely way to combine texture, warmth, and handmade charm. The folded ribbed collar creates a cozy neckline, the braided cables add beautiful dimension, and the cream flowers bring a delicate finishing touch.
Take your time with the cable placement and flower arrangement, and do not worry if your first version looks a little different from the photograph. Handmade projects are special because every stitch reflects the person who made them.
Choose your favorite yarn colors, make a few flowers, and enjoy creating a cozy accessory you can wear throughout the colder months.
Love this free crochet pattern? Save it to your crochet project list and share it with a friend who enjoys making beautiful handmade accessories. Your support helps inspire more free crochet patterns and creative projects.
Happy crocheting!