
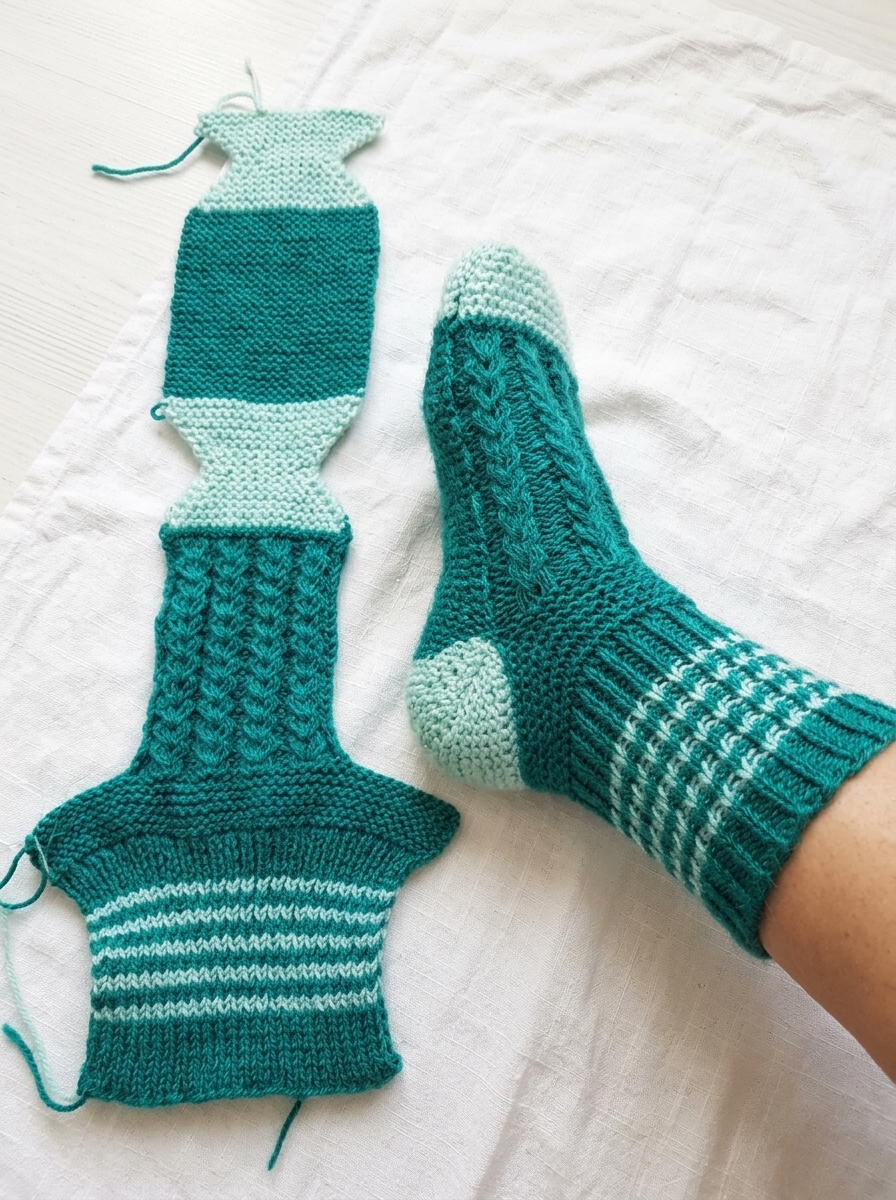
These cozy handmade knitted socks feature beautiful teal yarn, contrasting mint-green toes and heels, and a striped ribbed cuff. The raised texture along the leg and top of the foot gives the socks a lovely handcrafted appearance, while the soft color combination makes them perfect for chilly days, relaxing at home, or thoughtful handmade gifts.
This free knitted socks pattern is designed for knitters who want to create a colorful pair of comfortable socks using basic knitting techniques, simple decreases, and a decorative textured stitch pattern.
The instructions below provide a beginner-friendly interpretation inspired by the pictured socks. The original stitch counts cannot be determined precisely from the photograph, so this is not an exact reproduction of the original design.
Knitted Socks Pattern Details
- Skill level: Intermediate
- Sizes: Adult small, medium, and large
- Construction: Cuff-down, worked in the round
- Yarn: DK-weight sock yarn
- Needles: 3.0–3.5 mm double-pointed needles or circular needles for your preferred small-circumference method
- Colors: Dark teal, mint green, and pale mint
- Techniques: Ribbing, knit and purl stitches, cable stitches, heel flap, heel turn, gusset decreases, and toe shaping
Materials
- Color A: Teal yarn for the main sock
- Color B: Mint-green yarn for the heel and toe
- Color C: Pale mint yarn for the cuff stripes
- Knitting needles suitable for your yarn and gauge
- Cable needle
- Stitch markers
- Tapestry needle
- Scissors
- Measuring tape
Choose a yarn with good recovery and durability. For socks worn inside shoes, a yarn specifically designed for socks is preferable.
Knitting Abbreviations
- CO: Cast on
- BO: Bind off
- K: Knit
- P: Purl
- K2tog: Knit two stitches together
- SSK: Slip, slip, knit
- C4F: Slip 2 stitches onto a cable needle and hold in front, knit 2, then knit the 2 stitches from the cable needle
- C4B: Slip 2 stitches onto a cable needle and hold in back, knit 2, then knit the 2 stitches from the cable needle
- PM: Place marker
- SM: Slip marker
- Rnd: Round
- Rep: Repeat
Gauge and Sizing
Work a gauge swatch in the round using the chosen yarn and needles. A useful starting gauge for DK-weight socks is approximately 24 stitches and 32 rounds per 10 cm in stockinette stitch, although the actual gauge depends on your yarn and needles.
The following stitch counts are starting points for an adult sock:
- Small: 48 stitches
- Medium: 52 stitches
- Large: 56 stitches
Choose the size that gives a finished sock circumference approximately 5–10% smaller than your foot circumference. Measure your foot before beginning, and adjust the stitch count in multiples compatible with the ribbing and cable pattern.
Full Knitted Socks Pattern
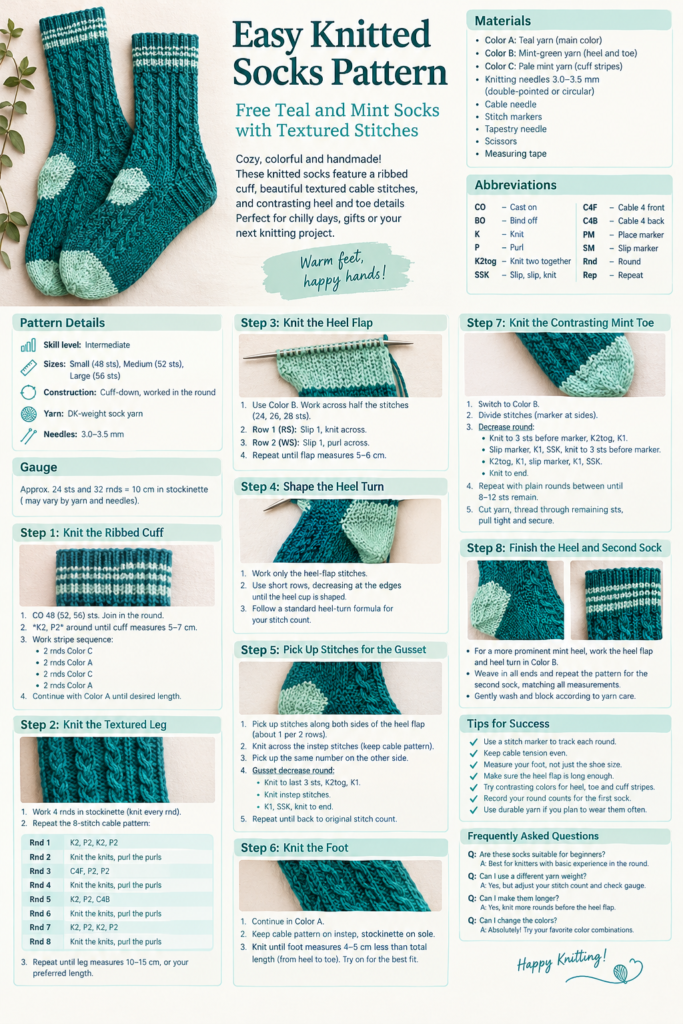
Step 1: Knit the Ribbed Cuff
Using Color A, cast on 48 (52, 56) stitches. Divide the stitches evenly between your needles, or arrange them for your preferred method of knitting in the round.
Join carefully, making sure the stitches are not twisted.
Cuff rounds:
Repeat K2, P2 around until the cuff measures approximately 5–7 cm, or your preferred length.
For a striped cuff inspired by the photograph, work the following color sequence after the main ribbing:
- 2 rounds in Color C
- 2 rounds in Color A
- 2 rounds in Color C
- 2 rounds in Color A
Continue with Color A until the cuff reaches your desired length.
Step 2: Knit the Textured Leg
Continue using Color A.
Work 4 rounds in stockinette stitch, knitting every round.
For the raised cable-inspired pattern, use this 8-stitch repeat:
Round 1: K2, P2, K2, P2.
Rounds 2, 4, 6, and 8: Knit the knit stitches and purl the purl stitches as they appear.
Round 3: C4F, P2, P2.
Round 5: K2, P2, C4B.
Round 7: Repeat Round 1.
Repeat these rounds, keeping the cable pattern centered over the top of the foot and leg. If you are using a cable repeat that requires more stitches than available in your chosen size, adjust the stitch count before beginning.
Continue until the leg measures approximately 10–15 cm from the top of the cuff, or until you reach your preferred height.
Step 3: Knit the Heel Flap
For a traditional heel flap, work across half of the stitches using Color B.
For 48 (52, 56) total stitches, the heel flap uses 24 (26, 28) stitches.
Row 1, right side: Slip 1 stitch purlwise, then knit across.
Row 2, wrong side: Slip 1 stitch purlwise, then purl across.
Repeat these two rows until the heel flap measures approximately 5–6 cm, or until it is long enough for your foot.
Keep the remaining stitches on hold for the instep.
Step 4: Shape the Heel Turn
Continue working only over the heel-flap stitches.
Row 1, right side: Slip 1, knit to the center area, then work a centered decrease as needed and turn.
Row 2, wrong side: Slip 1, purl to the center area, work a purl-side decrease as needed, and turn.
Continue working short rows, using the center stitches and decreasing at the edges of the heel cup until the heel is shaped.
The exact short-row sequence depends on the number of heel stitches and the heel method you prefer. For a more precise fit, use a standard heel-turn formula matched to your stitch count.
Step 5: Pick Up Stitches for the Gusset
Using Color A, knit across the heel stitches.
Pick up and knit approximately one stitch for every two heel-flap rows along the first side of the heel.
Knit across the held instep stitches, maintaining the cable pattern over the top of the foot.
Pick up and knit the same number of stitches along the other side of the heel flap.
The total stitch count will now be larger than the original cast-on count.
Gusset decrease round:
- Knit to the last 3 stitches before the instep, then K2tog and knit 1.
- Work the instep stitches in pattern.
- Knit 1, SSK, then knit to the end of the round.
Work one plain round between decrease rounds if desired. Repeat the decrease rounds until you return to your original stitch count of 48 (52, 56) stitches.
Step 6: Knit the Foot
Continue in the round using Color A.
Maintain the cable pattern across the instep and work stockinette stitch across the sole.
Knit until the foot measures approximately 4–5 cm less than the total desired foot length, measured from the back of the heel to the tip of the longest toe.
For a well-fitting sock, try it on during this stage. The exact length before beginning the toe depends on the wearer’s foot and the shape of the toe.
Step 7: Knit the Contrasting Mint Toe
Switch to Color B.
Divide the stitches evenly between the sole and instep, placing markers at each side if helpful.
Decrease round:
- Knit to the last 3 stitches before the first marker, K2tog, K1.
- Slip the marker, K1, SSK, then knit to 3 stitches before the second marker.
- K2tog, K1, slip the marker, K1, SSK.
- Knit to the end of the round.
Work one plain knit round between decrease rounds until approximately half the original stitches remain.
Then work a decrease round every round until 8–12 stitches remain.
Cut the yarn, leaving a long tail. Thread the tail through the remaining stitches, pull tight to close the toe, and secure it neatly on the inside.
Step 8: Finish the Heel and Second Sock
If you prefer a more prominent mint heel, work the heel flap and heel turn entirely in Color B. This creates the contrasting heel visible in the inspiration photo.
Weave in all loose ends carefully. Repeat the pattern for the second sock, matching the cuff length, leg length, heel depth, and foot length.
Gently wash and block according to the yarn manufacturer’s care instructions.
Tips for Beautiful Knitted Socks
- Use a stitch marker to identify the beginning of each round.
- Keep cable tension even so the textured pattern stays neat.
- Measure the foot rather than relying only on a general size chart.
- Make sure the heel flap is long enough to sit comfortably around the heel.
- Use contrasting yarn colors for the toe, heel, and cuff stripes.
- Record your round counts for the first sock to help the second sock match.
- Choose durable sock yarn if the socks will be worn frequently.
Frequently Asked Questions
Are these knitted socks suitable for beginners?
They are best for knitters who already know how to knit and purl in the round. The cable stitches, heel shaping, and gusset decreases require some experience. Beginners can simplify the pattern by replacing the cable panel with stockinette stitch.
Can I use a different yarn weight?
Yes, but you must recalculate the stitch count and check your gauge. Thicker yarn produces bulkier socks, while thinner sock yarn creates a lighter fabric.
Can I make the socks longer?
Yes. Continue the leg pattern for additional rounds before starting the heel flap.
Can I change the colors?
Absolutely. Try forest green and cream, navy and white, burgundy and blush, or any combination you like.
How do I make both socks the same size?
Record the number of rounds for the cuff, leg, heel flap, gusset, and foot on the first sock. Follow those notes for the second sock and measure both before finishing.
Final Thoughts
These teal and mint knitted socks combine a cozy ribbed cuff, raised cable-inspired texture, and contrasting heel and toe details. The result is a colorful handmade accessory that makes a thoughtful gift or a satisfying project for your own wardrobe.
Save this free knitted socks pattern for your next knitting project, and experiment with your favorite colors to create your own personalized pair.