
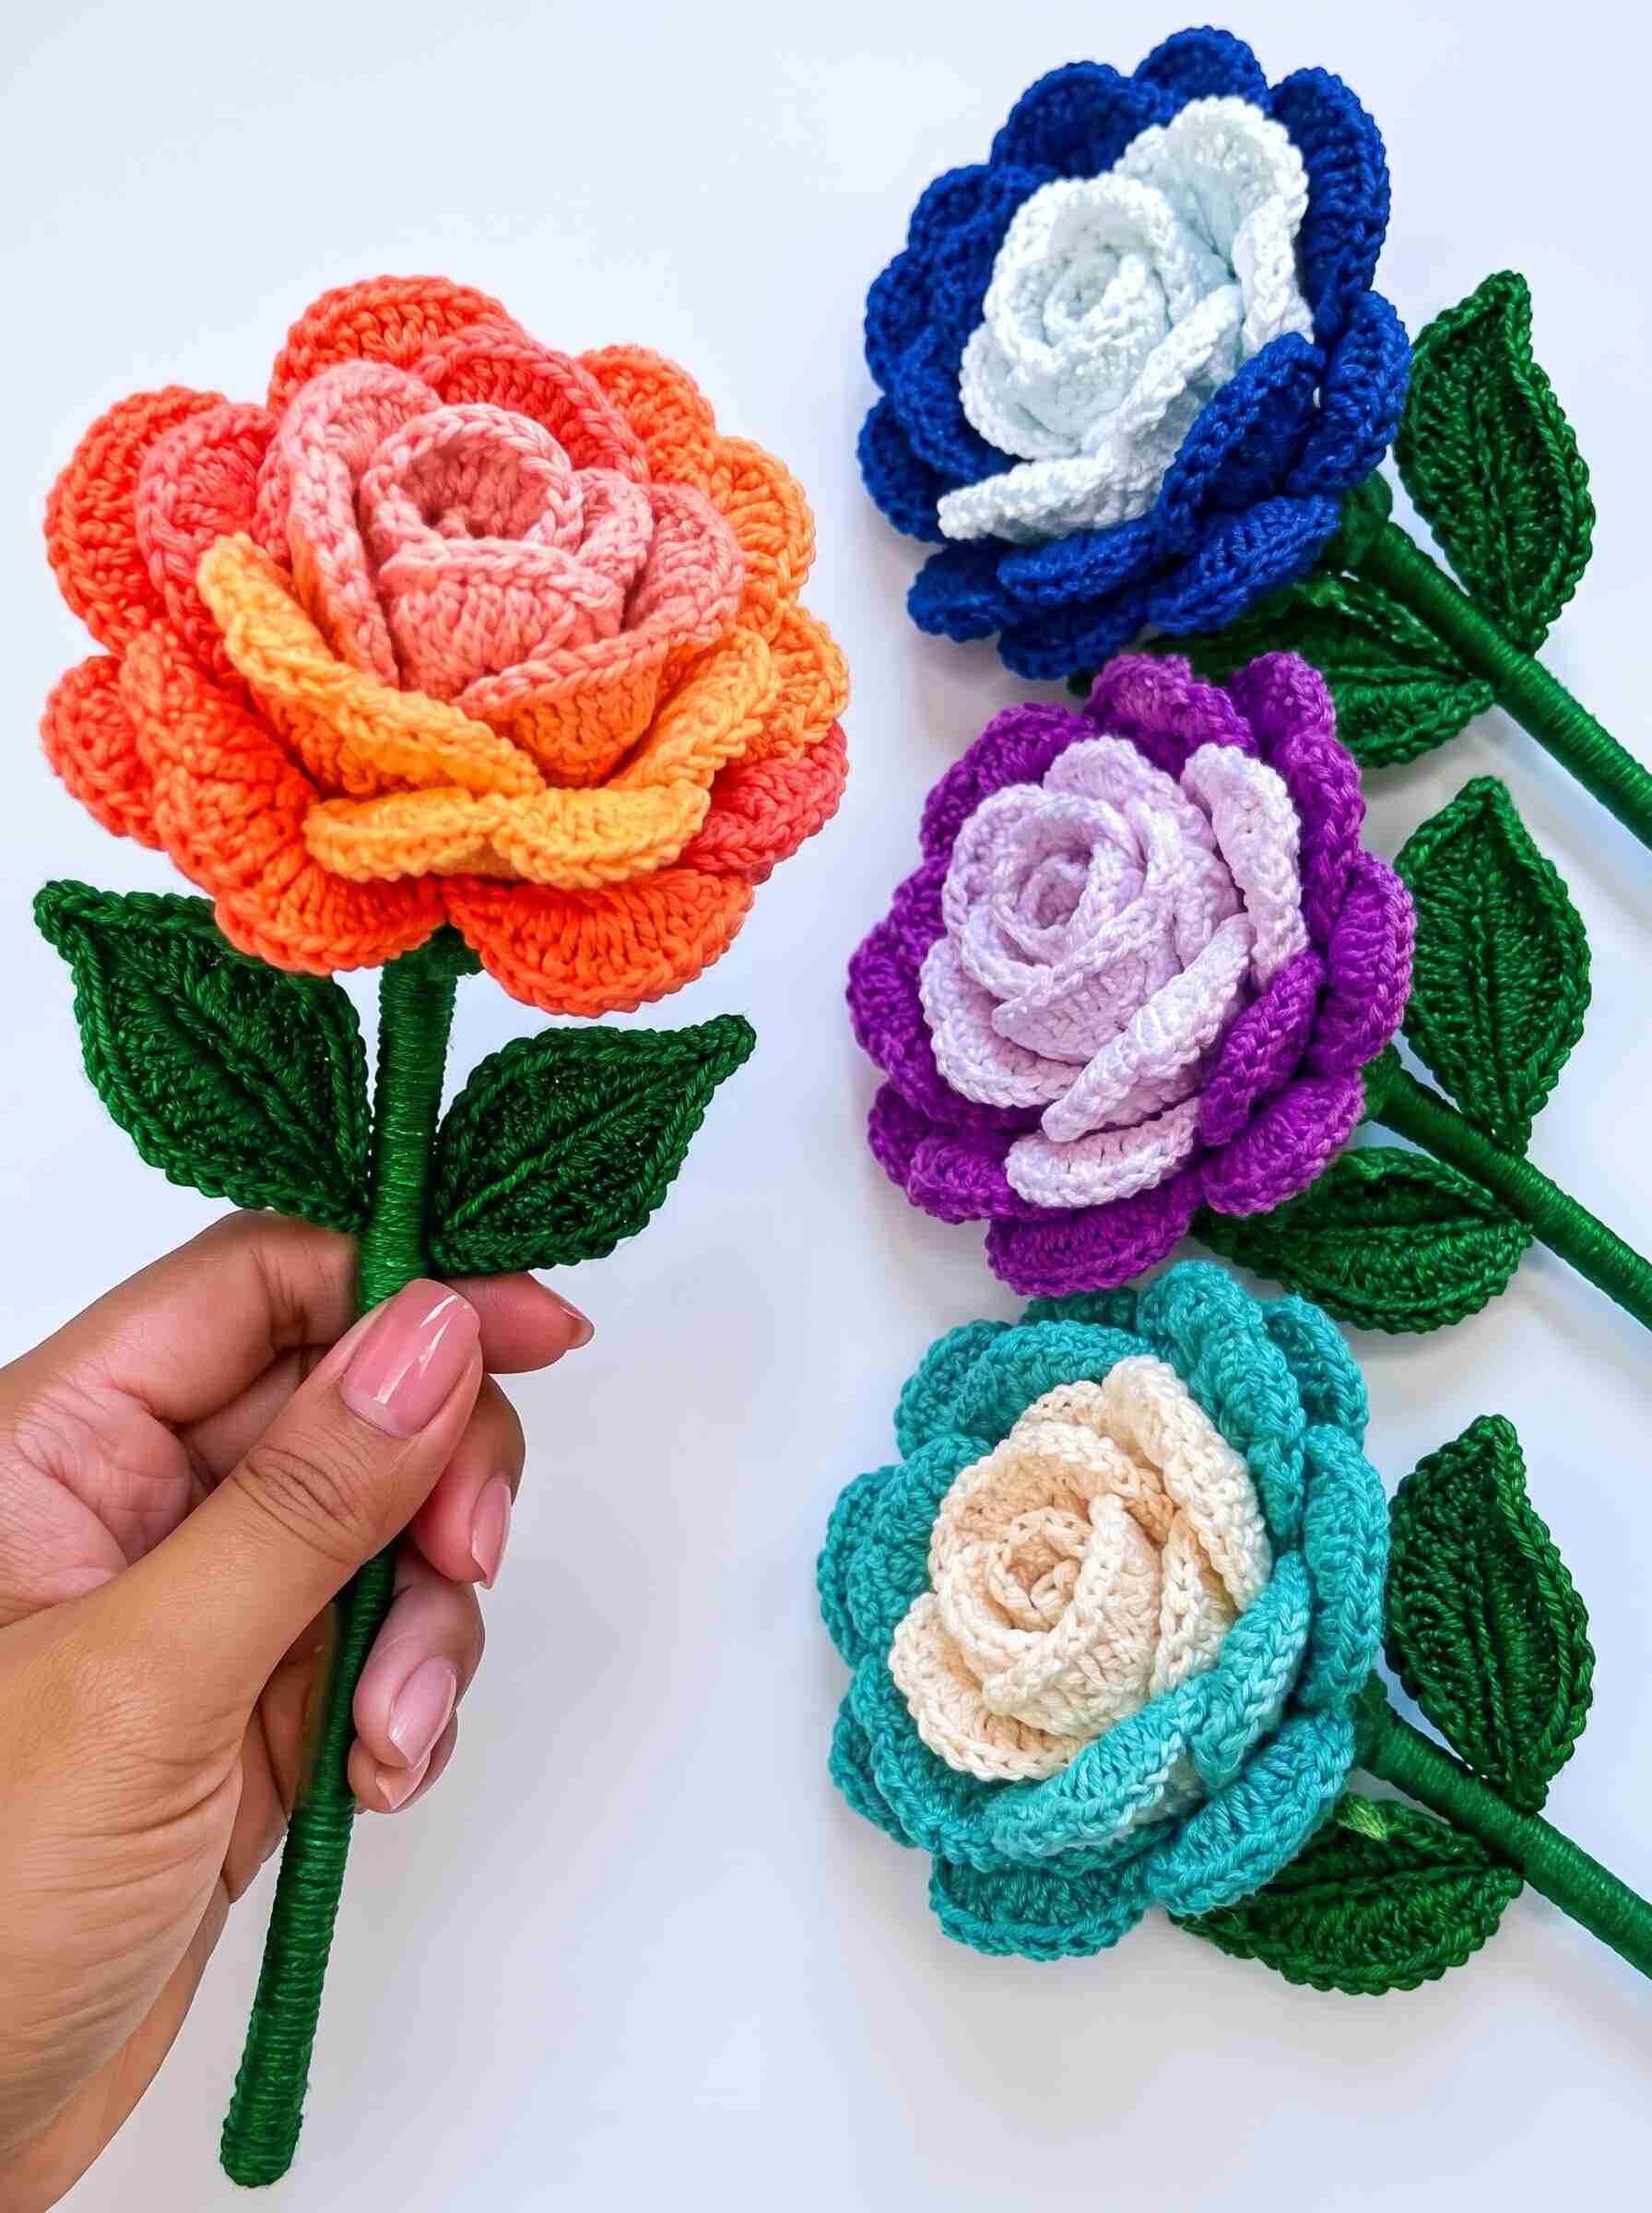
Have you ever wanted to make a beautiful bouquet of flowers that never wilts? These gorgeous crochet roses are a lovely way to bring handmade beauty into your home. With their layered petals, rich colors, textured green leaves, and long wrapped stems, they look wonderful as a decorative bouquet or a thoughtful handmade gift.
In this tutorial, you will learn how to crochet a rose flower step by step, from creating the delicate inner petals to shaping the outer layers and assembling the finished flower. You can use bright orange, royal blue, purple, turquoise, cream, pink, or any color combination you love.
This free crochet rose pattern is suitable for adventurous beginners who know the basic crochet stitches and want to try a more detailed floral project.
Why You’ll Love This Crochet Rose Pattern
- Beautiful layered petals: Create a full, realistic-looking rose with multiple rows of petals.
- Customizable colors: Make classic red roses, pastel flowers, or colorful fantasy roses.
- Long decorative stems: Add wrapped stems and crocheted leaves for a finished bouquet.
- Long-lasting flowers: Enjoy your handmade roses without watering or wilting.
- A thoughtful handmade gift: Perfect for birthdays, Mother’s Day, anniversaries, weddings, and home decoration.
Materials You’ll Need
- Medium-weight cotton yarn in your chosen flower color
- A small amount of cream, white, or contrasting yarn for the center, if desired
- Green cotton yarn for leaves and stems
- A 2.5–3.5 mm crochet hook, chosen to suit your yarn
- Floral wire or a sturdy, blunt-ended stem support
- Green floral tape or green yarn for wrapping the stem
- Scissors
- Yarn needle
- Stitch markers
- Optional: polyester stuffing for a fuller flower center
Skill level: Adventurous beginner to intermediate
Estimated time: Approximately 2–4 hours per flower, depending on your experience and the number of petals.
Finished size: Approximately 25–35 cm (10–14 inches) tall, depending on the yarn, hook, and stem length.
Crochet Abbreviations
This pattern uses US crochet terminology.
- MR: Magic ring
- ch: Chain
- sl st: Slip stitch
- sc: Single crochet
- hdc: Half double crochet
- dc: Double crochet
- tr: Treble crochet
- inc: Increase (work 2 stitches into the same stitch)
- st/sts: Stitch/stitches
- rep: Repeat
- FO: Fasten off
Pattern note: The petals are crocheted individually or in small groups, then layered and sewn together. This construction creates the dimensional rose shape shown in the reference photo.
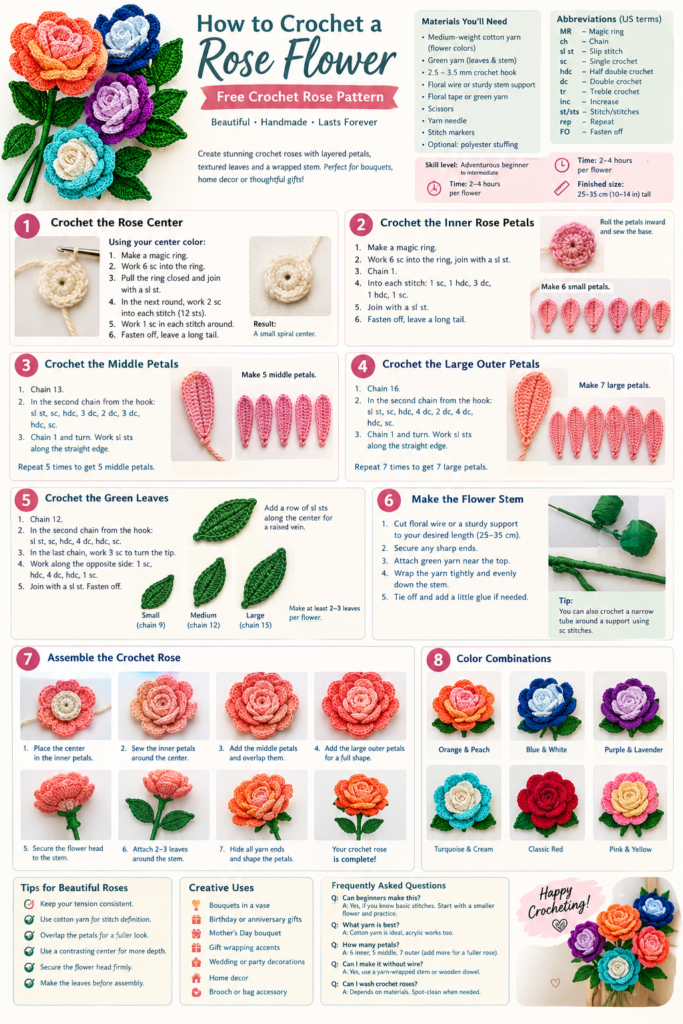
Step 1: Crochet the Rose Center
The center of the rose forms a small spiral that gives the flower its natural, curled appearance.
Using your chosen center color:
- Make a magic ring.
- Work 6 sc into the ring.
- Pull the ring closed and join with a sl st.
- In the next round, work 2 sc into each stitch to make 12 stitches.
- Work 1 sc in each stitch around.
- Fasten off, leaving a long tail for sewing.
If you want a two-tone rose like the white and blue or cream and turquoise flowers in the photo, use a contrasting color for this center.
Step 2: Crochet the Inner Rose Petals
The inner petals should be smaller and more tightly curled than the outer petals.
Using the yarn color selected for your inner petals:
- Make a magic ring.
- Work 6 sc into the ring and join with a sl st.
- Chain 1.
- Work the following petal sequence into each of the next 6 stitches:
- 1 sc
- 1 hdc
- 3 dc
- 1 hdc
- 1 sc
- Join with a sl st at the base of the first petal.
- Fasten off, leaving a long sewing tail.
Gently roll the petal circle inward, overlapping the edges slightly to create a small rosebud. Sew the base securely so the center keeps its shape.
Tip: Avoid pulling the petals too tightly. A little looseness helps the flower look soft and natural.
Step 3: Crochet the Middle Petals
The middle petals give the rose its fullness. Make a separate petal layer using the following instructions.
- Chain 13.
- Starting in the second chain from the hook, work 1 sl st.
- In the next chain, work 1 sc.
- In the next chain, work 1 hdc.
- In the next 3 chains, work 1 dc in each.
- In the next chain, work 2 dc.
- In the next 3 chains, work 1 dc in each.
- In the next chain, work 1 hdc.
- In the final chain, work 1 sc.
- Chain 1 and turn. Work sl sts along the straight lower edge to create a firm base.
This creates one elongated petal with a rounded top. Fasten off, leaving a sewing tail.
Repeat until you have 5 middle petals.
Arrange the petals in a circle around the inner rosebud, overlapping each one slightly. Sew them together along their lower edges.
Step 4: Crochet the Large Outer Petals
The outer petals create the broad, scalloped appearance of the finished rose.
Make 7 large petals using the same method as the middle petals, but increase the height and width:
- Chain 16.
- Starting in the second chain from the hook, work 1 sl st.
- Work 1 sc in the next chain.
- Work 1 hdc in the next chain.
- Work 1 dc in each of the next 4 chains.
- Work 2 dc in the next chain.
- Work 1 dc in each of the next 4 chains.
- Work 1 hdc in the next chain.
- Work 1 sc in the final chain.
- Chain 1 and work sl sts along the lower edge.
Fasten off, leaving a long sewing tail.
Repeat to create 7 petals.
Sew the large petals around the middle layer, overlapping their edges to create a full, rounded rose. Bend the outer edges gently outward with your fingers to make the flower look more natural.
For a fuller rose: Add 2–3 extra outer petals. For a smaller rose, use only 5 outer petals.
Step 5: Crochet the Green Leaves
The leaves in the photo have a pointed oval shape and raised vein-like texture. Make 2–3 leaves for each flower.
Leaf pattern
- Chain 12.
- Starting in the second chain from the hook, work 1 sl st.
- Work 1 sc in the next chain.
- Work 1 hdc in the next chain.
- Work 1 dc in each of the next 4 chains.
- Work 1 hdc in the next chain.
- Work 1 sc in the next chain.
- In the final chain, work 3 sc to turn around the tip.
- Working along the opposite side of the starting chain, work 1 sc, 1 hdc, 4 dc, 1 hdc, and 1 sc.
- Join with a sl st at the base.
Fasten off, leaving a long tail.
Adding leaf texture
For a more defined leaf, work a row of sl sts along the center of the leaf, catching the back loops where possible. This creates a subtle raised vein.
Make the leaves in different sizes by changing the starting chain:
- Small leaf: chain 9
- Medium leaf: chain 12
- Large leaf: chain 15
Make at least two leaves per flower. Three leaves arranged at slightly different angles will create a fuller botanical look.
Step 6: Make the Flower Stem
You can create the long green stem using floral wire or a sturdy stem support wrapped in yarn.
- Cut the support to your desired length, approximately 25–35 cm.
- Fold or finish any sharp wire ends securely so they cannot poke through the yarn.
- Attach green yarn near the top of the support.
- Wrap the yarn tightly and evenly down the entire stem.
- Secure the yarn at the bottom with a knot and a small amount of craft glue, if desired.
If you prefer a completely crocheted stem, crochet a narrow tube around a suitable support. Use sc stitches in a small spiral until the tube reaches the desired length, then slide it over the support and sew the ends closed.
Safety note: Keep exposed wire ends completely covered. Do not use an unsupported wire stem for children’s toys or anything intended for chewing.
Step 7: Assemble the Crochet Rose
Now it is time to bring all the pieces together.
- Position the rose center in the middle of the inner petal layer.
- Sew the inner petals securely around the center.
- Place the middle petals around the inner layer, overlapping them evenly.
- Add the large outer petals to create a full rose shape.
- Sew through the base of the petals several times to secure all the layers.
- Attach the flower head to the top of the wrapped stem.
- Sew two or three green leaves around the upper stem, positioning them at different angles.
- Hide all yarn ends inside the flower or stem.
Gently shape the petals with your fingers. Curl some inward and turn others outward to create the layered effect.
Your crochet rose is now complete!
Step 8: Make Different Color Combinations
One of the best things about this free crochet rose pattern is that you can personalize every flower.
- Orange and peach rose: Use coral or orange for the outer petals, peach for the inner petals, and golden yellow for a few accent petals.
- Blue and white rose: Use royal blue for the outer petals and white for the center and inner petals.
- Purple and lavender rose: Combine deep purple outer petals with pale lavender inner petals.
- Turquoise and cream rose: Use turquoise for the outer petals and warm cream for the center.
- Classic red rose: Use red yarn throughout, with dark green leaves and a matching wrapped stem.
Make a collection of different colors to create a bouquet that looks vibrant and handmade.
Tips for Beautiful Crochet Roses
Keep your tension consistent. Consistent stitches help your petals maintain similar shapes and sizes.
Choose cotton yarn for stitch definition. Cotton yarn gives the petals and leaves a crisp texture, making the details stand out.
Overlap the petals. Positioning the petals slightly over one another creates a fuller rose instead of a flat flower.
Use a contrasting center. A lighter or darker center adds depth and makes the flower look more dimensional.
Secure the flower head firmly. The flower may become heavy as you add layers, so sew the base securely to the stem.
Make the leaves before assembly. Having all your leaves ready makes it easier to plan their placement around the stem.
How to Use Your Finished Crochet Roses
These handmade crochet roses can be used in many creative ways:
- Arrange several flowers in a vase for a colorful, everlasting bouquet.
- Make a handmade birthday or anniversary gift.
- Create a Mother’s Day bouquet that can be treasured for years.
- Use individual flowers as decorative accents for gift wrapping.
- Add crocheted roses to wedding or party decorations.
- Display them in a bedroom, living room, or craft room.
- Attach a flower to a suitable base to make a decorative brooch or bag accessory.
Frequently Asked Questions
Are crochet roses suitable for beginners?
Yes, if you already know how to make chains, single crochet, half double crochet, and double crochet stitches. The layered assembly takes some practice, but you can start with a smaller flower before making a full rose.
What yarn is best for crocheting roses?
Cotton yarn is an excellent choice because it holds its shape and shows the stitch texture clearly. Acrylic yarn can also work well and offers a wide range of colors.
How many petals do I need for a full crochet rose?
For this pattern, use 6 small inner petals, 5 middle petals, and 7 large outer petals. You can add more outer petals for an even fuller flower.
Can I make crochet roses without wire?
Yes. You can use a thick yarn-wrapped stem, a wooden dowel, or a suitable craft stem support. Make sure the flower head is attached securely.
How do I keep crochet rose petals in shape?
Use consistent tension, sew the layers firmly at the base, and shape the petals by hand. If needed, lightly steam-block suitable yarn according to its care instructions, avoiding direct heat on synthetic fibers.
Can I wash crochet roses?
It depends on the yarn and stem materials. Remove any delicate wire or non-washable support first if possible. Follow the yarn care instructions, and spot-clean the flower when full washing is not suitable.
Final Thoughts
Crocheting your own rose is a lovely way to turn a simple ball of yarn into something special. With layered petals, textured leaves, and a wrapped green stem, you can create flowers in almost any color you can imagine.
Make one rose as a thoughtful handmade gift, or crochet a whole bouquet in different shades to brighten your home. Once you get comfortable with the pattern, experiment with petal sizes and color combinations to give every flower its own personality.
If you enjoyed this free crochet rose flower pattern, save it for your next crochet project and share it with a friend who loves handmade flowers. Happy crocheting!