
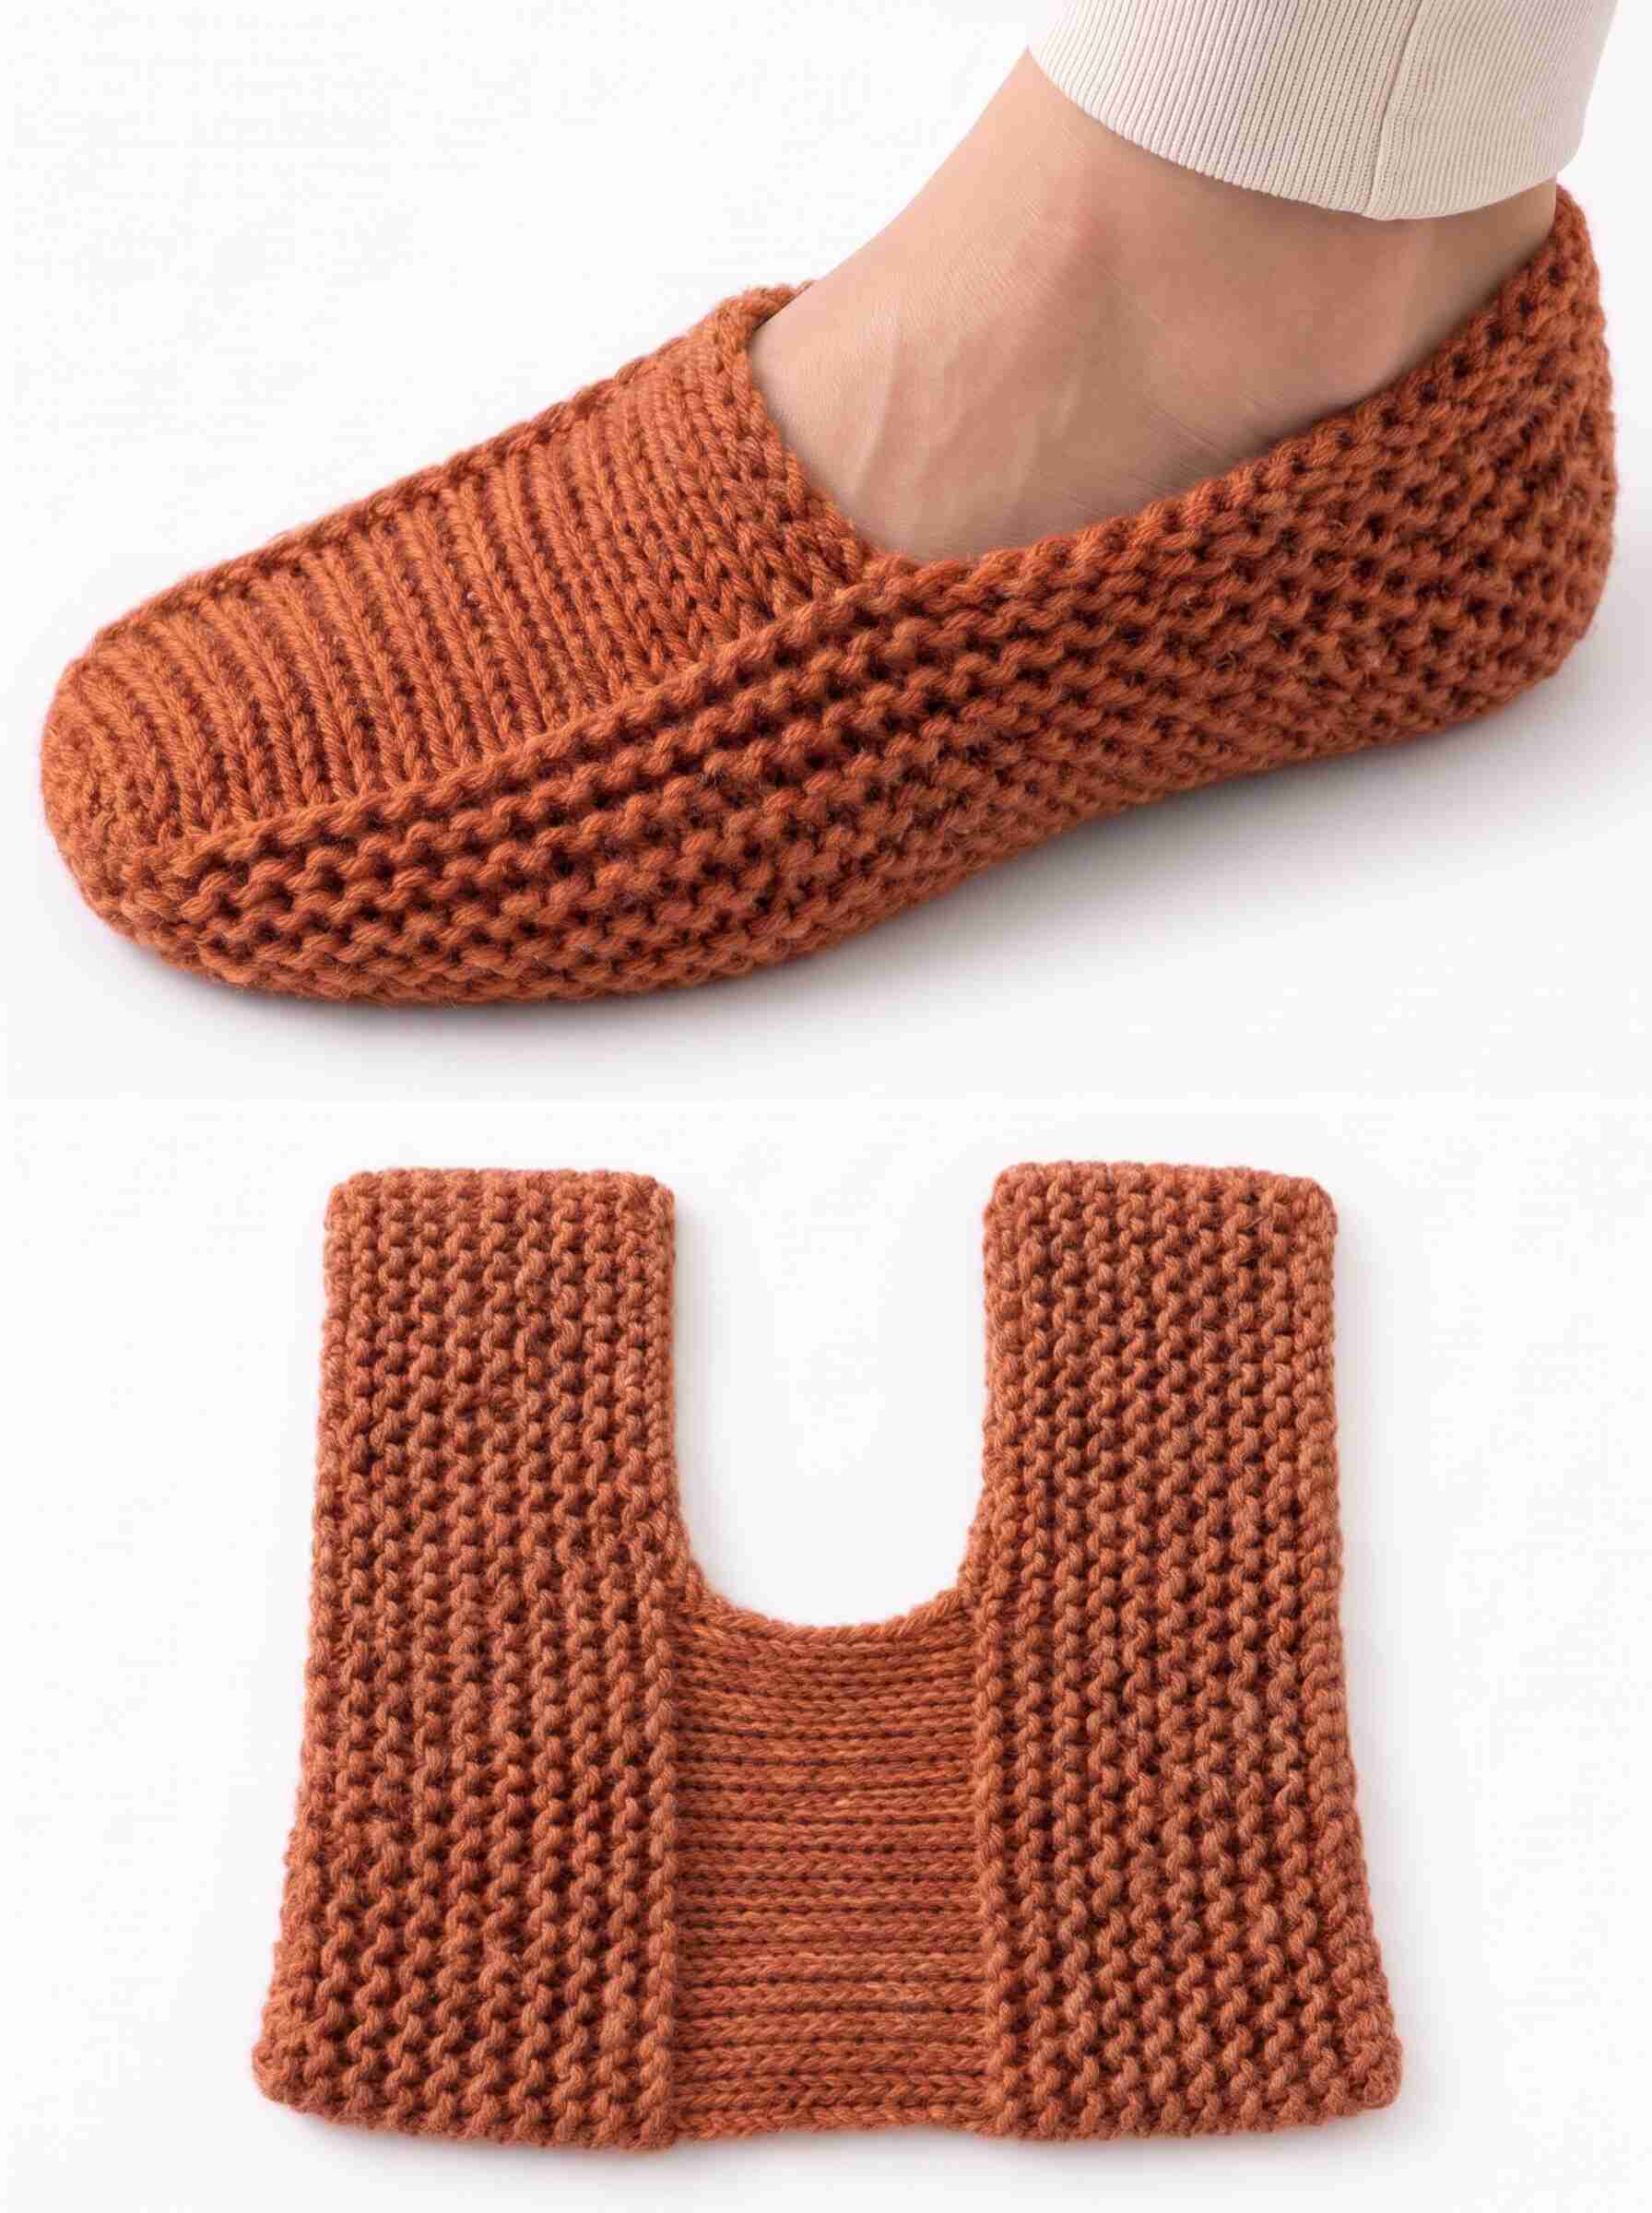
If you love cozy handmade accessories, these easy flat-knit slippers are a wonderful project to add to your knitting list. Made with soft teal yarn, a textured garter-stitch body, and a ribbed toe section, these slippers have a simple, comfortable design that looks beautiful in the photo.
The best part? You can knit the main pieces flat using straight knitting needles, so you don’t need to work in the round. With a little yarn, basic knitting skills, and a few finishing stitches, you can create a lovely pair of slippers for relaxing at home or giving as a handmade gift.
In this tutorial, I’ll walk you through the materials, stitch techniques, sizing, detailed knitting instructions, and assembly steps to help you make your own pair.
Easy Flat-Knit Slippers Pattern Details
- Skill level: Advanced beginner
- Project type: Flat-knit house slippers
- Construction: Knitted flat and sewn together
- Main stitch: Garter stitch
- Toe detail: Ribbed knitting
- Recommended yarn: Medium-weight (worsted) yarn
- Needles: Straight knitting needles
- Sizes: Adjustable adult sizing
- Best for: Everyday indoor wear, handmade gifts, and cozy winter projects
Materials You Will Need
Gather the following supplies before you begin.
- Approximately 100–150 g of medium-weight yarn, depending on foot size and yarn thickness
- Straight knitting needles, approximately 5 mm (US 8), or the size needed to obtain the gauge
- A yarn needle for sewing seams
- Stitch markers
- Scissors
- Measuring tape
- Optional: nonslip fabric or slipper sole grips
For the color, choose teal, turquoise, or a blue-green yarn to recreate the look in the photo. You can also use cream, gray, burgundy, mustard, or any color you love.
Yarn tip: A soft, durable wool blend or acrylic-wool blend is a good choice for indoor slippers. Choose a yarn that feels comfortable against the skin and can tolerate regular use.
Knitting Techniques Used
This pattern uses a few basic knitting techniques.
Knit stitch: Insert the right needle into the next stitch, wrap the yarn around the needle, pull the new loop through, and slide the old stitch off.
Purl stitch: Insert the right needle into the stitch from the front, wrap the yarn, pull through a new loop, and slide the old stitch off.
Garter stitch: Knit every row when working flat. This creates the bumpy, textured fabric visible along the sides of the slippers.
1×1 rib stitch: Alternate one knit stitch and one purl stitch. On subsequent rows, knit the knit stitches and purl the purl stitches as they appear.
Seaming: Use a yarn needle to join the knitted sections neatly without pulling the fabric too tightly.
Gauge and Sizing
For a comfortable fit, make a small gauge swatch before knitting the slippers.
A suggested starting gauge is approximately 16 stitches and 32 rows over 10 cm (4 inches) in garter stitch, using medium-weight yarn and 5 mm needles. Your actual gauge may vary depending on your yarn and knitting tension.
Measure the wearer’s foot from heel to longest toe.
| Size | Approximate foot length | Suggested finished slipper length |
|---|---|---|
| Small adult | 22–23 cm | 22.5–23.5 cm |
| Medium adult | 24–25 cm | 24.5–25.5 cm |
| Large adult | 26–27 cm | 26.5–27.5 cm |
These are approximate target measurements rather than standardized shoe sizes. Adjust your knitting to the actual foot measurement and the amount of stretch in your yarn.
Detailed Flat-Knit Slippers Pattern
The instructions below describe a practical way to recreate the overall appearance in the reference photo. The image does not provide the original stitch count or measurements, so treat these numbers as a starting point and check the fit before sewing the final seams.
Step 1: Knit a Gauge Swatch
Using your chosen yarn and needles, cast on 20 stitches.
- Rows 1–20: Knit every stitch.
- Bind off loosely.
- Measure the swatch after allowing it to relax.
Calculate how many stitches you need for your desired width. For example, if your gauge is 16 stitches per 10 cm, a piece measuring 20 cm wide will require approximately 32 stitches.
Step 2: Knit the Main Slipper Fabric
The textured sides in the photo resemble garter stitch.
- Cast on enough stitches to create the desired slipper length from heel to toe. As a starting point, try 36 stitches for a medium adult slipper, assuming your gauge is close to 16 stitches per 10 cm.
- Knit every stitch across the first row.
- Turn your work and knit every stitch across the next row.
- Continue knitting every row to create garter stitch.
- Measure your fabric regularly and continue until it reaches the planned length of the foot section.
Keep the edges even and avoid pulling the yarn too tightly at the beginning and end of each row.
Important: The number of rows depends on your gauge. Use the finished measurements rather than relying only on a fixed row count.
Step 3: Create the Ribbed Toe Section
The front of the pictured slipper has a visibly different, vertically ribbed texture.
To create a similar contrast, work a ribbed section at the toe end of the fabric.
- Establish the width of the toe panel using your foot measurement.
- Work the selected toe section in 1×1 rib: knit one stitch, purl one stitch, and repeat across.
- On the next row, work the knit stitches as knit stitches and the purl stitches as purl stitches.
- Continue until the ribbed section reaches approximately 4–6 cm, adjusting for the shape and size of your foot.
- Bind off loosely if the toe panel is worked as a separate piece.
If you are knitting the entire slipper as one continuous piece, the ribbed section needs to be planned into the construction rather than added as a separate panel afterward. The photograph alone does not establish the original construction method.
Step 4: Shape the Upper Opening
The slipper has a low-cut opening that exposes the top of the foot.
To recreate this look, arrange the knitted pieces so that the garter-stitch sides rise around the foot while the ribbed section covers the toes.
- Place the knitted fabric around the foot to identify the front, sides, and heel.
- Pin or mark the intended opening with stitch markers.
- If working separate side sections, shape their inner edges to leave a U-shaped opening at the top.
- Keep the opening wide enough for the foot to slide in comfortably.
- Try the pieces on before sewing to confirm that the toe and heel align correctly.
For a clean finish, avoid making the opening too tight. The fabric should sit securely without pressing uncomfortably against the top of the foot.
Step 5: Make the Second Slipper
Repeat the same instructions for the second slipper.
Check that both pieces have the same length, width, ribbed-toe measurements, and opening placement. Matching measurements help the finished pair look balanced.
Step 6: Assemble the Slippers
Lay each knitted piece flat with the right side facing outward.
- Fold or arrange the fabric around the foot to form the slipper shape.
- Use stitch markers to hold the heel and side edges in place.
- Thread a yarn needle with a length of matching yarn.
- Sew the heel seam using a neat mattress stitch or whipstitch, depending on the construction.
- Join the side edges along the sole, keeping the seam flat and comfortable.
- Attach the ribbed toe section if you knitted it separately.
- Leave the top opening unobstructed.
- Weave in all loose yarn ends on the inside.
Turn the slipper right side out and inspect the seams. If a seam feels bulky against the foot, undo that section and sew it more loosely or with a flatter stitch.
Step 7: Check the Fit
Try on the slippers before completing the finishing touches.
- The toes should have enough room to move.
- The heel should sit comfortably without excessive slipping.
- The opening should allow the foot to enter easily.
- The sole should lie flat without twisting.
- The seams should not rub against the foot.
If the slipper feels too tight, consider using larger needles or adding a few stitches to the width. If it feels too loose, reduce the width or adjust the seam placement.
Step 8: Finish and Care for Your Slippers
Weave in any remaining yarn ends and gently shape the slippers by hand.
Follow the care instructions for your yarn. Some fibers can be hand-washed in cool water, while others may require different treatment. Allow the slippers to dry fully before wearing them.
For additional grip on smooth floors, apply compatible nonslip sole grips according to the manufacturer’s instructions. Knitted fabric can be slippery on tile or polished wood, so take care when walking.
Tips for Making Beautiful Flat-Knit Slippers
Keep your tension consistent. Even stitches help the slippers retain their shape and create a neat textured finish.
Choose soft but durable yarn. Slippers receive friction from walking, so a yarn that resists wear is often better than a delicate novelty yarn.
Measure as you knit. Foot length and width are more reliable than choosing a size by stitch count alone.
Make both slippers together when possible. Complete the same sections on each slipper before moving on. This makes it easier to keep the pair identical.
Reinforce the seams. The heel and sole seams experience regular movement. Sew them securely while keeping the inside comfortable.
Common Questions About Flat-Knit Slippers
Can beginners knit these slippers?
Yes, a confident beginner can learn the basic techniques used here. You should be comfortable casting on, knitting, purling, binding off, and sewing seams. Shaping the opening and fitting the toe may require a little extra patience.
Can I use straight knitting needles?
Yes. Straight needles are suitable for knitting flat pieces, which are then assembled with a yarn needle.
How much yarn do I need?
A practical estimate is 100–150 g for an adult pair, although larger sizes, thicker yarn, and different construction methods may require more. Check your gauge and keep extra yarn available for seaming.
Can I make these slippers in different colors?
Absolutely. Teal gives the slippers the look shown in the photograph, but solid neutrals, two-tone combinations, and variegated yarn can all work beautifully.
How do I make the slippers larger or smaller?
Adjust the dimensions using the wearer’s foot measurements and your gauge. Change the length to suit the foot and adjust the width to achieve a comfortable fit. Always check the fabric around the toe, heel, and opening before sewing the seams.
Are knitted slippers suitable for outdoor use?
This design is intended primarily for indoor wear. Regular outdoor use can wear through the knitted sole quickly. If you want to use the slippers outside, consider a suitable durable sole attachment.
Final Thoughts
These cozy flat-knit slippers are a lovely handmade project for anyone who enjoys creating practical accessories with yarn. Their textured teal fabric, contrasting ribbed toe, and simple house-slipper silhouette make them a beautiful addition to your handmade collection.
Choose a soft yarn, check your measurements as you work, and take your time with the finishing seams. Once you have completed your first pair, you can experiment with different colors, sizes, and textures to create slippers for family and friends.
Save this tutorial for your next knitting project, gather your favorite yarn, and enjoy making a cozy pair of handmade slippers.