
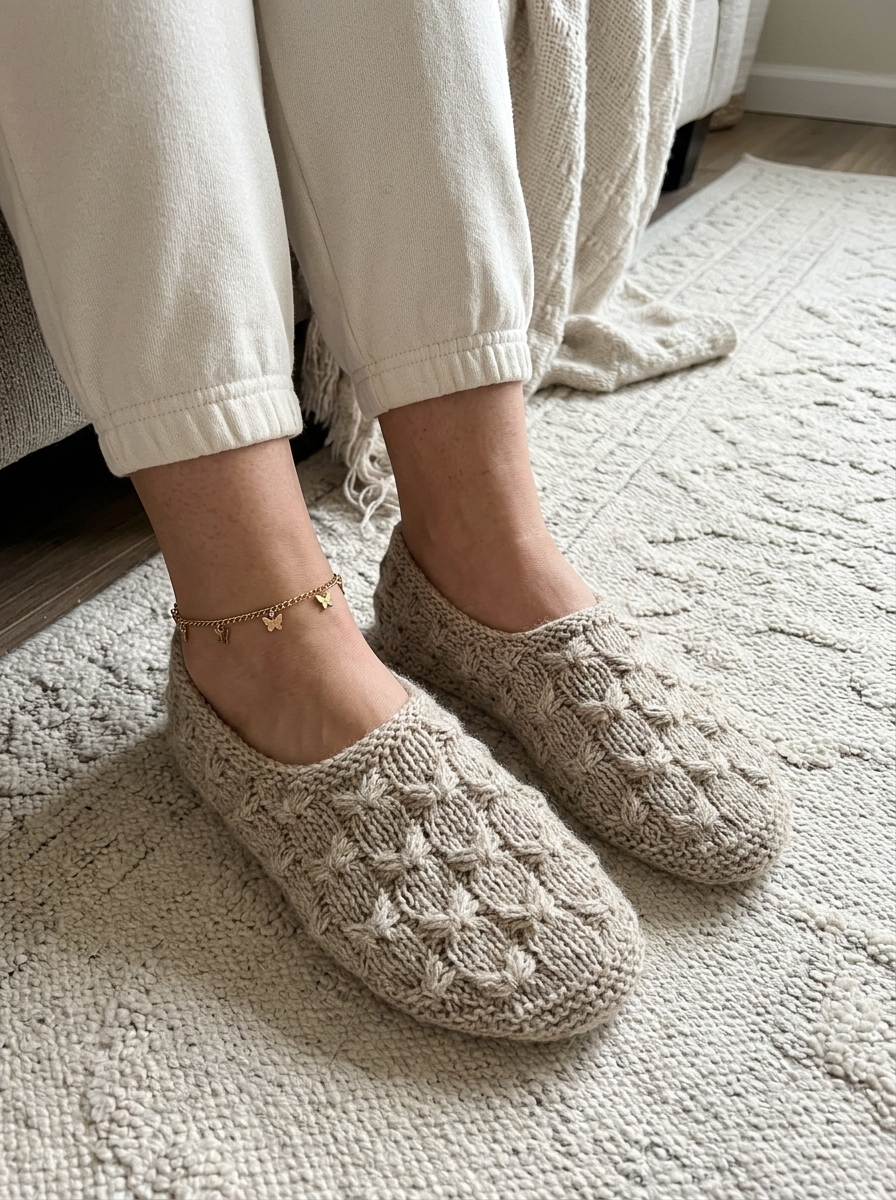
These beautiful knitted slippers are a lovely handmade project for anyone who enjoys cozy, comfortable footwear. With their pretty raised floral texture, soft rounded toes, and simple slip-on design, they are perfect for keeping your feet warm at home.
The cheerful yellow color gives these slippers a fresh, sunny look, while the delicate textured stitch creates a beautiful handmade finish.
Whether you are knitting for yourself, making a thoughtful gift, or adding a new project to your handmade collection, these easy knitted slippers are a wonderful choice.
In this tutorial, I’ll show you how to knit your own pair step by step, including the textured stitch pattern, slipper shaping, and finishing instructions.
About This Knitted Slipper Pattern
These slippers are designed with a comfortable closed toe, a rounded front, and an easy slip-on opening.
The pattern is worked flat using two knitting needles, with the pieces shaped and sewn together to create the finished slipper.
Pattern details:
- Skill level: Intermediate beginner
- Construction: Worked flat and seamed
- Sizes: Women’s small, medium, and large
- Main stitch: Stockinette stitch with textured floral motifs
- Recommended yarn: DK or light worsted-weight yarn
- Needles: 3.5 mm and 4 mm knitting needles
- Style: Slip-on house slippers
- Language: English
- Terminology: Standard knitting abbreviations
Materials You’ll Need
- Approximately 100–150 g of DK-weight yarn.
- 3.5 mm knitting needles.
- 4 mm knitting needles.
- Yarn needle for sewing.
- Scissors.
- Stitch markers.
- Measuring tape.
Choose a soft cotton-acrylic blend or wool yarn for comfortable everyday slippers.
Knitting Abbreviations
| Abbreviation | Meaning |
|---|---|
| CO | Cast on |
| BO | Bind off |
| K | Knit |
| P | Purl |
| St(s) | Stitch(es) |
| RS | Right side |
| WS | Wrong side |
| K2tog | Knit 2 together |
| P2tog | Purl 2 together |
| YO | Yarn over |
| Rep | Repeat |
| Sl | Slip stitch |
Gauge
Approximately 22 stitches and 30 rows = 10 cm in stockinette stitch using 4 mm needles.
Gauge is important for comfortable slippers, so make a small swatch before starting.
Step 1: Knit the Slipper Sole
Using 4 mm knitting needles, cast on 10 stitches.
The sole is worked in garter stitch, knitting every row.
Row 1: Knit all stitches.
Row 2: K1, increase 1 stitch, knit to the last stitch, increase 1 stitch, K1.
Rows 3–4: Knit all stitches.
Repeat Rows 2–4 until you have 22 stitches.
Continue knitting every row until the sole measures approximately:
- Small: 22 cm
- Medium: 24 cm
- Large: 26 cm
Now shape the opposite end.
Decrease row: K1, K2tog, knit to the last 3 stitches, K2tog, K1.
Knit 2 rows.
Repeat the decrease section until 10 stitches remain.
Bind off loosely.
Make two identical soles.
Step 2: Create the Textured Floral Stitch
The beautiful raised pattern is the main decorative feature of these slippers.
For this project, use a small textured stitch motif that creates a floral or clustered appearance.
Cast on a multiple of 4 stitches plus 2 edge stitches.
Row 1 (RS): K2, P2, K2, repeat from * to * across.
Row 2 (WS): P2, K2, P2, repeat across.
Row 3 (RS): K2, work a small knit cluster by knitting into the next stitch without dropping it, then knit into the back of the same stitch, knit into it again, and drop the original stitch; P2, repeat across.
Row 4 (WS): Purl all stitches.
Row 5: Repeat Row 1.
Row 6: Repeat Row 2.
Row 7: Repeat Row 3.
Row 8: Repeat Row 4.
Repeat these 8 rows for the textured fabric.
The cluster stitches create small raised details that give the slippers a decorative floral-inspired appearance.
Step 3: Knit the Upper Slipper Section
Using 4 mm needles, cast on 34 stitches for a medium-size slipper.
For different sizes:
- Small: 30 stitches
- Medium: 34 stitches
- Large: 38 stitches
Work the textured floral stitch pattern from Step 2.
Continue until the upper section measures approximately:
- Small: 15 cm
- Medium: 17 cm
- Large: 19 cm
This section will cover the top of your foot.
Keep the edges neat and maintain the same stitch pattern throughout.
Step 4: Shape the Rounded Toe
To create a comfortable rounded toe, gradually decrease the stitches.
Row 1 (RS): K1, K2tog, knit to the last 3 stitches, K2tog, K1.
Row 2 (WS): Purl all stitches.
Repeat these two rows until approximately 18 stitches remain.
Bind off loosely.
The upper section should have a gently rounded shape.
Step 5: Knit the Back and Heel Section
Using 4 mm needles, cast on 28 stitches.
Work in stockinette stitch:
Row 1: Knit all stitches.
Row 2: Purl all stitches.
Repeat these two rows until the piece measures approximately 7–9 cm.
Bind off loosely.
This section forms the back of the slipper and wraps around the heel.
Step 6: Assemble the Slippers
Place the knitted sole on a flat surface.
Position the upper section over the front portion of the sole, aligning the rounded toe edges.
Using a yarn needle and matching yarn:
- Sew the toe section carefully to the front of the sole.
- Continue sewing along both sides.
- Attach the heel section around the back.
- Leave the top opening comfortable enough for your foot.
- Check that both slippers have the same shape.
Use mattress stitch or a neat whip stitch for a clean finish.
Step 7: Finish the Slipper Opening
Pick up stitches evenly around the opening using 3.5 mm needles.
Work 4–6 rows of 1×1 ribbing:
Row 1: K1, P1, repeat around.
Repeat until the opening has a neat, flexible edge.
Bind off loosely in pattern.
Weave in all yarn ends.
Step 8: Make the Second Slipper
Repeat all steps to create the second slipper.
Compare both slippers to make sure they have the same length, width, and overall shape.
Gently block the slippers if necessary, following the care instructions for your yarn.
Your beautiful handmade knitted slippers are ready!
Tips for Making Beautiful Knitted Slippers
Choose soft yarn: A soft yarn blend makes slippers comfortable for everyday wear.
Keep your tension consistent: Even tension helps both slippers match in size.
Use a smaller needle for the opening: This creates a comfortable edge that holds its shape.
Reinforce the seams: Secure stitching helps your slippers last longer.
Add non-slip protection: Consider applying washable sock grip or sewing a suitable non-slip sole underneath for better traction on smooth floors.
Frequently Asked Questions
Are these knitted slippers suitable for beginners?
They are suitable for knitters who already know basic knitting stitches, increases, decreases, and simple seaming. The textured stitch requires a little extra practice.
Can I make these slippers in different colors?
Absolutely! Yellow gives them a cheerful appearance, but cream, beige, dusty pink, sage green, and lavender are also beautiful choices.
What yarn is best for knitted slippers?
DK-weight yarn or light worsted-weight yarn is a good option. Choose a soft, durable yarn that feels comfortable against your skin.
Can I make these slippers larger?
Yes. You can adjust the cast-on stitches, sole length, and upper length to fit your foot. Measure your foot before starting.
How do I prevent knitted slippers from slipping?
Add non-slip sock grips or a suitable slipper sole to the bottom. This is especially useful when wearing them on wooden or tiled floors.
Final Thoughts
These textured knitted slippers are a lovely combination of comfort and handmade beauty. The raised floral-inspired stitches give them a special decorative touch, while the simple slip-on shape makes them practical for everyday use.
Choose your favorite yarn color, grab your knitting needles, and enjoy creating a cozy pair of slippers for yourself or someone you love.
Happy knitting!