
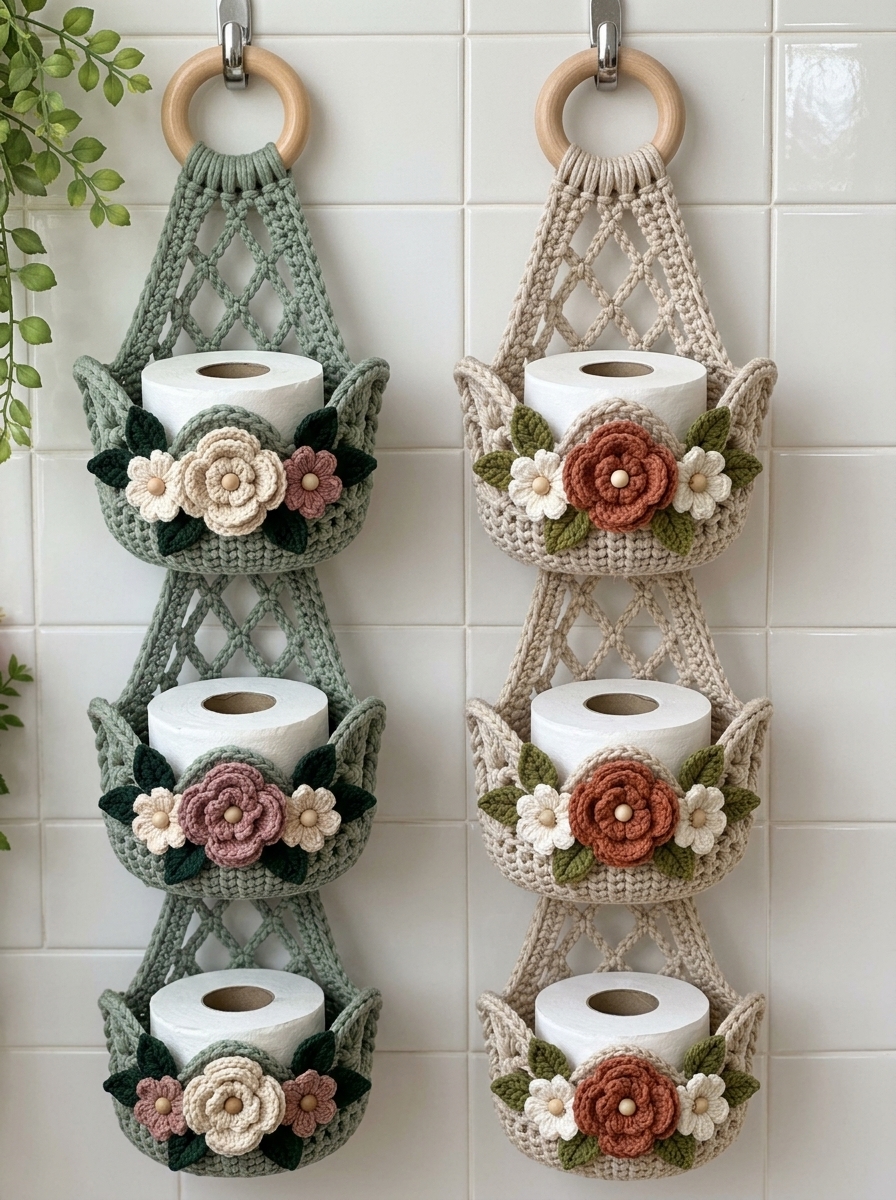
Bring a little handmade charm and practical storage to your bathroom with this beautiful crochet hanging toilet paper holder! This lovely wall organizer features three crochet pockets for storing toilet paper rolls, a decorative diamond mesh design, and adorable crochet flowers and leaves.
Inspired by vintage cottage-style decor, this crochet bathroom organizer is both useful and beautiful. The hanging design helps save space while keeping extra toilet paper within easy reach.
Whether you choose soft sage green, natural beige, or your favorite colors, this project is a wonderful way to add a cozy handmade touch to your home.
In this tutorial, I’ll show you how to crochet the hanging mesh panel, create the three storage baskets, and add beautiful floral decorations.
About This Crochet Hanging Toilet Paper Holder
This organizer is designed with three individual pockets connected by a decorative openwork crochet panel. A wooden ring at the top makes it easy to hang on a bathroom hook.
Project details:
- Skill level: Intermediate (confident beginners can follow along).
- Crochet terminology: US terms.
- Construction: Separate pieces assembled together.
- Design: Three storage pockets with floral decorations.
- Approximate finished length: 75–85 cm.
- Approximate pocket width: 16–18 cm.
- Suggested hook: 4 mm and 4.5 mm.
- Yarn: Medium-weight cotton yarn.
Materials You’ll Need
- Medium-weight cotton yarn in your main color (sage green or beige).
- Small amounts of cream or white yarn for flowers.
- Terracotta, dusty pink, or brown yarn for flower centers and petals.
- Olive green and dark green yarn for leaves.
- 4 mm crochet hook.
- 4.5 mm crochet hook.
- One wooden hanging ring (approximately 7–8 cm).
- Yarn needle.
- Scissors.
- Stitch markers.
- Small wooden or plastic buttons for flower centers (optional).
Yarn recommendation: Cotton yarn is a great choice because it holds its shape well and creates sturdy bathroom storage.
Crochet Abbreviations (US Terms)
| Abbreviation | Meaning |
|---|---|
| ch | Chain |
| sl st | Slip stitch |
| sc | Single crochet |
| hdc | Half double crochet |
| dc | Double crochet |
| tr | Treble crochet |
| inc | Increase (2 stitches in one stitch) |
| dec | Decrease |
| st | Stitch |
| sp | Space |
| rep | Repeat |
| rnd | Round |
Notes:
- The chain at the beginning of a round does not count as a stitch unless stated.
- Work in continuous rounds unless instructed otherwise.
- Use a stitch marker to mark the beginning of each round.
- Adjust the hook size if your stitches are too loose.
Step 1: Crochet the Diamond Mesh Hanging Panel
The decorative mesh panel creates the long hanging structure behind the three baskets.
Using your main yarn and 4.5 mm hook:
Foundation:
Ch 22.
Row 1: Sc in the second ch from the hook and in each chain across. (21 sc)
Row 2: Ch 5, turn, skip the next 3 stitches, sc in the next stitch. Repeat ch 5, skip 3 stitches, sc in the next stitch across.
Row 3: Ch 5, turn, sc in the next chain-5 space, ch 5, sc in the next chain-5 space. Repeat across.
Row 4: Ch 5, turn, sc in the next chain-5 space, ch 5, sc in the next chain-5 space. Repeat across.
Continue repeating Rows 3 and 4 until the mesh section measures approximately 20–22 cm.
Make three mesh sections, approximately 20–22 cm each, connecting them into one continuous hanging panel.
Finish with a row of sc along the sides to reinforce the edges.
Tip: Keep your chain spaces even to create a neat diamond-style openwork appearance.
Step 2: Make the Hanging Ring Attachment
Take your wooden ring and main yarn.
Round 1: Attach the yarn around the wooden ring. Work 35–40 sc evenly around the ring, covering the wood.
Sl st to join.
Row 2: Ch 1, sc in each stitch around. Sl st to join.
Attach the top of your mesh panel securely to the covered wooden ring using a yarn needle.
Make sure the panel hangs straight.
Step 3: Crochet the Three Storage Pockets
Now it’s time to create the three baskets that will hold your toilet paper rolls.
Make three identical pockets using your main yarn and 4 mm crochet hook.
Oval Basket Base
Ch 17.
Round 1: Sc in the second ch from the hook and in the next 14 chains. Work 3 sc in the last chain. Continue along the opposite side of the foundation chain with 14 sc. Work 2 sc in the final stitch. (34 sc)
Round 2: Inc in the first stitch, sc in the next 14 stitches, inc in each of the next 3 stitches, sc in the next 14 stitches, inc in the final 2 stitches. (40 sc)
Round 3: Sc around, increasing evenly at both rounded ends to maintain the oval shape. (46 sc)
Round 4: Sc in the back loop only around. (46 sc)
This creates a defined edge for the bottom of the basket.
Build the Basket Sides
Round 5: Sc in each stitch around. (46 sc)
Rounds 6–9: Repeat sc around without increasing.
Round 10: Sl st around for a neat finishing edge.
Fasten off and weave in the ends.
Your pocket should be deep enough to hold one standard toilet paper roll.
Add the Decorative Side Edges
To create the raised side details shown in the inspiration photo:
Attach yarn at one side of the pocket.
Row 1: Ch 1, sc evenly along the side edge.
Rows 2–4: Ch 1, turn, sc across.
Repeat on the opposite side.
These reinforced side sections help the pocket keep its shape when attached to the hanging panel.
Step 4: Crochet the Flower Decorations
The flowers give this bathroom organizer its charming handmade look.
Make a combination of large and small flowers in cream, dusty pink, terracotta, and white.
Large Five-Petal Flower
Using your flower color:
Round 1: Make a magic ring. Work 10 sc into the ring. Sl st to join.
Round 2: Ch 1, sc in the next stitch, ch 3, 2 dc in the same stitch, ch 3, sl st in the same stitch. Repeat around to create five petals.
Fasten off.
Flower Center
Using a contrasting yarn:
Make a magic ring and work 6 sc into the ring.
Pull tight and fasten off.
Sew the center onto the flower.
You can also use a small wooden button for a decorative center.
Small Daisy Flowers
Make smaller flowers using cream or white yarn.
Round 1: Magic ring, 6 sc into the ring. Sl st to join.
Round 2: For each petal, work sl st, ch 3, 2 dc, ch 3, sl st into the same stitch.
Repeat around to create six small petals.
Add a small beige or yellow center.
Make approximately 6 small flowers and 3 larger flowers for all three pockets.
Step 5: Crochet the Decorative Leaves
Using olive green or dark green yarn:
Foundation: Ch 8.
Row 1: Sl st in the second ch from the hook, sc in the next ch, hdc in the next ch, dc in the next 2 ch, hdc in the next ch, sc in the last ch.
Now work along the opposite side of the foundation chain:
Sc, hdc, dc in the next 2 stitches, hdc, sc, sl st.
Fasten off, leaving a long tail for sewing.
Make leaves in different shades of green.
Prepare approximately 18–24 leaves, depending on how full you want the floral decorations to look.
Step 6: Assemble the Hanging Organizer
Lay your long mesh panel flat on a table.
Position the three baskets evenly along the front of the panel.
The top edge of each basket should be securely attached to the mesh backing.
Using a yarn needle and matching yarn:
- Center the first basket below the wooden ring.
- Sew the back edge of the basket to the mesh panel.
- Secure both sides carefully.
- Repeat for the second and third baskets.
- Check that the pockets are level and evenly spaced.
Make sure the front of each pocket remains open so you can easily insert and remove toilet paper rolls.
Step 7: Add the Flowers and Leaves
This is the fun part!
Arrange the crochet flowers across the front of each basket.
For a design similar to the inspiration photo:
- Place one large flower in the center.
- Add two smaller flowers on either side.
- Position green leaves behind the flowers.
- Mix light and dark green leaves for a natural look.
- Use contrasting flower colors to make the arrangement stand out.
Sew every flower and leaf securely to the basket.
Avoid using loose buttons or small detachable decorations if the organizer will be accessible to young children.
Step 8: Finishing Touches
Weave in all remaining yarn ends.
Check all the seams, especially where the baskets connect to the hanging panel.
Gently shape each pocket with your hands.
Hang the organizer from a sturdy bathroom hook and place one toilet paper roll in each pocket.
Your beautiful handmade crochet bathroom organizer is ready!
Helpful Tips for a Beautiful Result
Choose sturdy yarn: Cotton yarn provides excellent stitch definition and helps the baskets hold their shape.
Keep your tension consistent: This is especially important for the mesh panel so the organizer hangs evenly.
Use contrasting colors: Cream flowers against sage green or terracotta flowers against beige create a lovely cottage-style appearance.
Reinforce the pockets: Sew the baskets firmly to the mesh backing, especially at the sides and bottom.
Customize the size: You can make the baskets wider or deeper to accommodate different toilet paper sizes.
Frequently Asked Questions
How many toilet paper rolls does this crochet organizer hold?
This design has three separate storage pockets, so it holds three standard toilet paper rolls.
What yarn is best for a crochet toilet paper holder?
Cotton yarn is recommended because it is durable, washable, and holds its shape well. A cotton blend can also work.
Can beginners make this crochet bathroom organizer?
Yes! Beginners who know basic stitches such as single crochet, half double crochet, and double crochet can follow the individual sections. The mesh construction and assembly may require a little extra practice.
Can I make this organizer in different colors?
Absolutely! Try sage green with cream flowers, natural beige with terracotta flowers, or dusty pink with white flowers.
How do I wash a crochet toilet paper holder?
If you use washable cotton yarn, gently hand-wash the crochet sections with mild detergent and lay them flat to dry. Remove the wooden ring if necessary and follow the yarn manufacturer’s care instructions.
Final Thoughts
I love how this crochet hanging toilet paper holder combines practical storage with beautiful handmade details. The little flowers, delicate leaves, and diamond mesh design make an everyday bathroom accessory feel special.
You can customize the colors to match your bathroom decor and even make one as a thoughtful handmade gift for someone who loves crochet and cozy home accessories.
Happy crocheting!
If you make this pattern, I’d love to see your finished project. Share your favorite color combinations and enjoy creating something beautiful for your home!