
- Difficulty Level: Intermediate
- Estimated Time: 4–6 hours
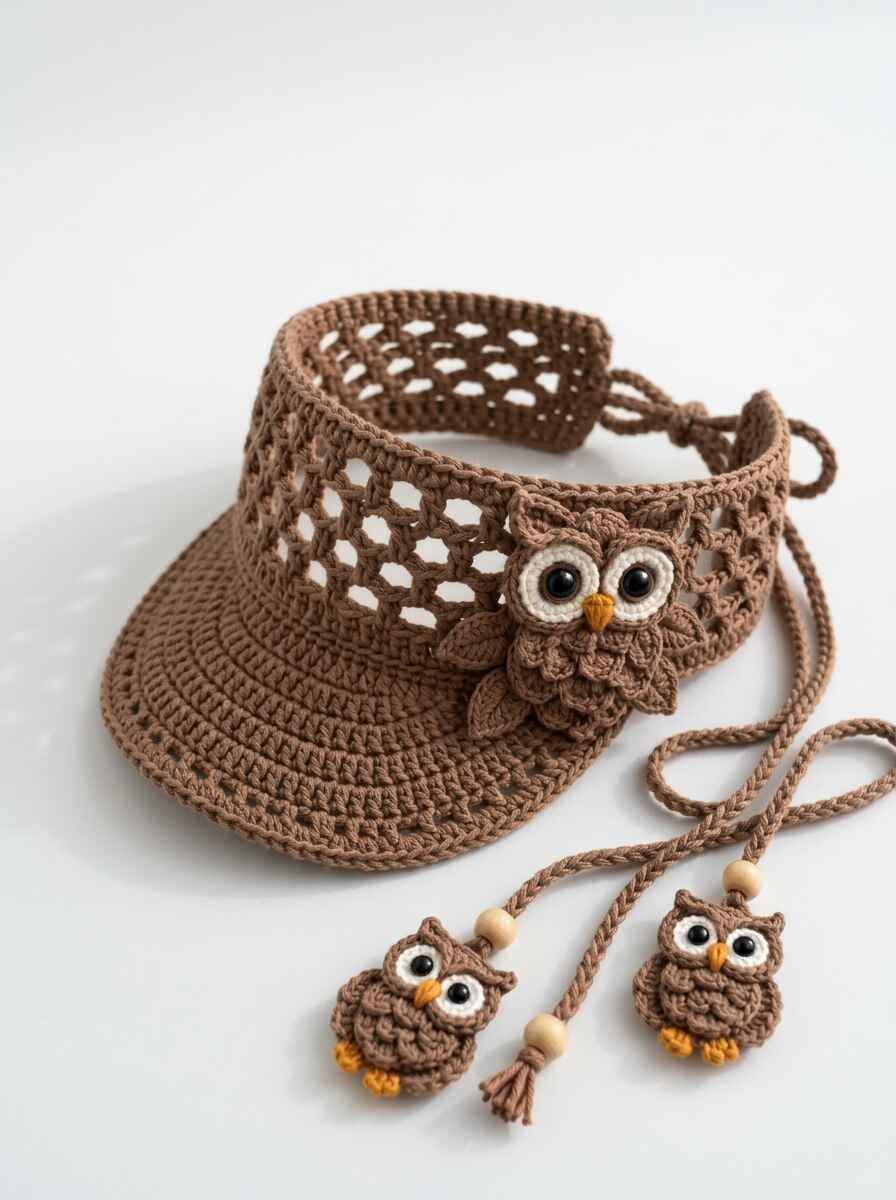
Looking for a unique, functional, and whimsical summer project? Meet the Crochet Owl Lace Sun Visor! Combining the breezy breathability of an open-weave lace headband with the sun-blocking power of a sturdy, shaped brim, this visor is equal parts practical and charming.
Finished with adjustable tie-back cords, wooden accent beads, and miniature owl tassels, this accessory is perfect for farmers market strolls, beach vacations, or gardening in style.
Materials Needed
- Yarn:
- Main Color (MC – Taupe/Caramel Brown): ~150g of DK or Worsted Weight 100% Cotton Yarn (e.g., Lily Sugar ‘n Cream or Paintbox Yarns Cotton DK for crisp stitch definition)
- Accent Colors: Small scraps of White (eyes), Mustard Yellow/Orange (beaks & feet), and Dark Brown (optional accents)
- Crochet Hook: 3.0 mm (US C/2 or D/3) — Using a slightly smaller hook ensures a stiffer brim with good sun structure.
- Notions & Hardware:
- 2 x 10 mm black safety eyes (or black embroidery floss) for the main owl
- 4 x 6 mm black safety eyes or small black wooden beads for the cord owls
- 4–6 Natural round wooden beads (~12–15 mm hole)
- Millinery wire or plastic canvas / craft wire (optional, for extra brim reinforcement)
- Tapestry needle & stitch markers
- Scissors
Pattern Abbreviations (US Terms)
- ch: Chain
- sc: Single crochet
- hdc: Half double crochet
- dc: Double crochet
- sl st: Slip stitch
- inc: Increase (2 stitches into the same stitch)
- dec: Decrease / sc2tog
- sk: Skip stitch
- BLO: Back loop only
- ch-sp: Chain space
- st(s): Stitch(es)
Size & Gauge
- Size: One size fits most teens/adults (Head circumference ~20–23 inches / 51–58 cm). The open back and tie cords allow for easy adjustment.
- Gauge: 20 sc x 22 rows = 4″ (10 cm) with a 3.0 mm hook.
Step-by-Step Crochet Instructions
Part 1: The Open-Mesh Crown Band
Work flat in rows.
- Row 1 (Foundation): Ch 81. Sc in the 2nd ch from hook and in each ch across. Turn. (80 sc)
- Row 2 (Base Edge): Ch 1, sc in each st across. Turn. (80 sc)
- Row 3 (Diamond Mesh Pattern): Ch 4 (counts as dc + ch 1), sk 1 st, dc in next st. *Ch 2, sk 2 sts, dc in next st* across to the last 2 sts, ch 1, sk 1 st, dc in last st. Turn.
- Row 4: Ch 5 (counts as dc + ch 2), sk first ch-sp, dc in next dc. *Ch 2, sk ch-2 sp, dc in next dc* across. Turn.
- Rows 5–10: Repeat Row 4 until mesh band measures approximately 3″ (7.5 cm) high.
- Row 11 (Top Transition): Ch 1, work 2 sc in each ch-2 space and 1 sc in each dc across. (80 sc)
- Rows 12–13 (Top Border): Ch 1, sc in each st across. Do not fasten off; work a tidy round of sc along the short ends for a clean edge. Fasten off and weave in ends.
Part 2: The Structured Brim
The brim is worked directly onto the center bottom edge of the headband, working back and forth in curved rows.
- Mark Brim Placement: Lay the band flat. Place stitch markers across the central 46 stitches of the bottom edge (leaving 17 stitches open on either side for the back/temples).
- Row 1: Join MC with a sl st at the first marker. Ch 1, sc in each of the 46 marked stitches. Turn. (46 sc)
- Row 2 (Increases): Ch 1, sc 4, *inc, sc 5* 7 times. Turn. (53 sc)
- Row 3: Ch 1, sc in each st across. Turn.
- Row 4: Ch 1, sc 5, *inc, sc 6* 6 times, sc to end. Turn. (59 sc)
- Row 5: Ch 1, sc in each st across. Turn.
- Row 6: Ch 1, sc 6, *inc, sc 7* 6 times, sc to end. Turn. (65 sc)
- Rows 7–12: Ch 1, sc evenly across (maintaining a smooth crescent shape, adding ~4 evenly spaced increases on odd rows if the brim begins to curl inward).
- Final Edge & Optional Wire: Ch 1, reverse single crochet (crab stitch) or regular firm sc along the entire curved brim edge. (Tip: To keep the brim crisp and stiff, encase 16-gauge floral wire or millinery wire into this final row of single crochet). Fasten off.
Part 3: The Statement Owl Appliqué (Front Band)
1. Owl Body:
With MC (Brown):
- Rnd 1: In a magic ring, ch 2 (counts as 1 hdc), 9 hdc. Join with sl st. (10)
- Rnd 2: Ch 2, 2 hdc in each st around. Join. (20)
- Rnd 3 (Feather Texture/Shells): *Sk 1 st, 5 dc in next st, sk 1 st, sl st in next st* around to create ruffled lower chest feathers. Fasten off.
2. Owl Head & Ears:
- Row 1: Join yarn at the top of the body across 8 sts. Ch 1, sc 8. Turn.
- Row 2: Sc across. Turn.
- Row 3 (Ears): Sl st in first st, (sc, hdc, dc, ch 2, sl st to 1st ch, dc) in next st (ear point), sl st 4, (dc, ch 2, sl st to 1st ch, dc, hdc, sc) in next st, sl st in last st. Fasten off.
3. Eyes (Make 2):
- White: Magic ring, ch 1, 6 sc. Join with sl st.
- Rnd 2: 2 sc in each st around. (12 sc). Fasten off, leaving a tail.
- Insert a 10 mm black safety eye into the center of each white disc. Sew eyes side-by-side onto the owl’s face.
4. Wings (Make 2):
- Ch 7. Sc in 2nd ch from hook, hdc, dc, dc, hdc, (sc, ch 1, sc) in last ch. Working along the bottom loop: hdc, dc, dc, hdc, sc. Fasten off.
5. Beak:
- With Mustard Yellow, embroider a small triangular satin stitch beak between the two eyes.
Part 4: Ties & Mini Owl End Charms
1. Tie Cords:
- Join MC to each rear corner of the mesh band. Work a 14″ (35 cm) Roman Cord or 3-strand braid.
- Thread 1–2 wooden beads onto each cord end.
2. Mini Tassel Owls (Make 2):
- Body: With MC, magic ring, 8 sc. Rnd 2: 2 sc in each st (16). Rnd 3: Work (ch 2, 2 dc, sl st) into 3 front stitches to suggest feathers. Fasten off.
- Eyes: With White yarn, magic ring with 5 sc. Attach 6 mm safety eyes or bead centers. Sew onto mini body.
- Feet: With Mustard Yellow, add two tiny French knots or 3-dc picots at the base.
- Sew one mini owl onto the bottom of each tie cord just below the wooden beads, finishing with a small fringed yarn tassel underneath.
Assembly & Finishing Touches
- Attach the Main Owl: Pin the large owl appliqué to the right or left front corner of the visor, where the mesh meets the brim (as shown in the reference image). Hand-sew securely from the inside with matching thread or yarn.
- Block Your Work: Lightly steam-block the visor brim and mesh band using an iron on low steam (held 1–2 inches away, never touching the acrylic/cotton directly) to give the brim a crisp, polished contour.
Styling & Care Tips
- Style it with: A flowy linen maxi dress, high ponytail, or messy bun!
- Care Instructions: Hand wash gently in cold water with mild detergent. Reshape the brim over a round bowl and lay flat to dry in the shade.