
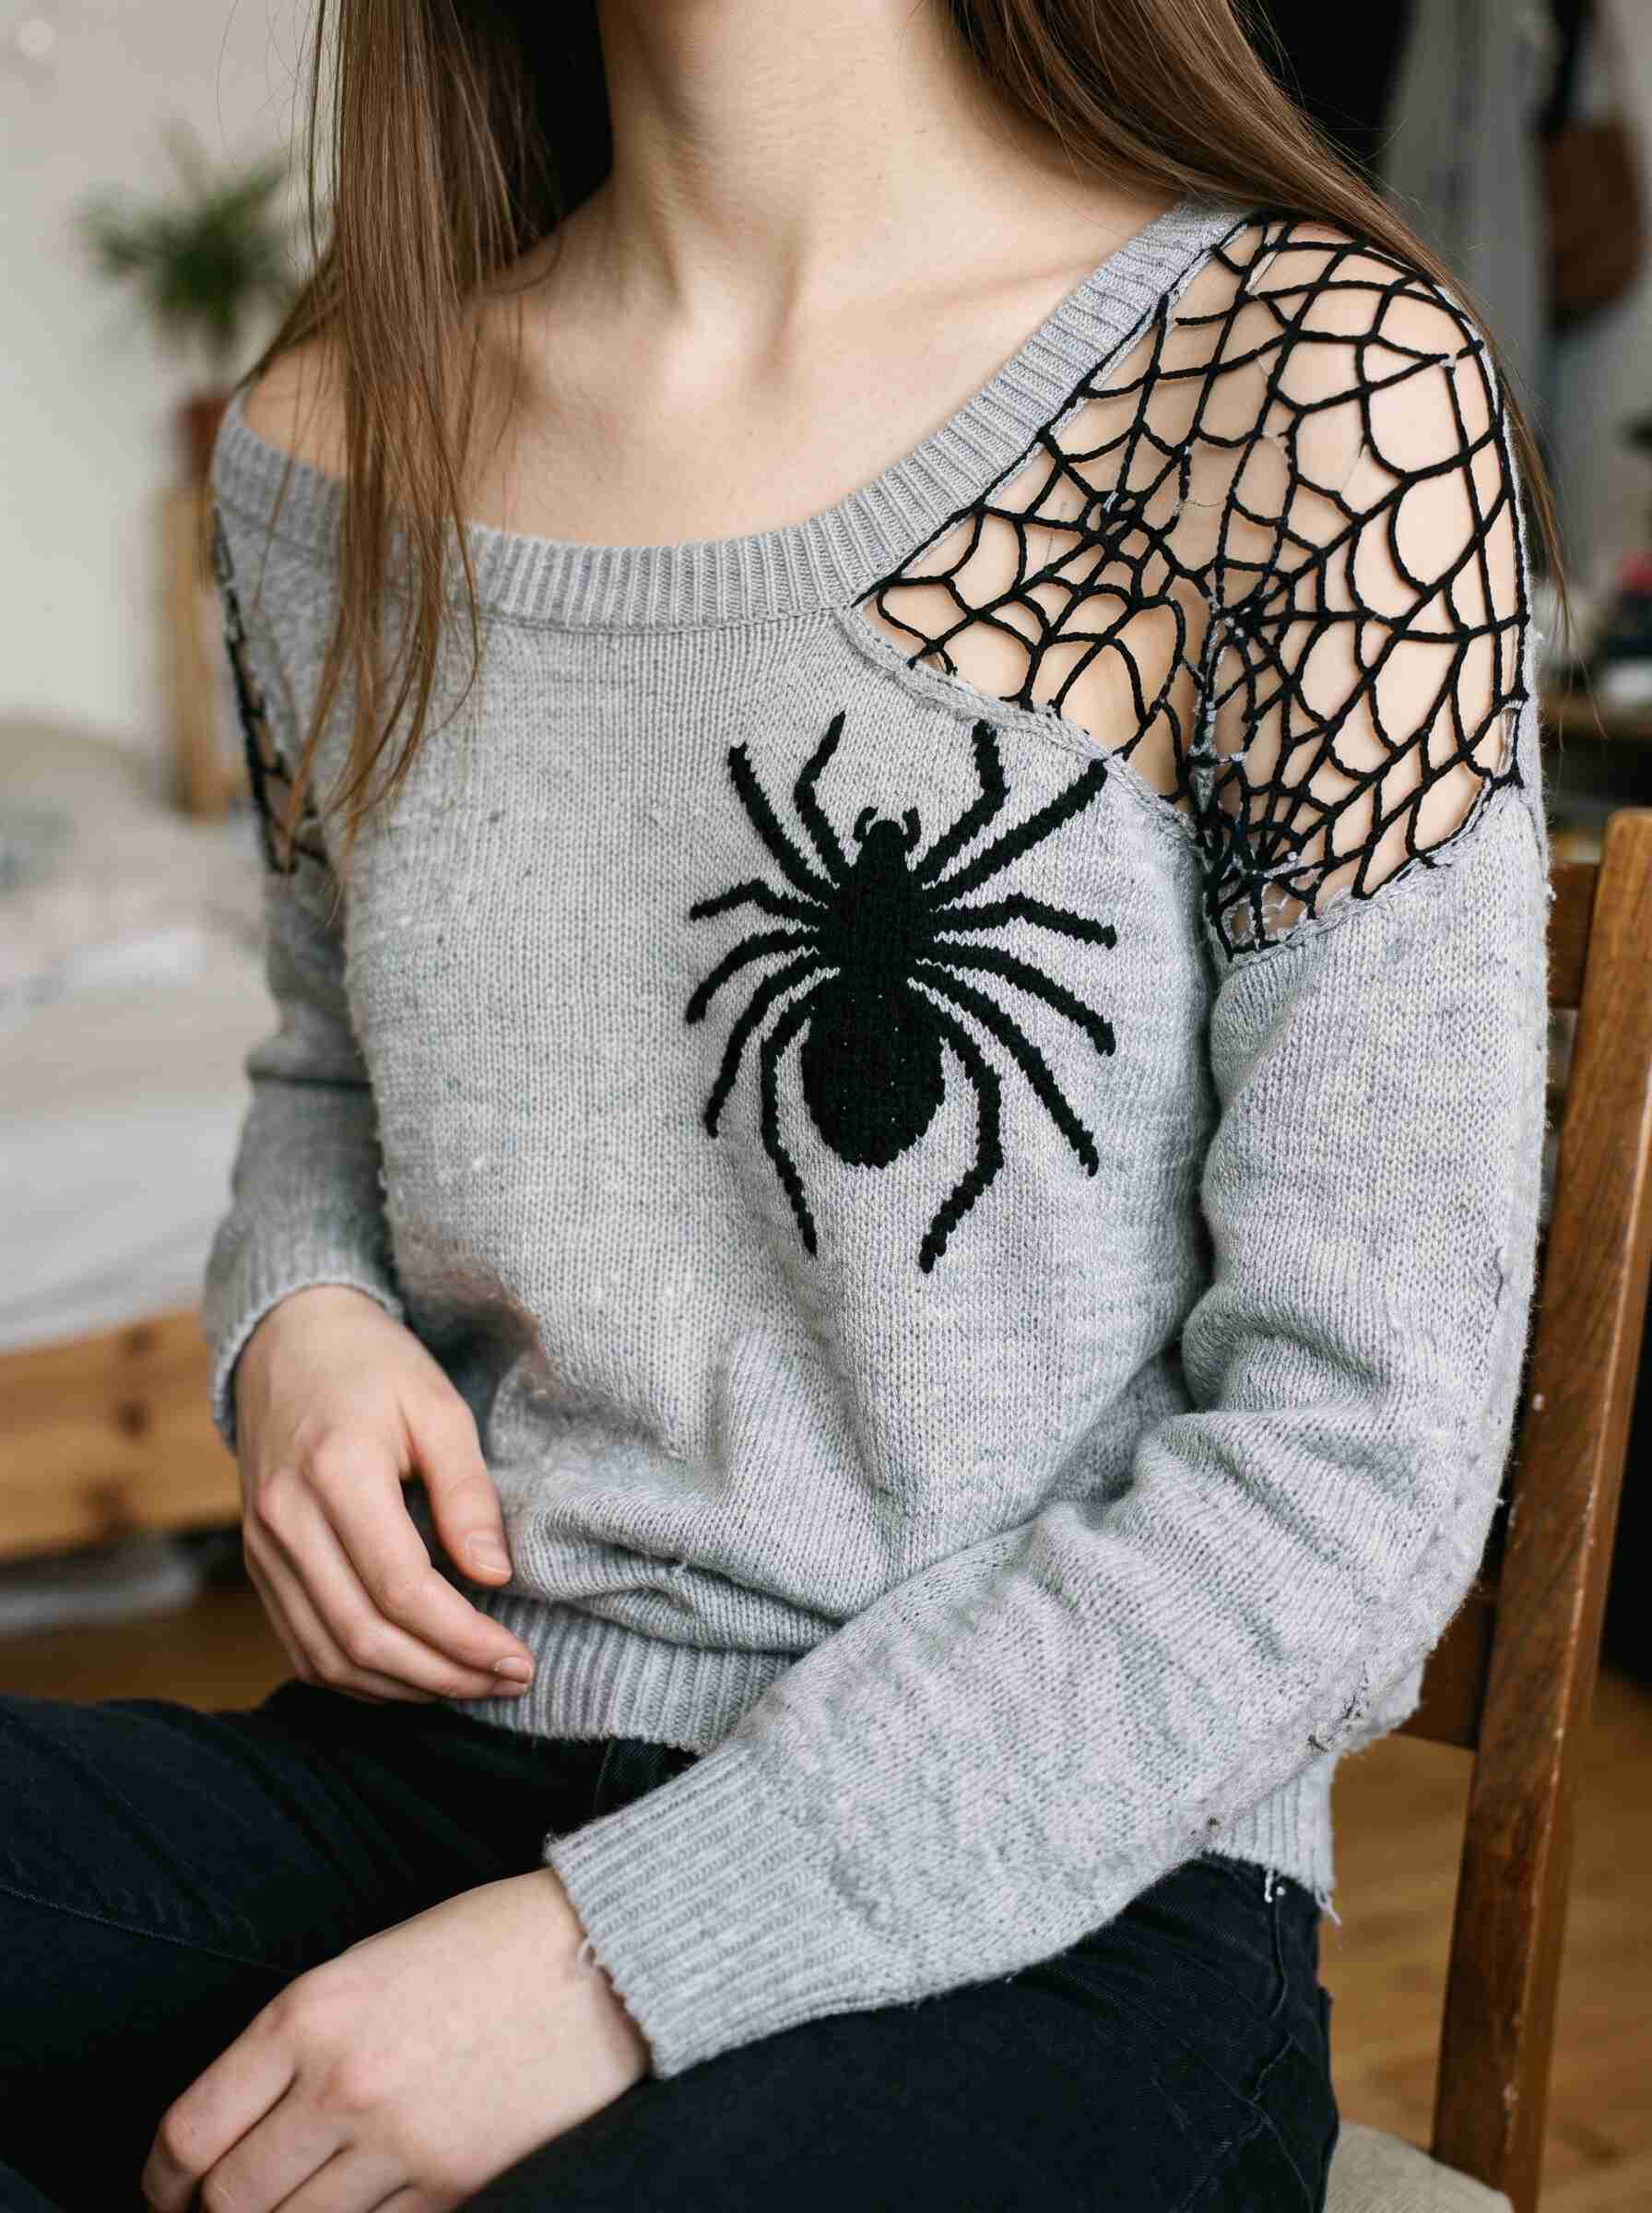
If you love spooky-but-stylish crochet projects, this spiderweb sweater is the perfect addition to your handmade wardrobe. Inspired by the cozy gray sweater in the photo, this design combines a soft crochet pullover with delicate black spiderweb panels on the shoulders and sleeves and a bold spider motif on the front.
The result is a cozy, slightly gothic sweater that works beautifully for Halloween, fall outfits, costume parties, or everyday alternative fashion.
Crochet Spiderweb Sweater Pattern
Skill Level
Intermediate
You should be comfortable with:
- Single crochet
- Half double crochet
- Double crochet
- Slip stitch
- Working in rows
- Basic increasing and decreasing
- Joining crochet panels
Finished Look
This sweater features:
- Soft gray main body
- Black spiderweb crochet panels
- Large black spider motif
- Relaxed, comfortable fit
- Ribbed neckline, cuffs, and hem
- Long sleeves
- Off-the-shoulder-inspired neckline
- Gothic/Halloween aesthetic
Materials You’ll Need
Yarn
For a medium-size sweater, approximately:
- Gray worsted-weight yarn: 900–1,200 yards
- Black worsted-weight yarn: 150–250 yards
You can adjust the amount depending on your size and desired fit.
For a lighter sweater, use DK yarn. For a warmer winter sweater, choose a soft worsted or aran-weight yarn.
Crochet Hook
- 5 mm crochet hook for the main sweater
- 4 mm crochet hook for the ribbing
- 3.5–4 mm hook for the spiderweb details
Always check your gauge before beginning.
Other Supplies
- Yarn needle
- Scissors
- Stitch markers
- Measuring tape
Crochet Abbreviations
| Abbreviation | Meaning |
|---|---|
| ch | Chain |
| sc | Single crochet |
| hdc | Half double crochet |
| dc | Double crochet |
| sl st | Slip stitch |
| st | Stitch |
| sk | Skip |
| inc | Increase |
| dec | Decrease |
Step 1: Crochet a Gauge Swatch
Before starting your sweater, crochet a small swatch using your gray yarn.
Work approximately:
16 hdc × 12 rows = 4 × 4 inches
Your gauge may vary depending on your tension.
If your stitches are too tight, go up a hook size. If your stitches are too loose, go down a hook size.
Step 2: Crochet the Front Panel
Start with the gray yarn.
Chain enough stitches to reach approximately half of your desired chest circumference.
For a medium sweater, you can begin with approximately:
Ch 76
Row 1
Hdc in the second chain from the hook and across.
Ch 1, turn.
Rows 2–60
Hdc across.
Continue until the panel reaches approximately from your waist to your shoulder.
For a longer or oversized sweater, simply add more rows.
Shape the Neckline
To create the wide neckline seen in the inspiration photo, leave the center stitches unworked near the top.
Work the left shoulder and right shoulder separately for several rows.
This creates a broad neckline that can sit slightly off the shoulders.
Step 3: Crochet the Back Panel
Make the back panel the same width as the front.
Work:
Ch 76
Then crochet approximately 60 rows of hdc.
The back neckline can be slightly higher than the front.
Join the shoulder sections while leaving enough room for the neck opening.
Step 4: Create the Ribbed Bottom
The ribbed hem gives the sweater that comfortable ready-to-wear appearance.
Using your gray yarn and a smaller hook:
Ribbing Row
Ch 11.
Sc in the second chain from the hook and across.
Attach the ribbing to the bottom edge of the sweater with slip stitches.
Continue:
Sc in back loop only across the ribbing.
Repeat until the entire bottom edge is covered.
Sew or crochet the ends together.
Step 5: Crochet the Sleeves
For a relaxed sleeve, start at the armhole and work downward.
Attach gray yarn around the armhole.
Work approximately:
Hdc around the armhole.
Join with a slip stitch.
Sleeve Rows
Ch 1 and hdc around.
Continue for approximately 45–50 rows, depending on your desired sleeve length.
For a slightly tapered sleeve, decrease 2 stitches every 8–10 rows.
Finish with ribbing around the wrist.
Step 6: Make the Spiderweb Crochet Panels
This is the detail that gives the sweater its distinctive look.
The spiderweb sections can be placed over the shoulders and upper sleeves.
Use black yarn and a smaller crochet hook.
A simple spiderweb effect can be made with chains and double crochet stitches.
Basic Spiderweb Motif
Start with a magic ring.
Round 1
Ch 3.
Work 11 dc into the ring.
Sl st to join.
Round 2
Ch 5.
Dc into the next stitch.
Ch 3, dc into the next stitch.
Repeat around.
Round 3
Sl st into the first chain space.
Ch 5.
Dc into the same space.
Ch 4.
Work 2 dc into the next chain space.
Continue around.
The spaces will gradually create the open web structure.
Step 7: Build the Larger Spiderweb Panel
For the shoulder section, continue expanding the spiderweb motif rather than stopping at a small circle.
Create several concentric sections using:
dc + chain spaces
For example:
        \ | /
      ---\|/---
     \   \|/   /
   ---\---●---/---
     /   /|\   \
      ---/|---
        / | \
The important part is to keep the chain spaces relatively open.
This creates the delicate web effect seen in the inspiration sweater.
Step 8: Attach the Spiderweb to the Sweater
Place the spiderweb panel over the shoulder area.
Use black yarn and a yarn needle to carefully sew the web onto the gray sweater.
Leave some of the web open so the gray fabric underneath is visible.
For a more dramatic look, you can make the web section larger and allow it to continue from the shoulder toward the upper arm.
Step 9: Crochet the Spider Applique
The large black spider on the front is the statement feature.
Use black yarn.
Spider Body
Start with a magic ring.
Round 1:
Work 6 sc into the ring.
Round 2:
2 sc in each stitch around.
Round 3:
Sc in the next stitch, 2 sc in the next.
Repeat around.
Continue increasing until you have an oval-shaped body.
Then work several rounds without increases.
Finish with a smaller rounded section for the spider’s head.
Step 10: Crochet the Spider Legs
Make 8 spider legs.
Each leg can be made using chains and slip stitches.
For each leg:
Ch 12–18
Sl st back along part of the chain.
Add a slight bend near the end to make the leg look more natural.
Make:
- 4 legs on the left
- 4 legs on the right
You can make the upper legs slightly shorter and the middle legs longer.
This gives the spider a more realistic silhouette.
Step 11: Assemble the Spider
Place the spider body on the front of the sweater, slightly below the neckline.
Arrange the eight legs around it.
Sew everything securely into place using black yarn.
For a bolder graphic appearance, you can crochet the spider directly onto the sweater using surface crochet.
Step 12: Crochet the Neckline
The wide ribbed neckline is one of the most important details of this design.
Using gray yarn:
Attach yarn around the neckline.
Work 1–3 rounds of single crochet.
Then create ribbing using:
sc through the back loop only.
For a wider neckline, use a longer ribbing strip and attach it loosely around the opening.
The finished neckline should stretch comfortably over the head.
Finishing Your Spiderweb Sweater
Once all pieces are attached:
- Weave in all loose ends.
- Check the shoulder seams.
- Check the sleeve joins.
- Gently stretch the neckline into shape.
- Block the spiderweb panels if necessary.
- Hand wash or gently wash according to your yarn label.
- Lay flat to dry.
Avoid aggressive stretching because the spiderweb crochet sections are more delicate than the solid sweater fabric.
How to Customize the Sweater
One of the best things about making your own crochet sweater is that you can easily change the design.
Make It More Halloween-Themed
Use:
- Black + orange
- Black + purple
- Black + burgundy
- Black + neon green
Make It More Subtle
Instead of a large spider, use a small spiderweb motif on each shoulder.
Make It Oversized
Add 8–15 stitches to the width of each panel and increase the sleeve circumference.
Make It Cropped
Reduce the number of body rows before joining the front and back.
Make It Extra Cozy
Use a soft bulky yarn and a larger crochet hook, adjusting the stitch count to maintain your desired measurements.
Crochet Spiderweb Sweater Size Guide
You can customize the pattern according to your measurements.
| Size | Approx. Bust | Suggested Ease |
|---|---|---|
| XS | 32–34 in | 4–6 in |
| S | 34–36 in | 4–6 in |
| M | 36–38 in | 5–7 in |
| L | 40–42 in | 5–8 in |
| XL | 44–46 in | 6–8 in |
| 2XL | 48–50 in | 6–10 in |
For the relaxed look shown in the inspiration photo, I recommend adding 5–8 inches of positive ease.
Tips for Crocheting the Perfect Spiderweb Sweater
Choose the right yarn
A soft acrylic, wool blend, or cotton-acrylic yarn works well for this project.
Avoid very stiff yarn for the spiderweb because you want the web to drape naturally.
Don’t crochet the web too tightly
The spiderweb should have open spaces. Tight stitches can make the web look more like lace than a spiderweb.
Measure as you go
Sweaters are much easier to customize when you compare the piece with your own measurements throughout the project.
Block the web
Light blocking can dramatically improve the appearance of the spiderweb sections.
Use contrasting colors
Gray and black create a subtle gothic look, while black and orange give the sweater a classic Halloween feel.
What Makes This Crochet Spiderweb Sweater Special?
This project combines two popular crochet trends: cozy handmade sweaters and gothic/Halloween crochet.
The solid gray body keeps the sweater comfortable and wearable, while the open spiderweb crochet panels add a dramatic handmade detail. The oversized spider applique turns a simple pullover into a statement piece.
You can wear it with black jeans, leggings, a denim skirt, or even layer it over a simple dress for a cute fall outfit.
Frequently Asked Questions
Is this spiderweb sweater beginner-friendly?
The basic sweater construction is suitable for an adventurous beginner, but the spiderweb panels require some experience with chain spaces, double crochet, and sewing crochet pieces together.
Can I use different yarn?
Yes. You can use DK, worsted, or aran-weight yarn. Just make a gauge swatch and adjust your stitch count.
Can I make this crochet sweater in different sizes?
Absolutely. Measure your bust and desired sweater length first, then adjust the starting chain and number of rows.
Can I make the spider smaller?
Yes. Simply reduce the number of increases when crocheting the spider body and use shorter chains for the legs.
Is this a good Halloween crochet project?
Definitely. The spiderweb and spider design make it an excellent Halloween crochet sweater, but the neutral gray and black color combination also makes it wearable throughout fall.
Final Thoughts
This crochet spiderweb sweater is a fun project for anyone who loves cozy handmade clothing with a little spooky personality. The combination of a soft gray sweater, black spiderweb crochet panels, and a bold spider applique creates a unique statement piece that’s perfect for the fall season.
Once you’ve mastered the basic construction, you can experiment with different yarn colors, spider sizes, web designs, and sweater lengths to create your own version.
Save this crochet sweater pattern for your next fall project and share it with a fellow crochet lover! 🕷️🧶