
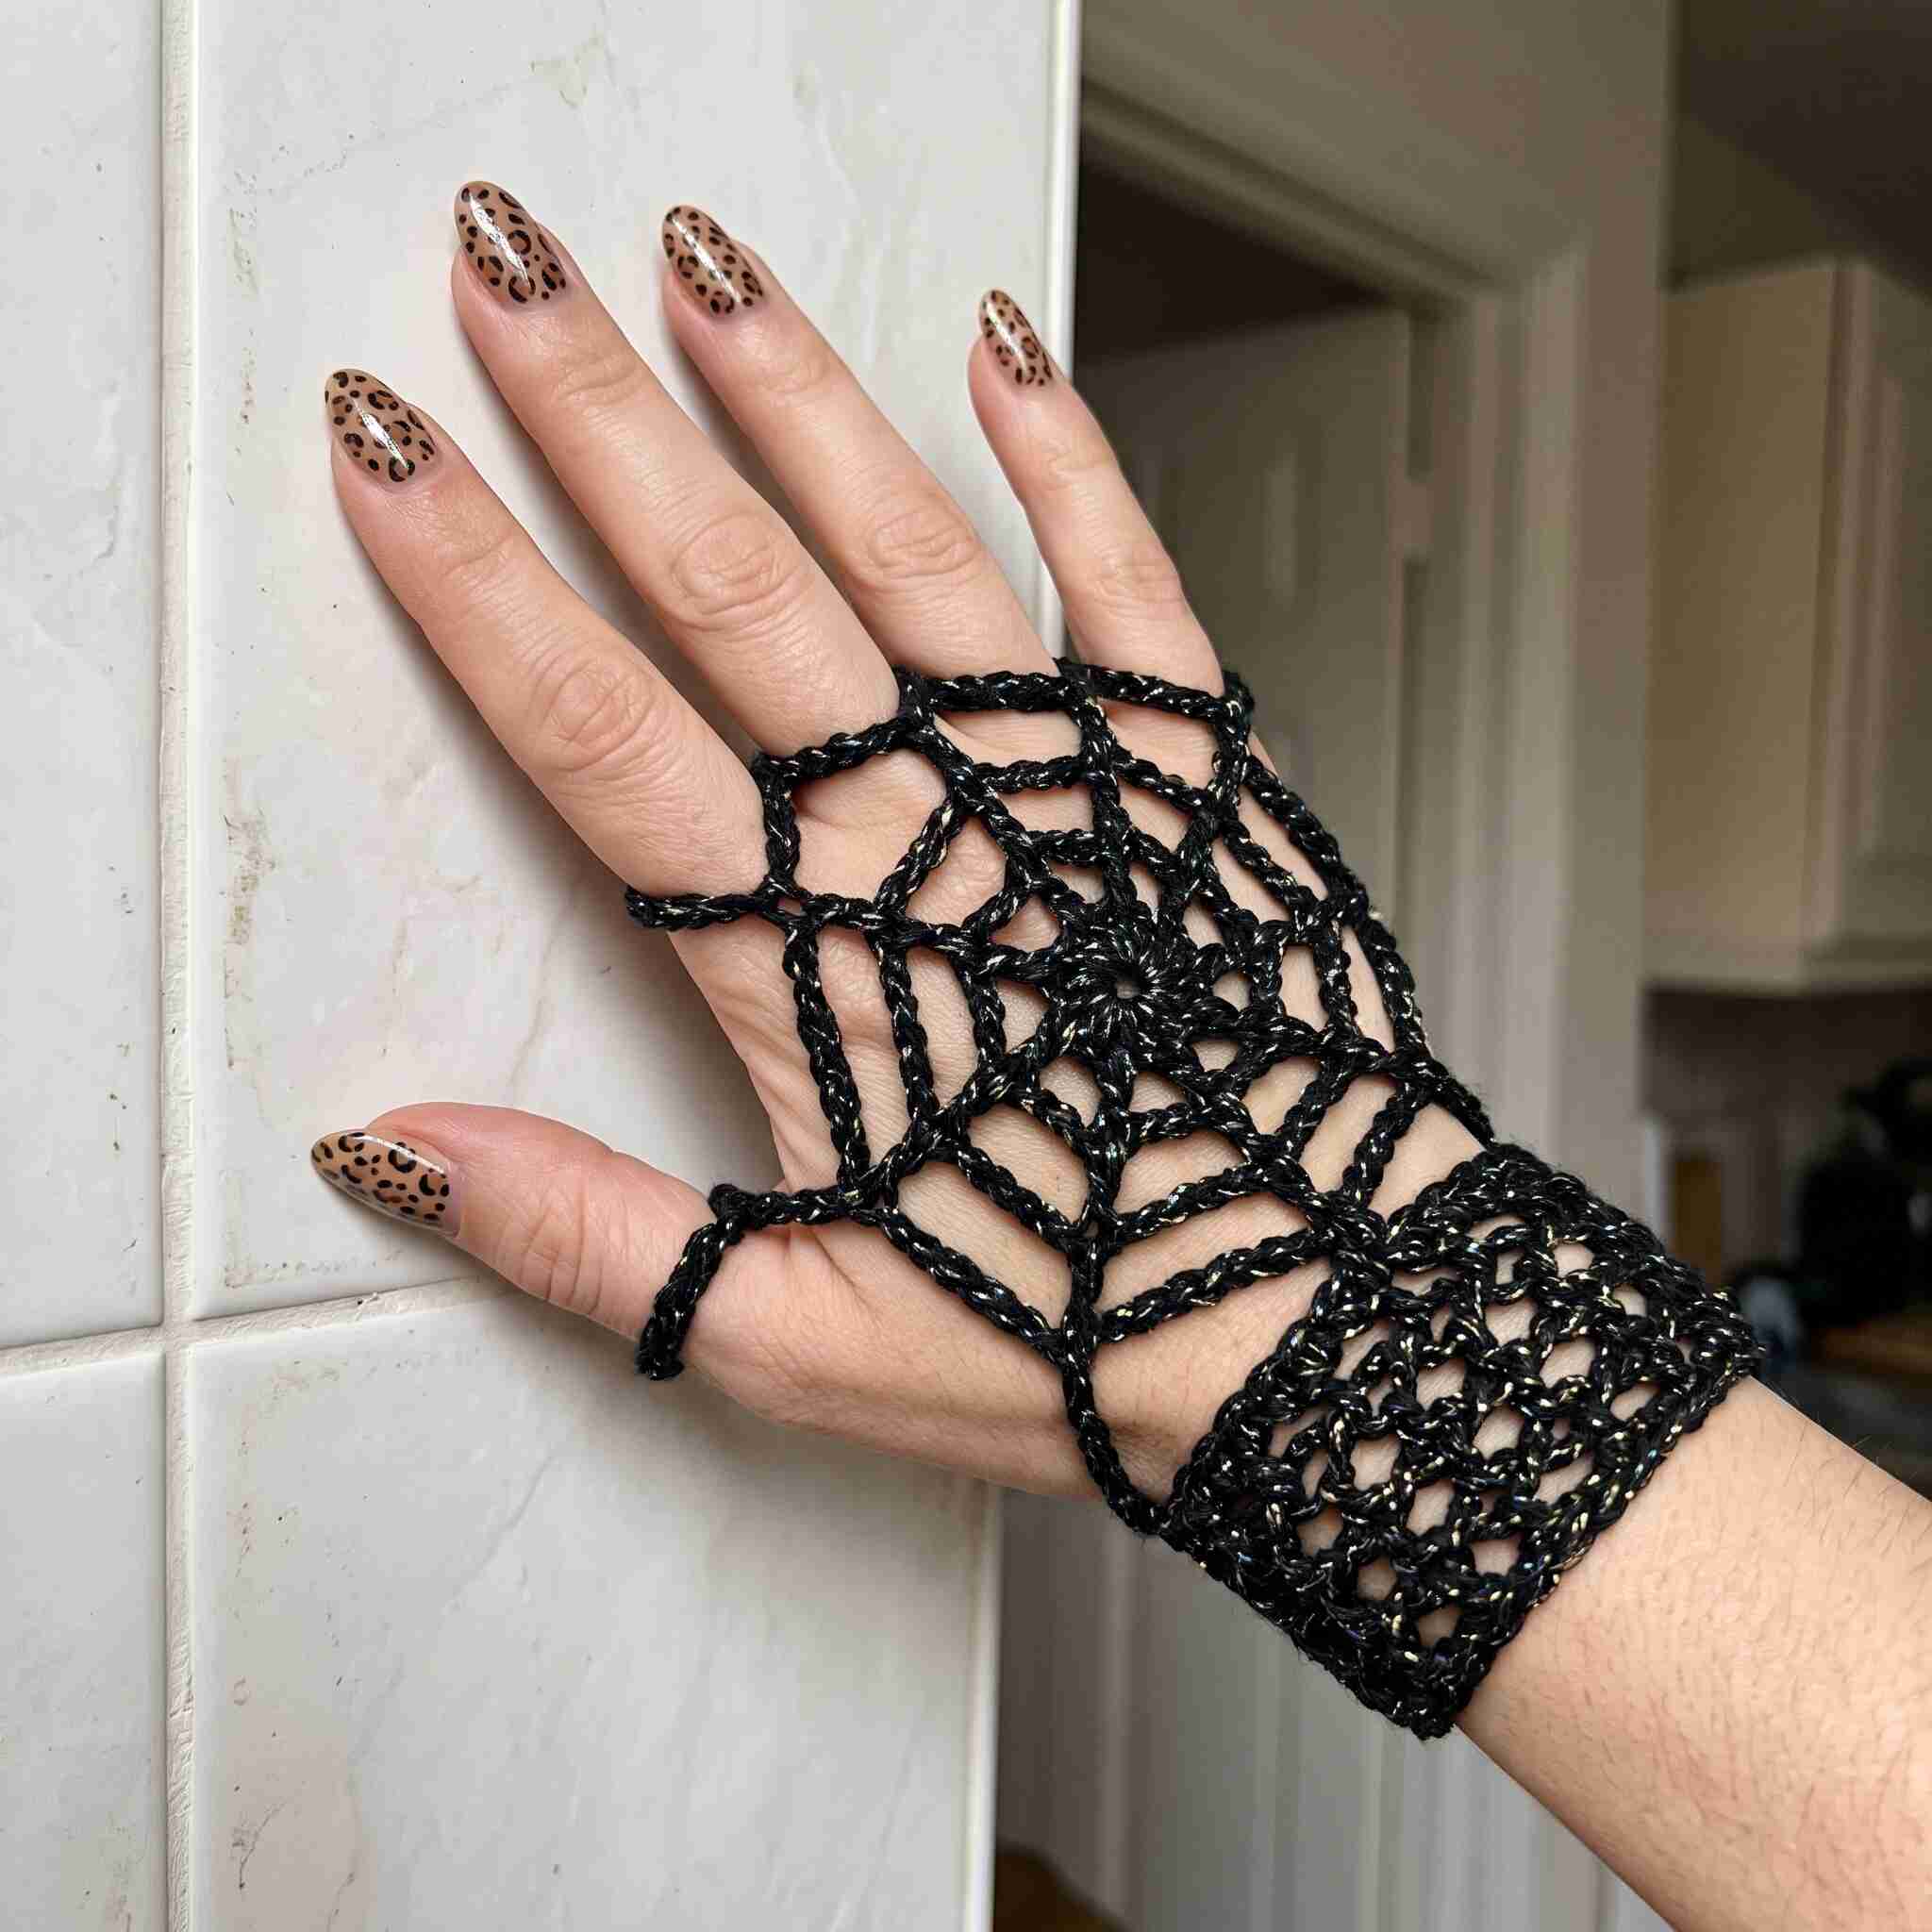
This crochet hand harness is one of those projects that looks complicated but is surprisingly approachable once you break the construction into sections.
Instead of crocheting a traditional glove, this design uses chains, single crochet, and slip stitches to create an open web across the back of the hand. The wrist is finished with a more solid lace cuff, while small loops around the fingers help keep the web securely in place.
The black thread gives the finished accessory a beautiful gothic appearance, but you can easily change the color to create a completely different style.
Materials
- Black crochet thread, size 10 or similar
- 1.5–2 mm crochet hook
- Yarn needle
- Scissors
- Measuring tape
- Stitch markers
- Black sewing thread, optional
Optional
- Metallic crochet thread
- Small black or silver beads
- Small decorative beads
- Fabric-safe elastic thread for additional stretch
For a delicate spiderweb effect, fine crochet thread works much better than bulky yarn.
Crochet Abbreviations
This pattern uses US crochet terminology.
| Abbreviation | Meaning |
|---|---|
| ch | chain |
| sl st | slip stitch |
| sc | single crochet |
| st | stitch |
| sts | stitches |
| rep | repeat |
| sp | space |
| sk | skip |
| MR | magic ring |
Before You Begin
Because everyone’s hands are different, measure your hand before crocheting.
Measure:
- Around your wrist.
- Around the base of your fingers.
- From your wrist to the base of your fingers.
- Around each finger where the crochet loop will sit.
The web should sit comfortably on the back of the hand without pulling when you open your fingers.
Part 1: Crochet the Wrist Cuff
The wrist cuff forms the base of the hand harness.
Foundation Chain
Chain enough stitches to fit comfortably around your wrist.
For an average adult wrist, begin with approximately:
Ch 31
Remember that your chain count may need to change depending on your thread and tension.
Join the chain with a slip stitch, making sure the chain isn’t twisted.
Round 1
Ch 1.
Sc in each chain around.
Sl st to the first sc.
Round 2
Ch 1.
Sc in each stitch around.
Sl st to join.
Repeat Round 2 until the cuff reaches approximately 1½–2 inches wide.
For a wider cuff, simply add additional rounds.
Part 2: Create the Lace Texture
To make the cuff look more open and decorative like the one in the photograph, replace some solid rounds with a chain-lace round.
Lace Round
Ch 3.
Skip 2 stitches.
Sc in the next stitch.
Ch 3, skip 2 stitches, sc in the next stitch.
Repeat around.
Sl st to the beginning of the round.
This creates a series of small open spaces.
Next Round
Sl st into the first chain-3 space.
Ch 1.
Sc into the same space.
Work 3 sc into each chain-3 space around.
Sl st to join.
Repeat if you want a more textured cuff.
Part 3: Create the Center of the Spiderweb
The small flower/star-shaped center is the starting point for the web.
Make a magic ring.
Round 1
Ch 1.
Work 8 sc into the magic ring.
Sl st to the first sc.
Pull the ring closed.
Round 2
Ch 3.
Dc into the same stitch.
Ch 2, 2 dc into the next stitch.
Repeat around.
Sl st to the top of the beginning chain.
You should now have a small circular center with open spaces.
Part 4: Build the Spiderweb
This is the most recognizable part of the design.
The web is created with chain arches that gradually become larger as they move toward the wrist and fingers.
Attach your thread to one of the spaces around the center.
Web Round 1
Ch 5.
Sc into the next space.
Ch 5, sc into the next space.
Repeat around.
Sl st to the first sc.
You now have the first ring of the web.
Web Round 2
Sl st into the first chain-5 space.
Ch 6.
Sc into the next chain space.
Ch 6, sc into the next chain space.
Repeat around.
Sl st to join.
Web Round 3
Move into the next chain space.
Ch 7.
Sc into the following chain space.
Repeat around.
This creates a larger web ring.
Web Round 4
Sl st into the next chain space.
Ch 8.
Sc into the following space.
Repeat around.
Continue increasing the chain length slightly as necessary so the web lies flat against the hand.
Important
Do not make the chain arches too tight.
The web should have a loose, open lace appearance rather than pulling tightly across the hand.
Part 5: Connect the Web to the Wrist
Once the web reaches approximately the middle of the hand, begin attaching the outer arches to the wrist cuff.
Position the work on the back of your hand.
Choose several evenly spaced points along the upper edge of the cuff.
Create a connecting chain from the web to the cuff.
For example:
Ch 8–12, depending on the distance.
Slip stitch into the cuff.
Fasten off.
Repeat across the wrist until the web is securely connected.
These connections create the beautiful geometric web pattern visible in the finished design.
Part 6: Make the Finger Loops
The finger loops keep the spiderweb in place.
You will need loops for the index, middle, ring, and pinky fingers.
The thumb gets its own separate loop.
Index Finger Loop
Chain approximately 12–16 chains.
Wrap the chain around your finger to check the fit.
Join with a slip stitch.
Round 1
Ch 1.
Sc around.
Sl st to join.
Fasten off.
Repeat for the remaining fingers.
Tip
Do not use the same number of chains for every finger automatically.
Your index, middle, ring, and pinky fingers can have noticeably different circumferences.
Make each loop individually for a better fit.
Part 7: Create the Thumb Loop
The thumb loop is slightly larger than the finger loops.
Chain approximately 16–20 chains.
Wrap the chain around the base of your thumb.
Join with a slip stitch.
Work one round of sc.
Fasten off.
The loop should sit comfortably without restricting thumb movement.
Part 8: Connect the Finger Loops to the Spiderweb
Now connect each finger loop to the outer portion of the web.
Attach your crochet thread to the top of the spiderweb.
Index Finger
Chain approximately 8–12 chains.
Check the placement on your hand.
Slip stitch into the index-finger loop.
Fasten off.
Middle Finger
Repeat, adjusting the chain length so the web sits naturally on the back of the hand.
Ring Finger
Repeat.
Pinky Finger
Repeat with a slightly different chain length if necessary.
The exact lengths will depend on the size of your hand.
Part 9: Create the Thumb Connection
Attach the thread near the side of the wrist cuff.
Chain approximately 10–16 chains.
Position the chain diagonally across the side of the hand.
Slip stitch into the thumb loop.
Fasten off.
This creates the open section between the thumb and the main spiderweb.
Part 10: Add Additional Web Lines
For a fuller spiderweb appearance, add additional diagonal chains between the existing web rings.
Attach the thread to one web intersection.
Chain 5–8.
Slip stitch into the next web intersection.
Repeat across the hand.
The goal is to create a series of connected geometric openings rather than a solid piece of crochet.
Keep checking the fit
Put the harness on your hand regularly.
Open and close your fingers.
If the web pulls, make the connecting chains longer.
If it becomes too loose, remove a chain or two.
Part 11: Decorative Wrist Border
To reproduce the detailed edge of the pictured cuff, add a decorative border around the bottom.
Attach yarn to the edge of the cuff.
Work:
Sl st into next stitch, ch 1, 3 sc into next stitch, sl st into following stitch.
Repeat around the cuff.
This produces a small scalloped edge.
For a more dramatic gothic look, work a second decorative round.
Part 12: Add Beads
Beads are optional, but they can give the black crochet a beautiful sparkling finish.
You can either pre-string beads onto your crochet thread or sew them onto the finished piece.
Place beads around:
- The center flower
- Web intersections
- Wrist cuff
- Finger loops
- Outer edge of the cuff
For a subtle look, add only a few beads.
For a more dramatic gothic design, add beads throughout the entire harness.
Finishing the Crochet Hand Harness
Carefully weave all loose ends into the back of the crochet.
Trim the excess thread.
Gently stretch the web with your fingers so the chain spaces open evenly.
Try the finished harness on your hand and make any final adjustments.
The finished piece should sit comfortably across the back of the hand while allowing your fingers and thumb to move freely.
How to Customize the Pattern
Make It Smaller
Use:
- A smaller crochet hook
- Finer thread
- Shorter connecting chains
- Smaller finger loops
Make It Larger
Use:
- A slightly larger hook
- Thicker crochet thread
- Longer chain sections
- Larger finger loops
Make It More Gothic
Use black metallic thread with black beads or small silver accents.
Make It More Colorful
Try:
- Burgundy
- Dark purple
- Emerald green
- Deep red
- Metallic silver
Tips for Perfect Crochet Spiderwebs
Keep your tension relaxed
Tight chains can cause the web to curl or pull.
Test the fit frequently
This is a wearable project, so don’t wait until the end to check the size.
Use fine thread
The open lacework looks much more delicate with crochet thread than standard yarn.
Reinforce the joins
The points where the web connects to the finger loops receive the most movement. Sew through these areas several times or reinforce them with additional slip stitches.
Block the finished piece
Lightly dampen the crochet and gently arrange the web into an even shape.
Allow it to dry completely before wearing.
Frequently Asked Questions
Is this crochet hand harness beginner-friendly?
It is best suited to a confident beginner or intermediate crocheter because the individual stitches are simple, but maintaining even chain spaces and connecting the web correctly requires some attention.
Can I make this without beads?
Absolutely. The spiderweb crochet pattern looks beautiful on its own. Beads are simply an optional embellishment.
What yarn should I use?
Fine cotton crochet thread is ideal. A size 10 crochet thread with a 1.5–2 mm hook will give you a delicate lace effect similar to the photograph.
Can I make the harness for Halloween?
Yes! This is a great Halloween crochet accessory, especially when made in black. You can also add a small crocheted spider to the center for an extra spooky detail.
How do I make it fit my hand?
The easiest approach is to make the wrist cuff and finger loops according to your own measurements and adjust the connecting chains while wearing the piece.
Final Thoughts
This crochet spiderweb hand harness is a fun wearable project when you want something a little different from traditional crochet accessories. The open lacework creates a delicate spiderweb effect while the fitted wrist cuff and finger loops keep the design comfortably in place.
Make it in classic black for a gothic look, add beads for extra sparkle, or experiment with different colors to create your own version.
Pin this pattern for your next crochet jewelry project and make one for Halloween, festivals, costumes, or everyday alternative fashion!