
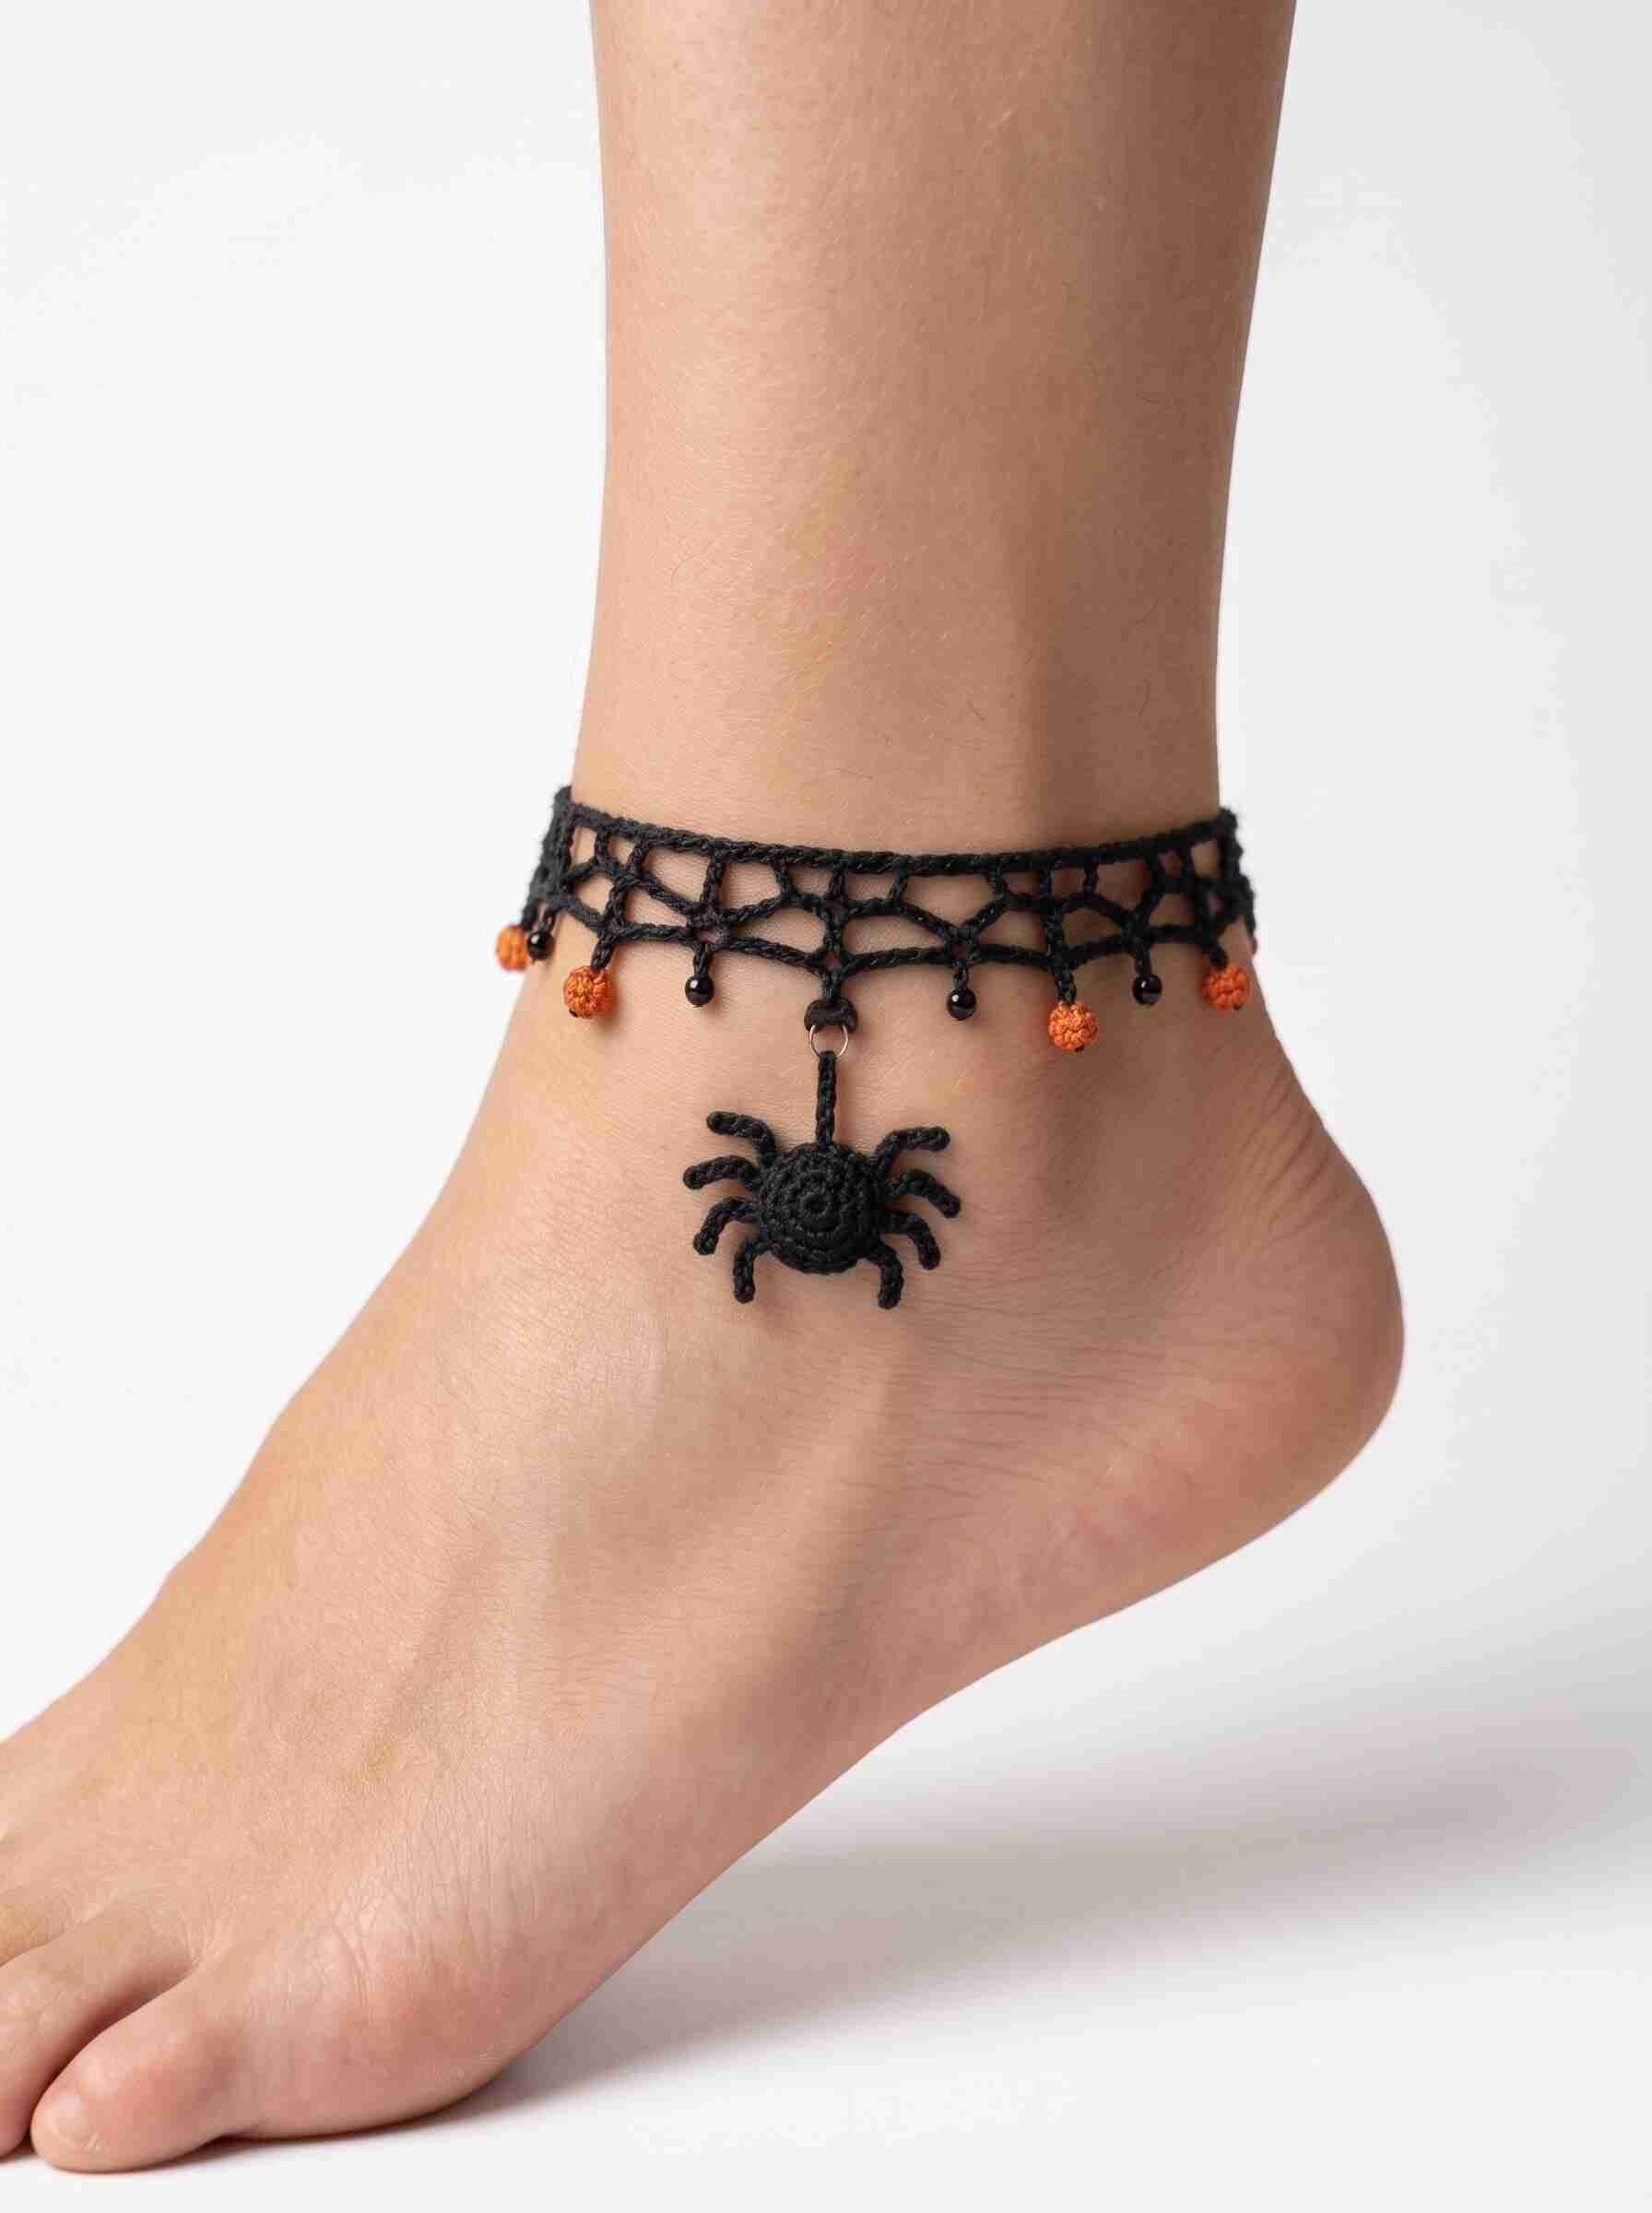
Looking for a fun and unique crochet accessory for Halloween? This crochet spider anklet pattern is a charming little project that combines delicate black crochet lace, tiny decorative beads, and an adorable spider pendant. It is perfect for adding a spooky touch to your Halloween outfit or creating a handmade gift for someone who loves gothic-inspired accessories.
The anklet features an open lace design that wraps comfortably around the ankle. Small black and orange beads hang from the lower edge, while a crocheted spider charm adds the perfect finishing touch. You can customize the colors, bead placement, and length to make the design your own.
Even if you are relatively new to crochet, you can make this project by working with basic crochet stitches, chains, and simple shaping techniques.
Why You Will Love This Crochet Anklet
- Perfect for Halloween: Black yarn and orange accents create a classic spooky color combination.
- Lightweight and delicate: The open lace pattern creates a pretty, web-inspired appearance.
- Customizable: Adjust the length, bead colors, and spider size to suit your style.
- Great for handmade gifts: Make one for a friend who loves crochet jewelry or Halloween accessories.
- Uses small amounts of yarn: This is an excellent project for using leftover crochet thread.
Materials and Supplies
Before starting your crochet spider anklet, gather the following supplies:
- Black crochet cotton thread, size 10 or similar.
- Small amount of orange crochet thread.
- 1.5 mm crochet hook, or a hook suitable for your thread.
- Small black beads.
- Small orange beads.
- A yarn needle.
- Scissors.
- Measuring tape.
- Small jewelry jump rings, if desired.
- Optional small jewelry clasp or adjustable tie closure.
Important: If you are using beads, make sure their holes are large enough for your thread. For a more secure and child-safe design, avoid loose beads and small detachable parts around young children.
Finished Size
The finished anklet is designed to be approximately 8–10 inches (20–25 cm) long, excluding any optional extension chain.
Your actual size will depend on your ankle measurement, thread thickness, hook size, and tension. Measure your ankle and add enough room for comfortable movement before finishing the band.
Crochet Abbreviations
This pattern uses US crochet terminology.
- ch: Chain
- sl st: Slip stitch
- sc: Single crochet
- hdc: Half double crochet
- dc: Double crochet
- sc2tog: Single crochet two stitches together
- MR: Magic ring
- st(s): Stitch(es)
- rep: Repeat
- sp: Space
Skill Level: Advanced beginner
Estimated Time: 2–3 hours, depending on your experience and the amount of decorative detail.
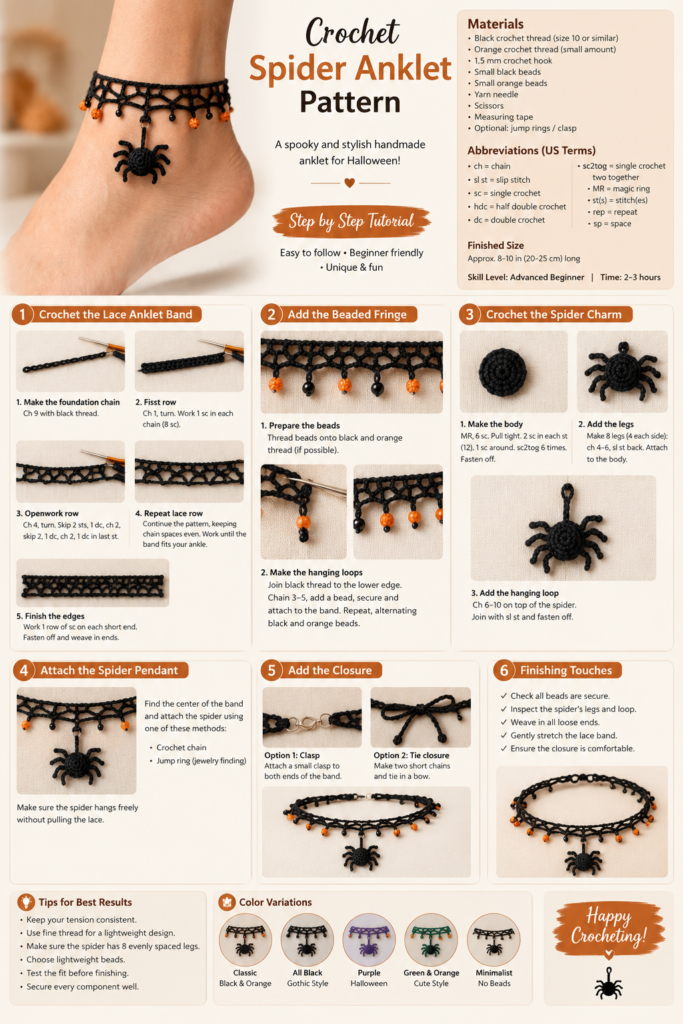
Part 1: Crochet the Lace Anklet Band
The band is worked in rows to create a delicate openwork pattern. The finished lace should be flexible enough to wrap comfortably around your ankle.
Step 1: Make the foundation chain
Using black crochet thread, make a foundation chain of 9 stitches.
This chain creates the starting edge of the anklet.
Step 2: Crochet the first row
- Chain 1 and turn.
- Work 1 single crochet into the second chain from the hook.
- Work 1 single crochet into each remaining chain.
- You should have 8 single crochet stitches.
This creates a narrow foundation edge.
Step 3: Create the first openwork row
- Chain 4 and turn.
- Skip the first 2 stitches.
- Work 1 double crochet into the next stitch.
- Chain 2.
- Skip 2 stitches and work 1 double crochet into the next stitch.
- Chain 2 and work 1 double crochet into the final stitch.
You should now have a row of double crochet stitches separated by chain spaces.
Step 4: Build the lace pattern
For the next row:
- Chain 4 and turn.
- Work 1 double crochet into the top of the first double crochet.
- Chain 2.
- Work 1 double crochet into the next double crochet.
- Repeat across the row, keeping the chain spaces open and even.
Repeat this lace row until the band reaches your desired length when gently stretched around your ankle.
For a more web-like appearance similar to the reference photo, you can add occasional diagonal connections by working a slip stitch into a neighboring chain space before continuing with the next chain section.
Sizing tip: The band should sit comfortably without digging into your skin. Try it around your ankle before adding the decorative edging.
Step 5: Finish the band edges
Work a row of single crochet along each short end of the band to strengthen the edges.
Fasten off and weave in the loose ends using a yarn needle.
Part 2: Add the Decorative Beaded Fringe
The tiny dangling beads give this crochet anklet its distinctive Halloween look.
Step 1: Prepare the beads
Choose a combination of black and orange beads. The orange beads add a bright accent against the black lace.
If your beads can fit over the crochet thread, string them onto the black and orange thread before beginning the fringe.
If they cannot fit over the thread, attach them afterward using a secure jewelry-making method.
Step 2: Make the hanging loops
- Join black thread to the lower edge of the lace band with a slip stitch.
- Chain 3–5 stitches to create a small hanging loop.
- Slide a bead down to the loop, if you pre-strung the beads.
- Secure the bead according to its construction.
- Attach the thread to the next selected point on the lace band.
- Repeat along the lower edge, alternating black and orange beads.
Keep the hanging loops short and consistent so the anklet looks balanced.
Suggested arrangement: Use orange beads at the outer edges and in selected spaces, with black beads between them. Adjust the number of beads to suit the length of your band.
Fasten off and weave in the ends securely.
Part 3: Crochet the Spider Charm
The little spider is the focal point of this Halloween anklet. It is made from a rounded crocheted body with eight small legs.
Materials for the Spider
- Black crochet thread.
- 1.5 mm crochet hook.
- Yarn needle.
- Scissors.
- Optional small amount of black embroidery thread.
Step 1: Make the spider’s body
Using black thread:
- Make a magic ring.
- Work 6 single crochet stitches into the ring.
- Pull the ring closed.
- Work 2 single crochet stitches into each stitch around. You will have 12 stitches.
- Work 1 single crochet into each stitch around.
- Work single crochet two stitches together six times to decrease back to 6 stitches.
Before closing the opening, adjust the shape with your fingers. If you prefer a slightly raised body, add a tiny amount of yarn as stuffing.
Fasten off, leaving a long tail. Use the tail to close the opening and secure the body.
Step 2: Create the spider’s legs
The spider has eight legs, with four on each side.
For each leg:
- Attach black thread to the side of the body.
- Chain 4–6 stitches, depending on your desired leg length.
- Work a slip stitch back along the chain to create a slightly thicker leg.
- Fasten off and secure the end.
Repeat until you have eight legs, four on each side.
Arrange the legs symmetrically. You can gently curve them with your fingers before securing the thread ends.
Step 3: Add the spider’s hanging loop
Attach black thread to the top of the spider’s body.
- Chain 6–10 stitches to form a hanging loop.
- Join the chain back to the body with a slip stitch.
- Fasten off securely.
- Weave in the ends.
This loop will connect the spider to the center of the anklet.
Part 4: Attach the Spider Pendant
Find the center of the lace band and identify a strong stitch or chain space.
Attach the spider using one of these methods:
Crochet attachment: Use a short chain of black thread to connect the spider’s hanging loop to the center of the band. Secure both ends carefully.
Jewelry attachment: If you are using a small jump ring, connect the spider’s loop to a reinforced point on the band. Close the ring securely so the charm cannot slip off.
The spider should hang freely below the band without pulling the lace out of shape.
Part 5: Add the Closure
Try the anklet around your ankle before adding the closure.
You can use a small jewelry clasp attached to reinforced loops at each end of the band. Alternatively, make two short crochet chains that tie together in a bow.
For an adjustable design, create a slightly longer band and use a secure extension chain.
Make sure the closure is comfortable and does not rub against your skin.
Finishing Touches
Before wearing your handmade anklet:
- Check that all beads are securely attached.
- Inspect the spider’s eight legs and hanging loop.
- Weave in all loose thread ends.
- Gently stretch the lace band to even out the spaces.
- Check the closure and make sure it stays fastened.
- Trim any remaining loose ends carefully.
Your crochet spider anklet is now ready to wear!
Tips for the Best Results
- Keep your tension consistent: Even tension helps the lace look balanced and prevents the band from twisting.
- Use a fine thread: Crochet cotton thread works well for a lightweight jewelry design.
- Count the spider’s legs: Eight evenly distributed legs make the spider recognizable and symmetrical.
- Choose lightweight beads: Heavy beads can pull down the lace and make the anklet uncomfortable.
- Test the fit before finishing: Crochet fabric can stretch, so measure the band around your ankle before attaching the closure.
- Secure every component: Small charms and beads should be attached firmly to prevent them from falling off during wear.
Color Variations and Customization Ideas
You can easily change the look of this crochet spider anklet by experimenting with different colors.
- Classic Halloween: Black thread with orange beads.
- Gothic style: All-black thread and black beads.
- Purple spider anklet: Black lace with purple beads and a matching spider charm.
- Cute Halloween style: Black lace with orange, purple, and green accents.
- Minimalist design: Fine black thread with a single spider charm and no beads.
You can also use the same lace technique to create a matching bracelet or a decorative choker, adjusting the length to suit the project.
Frequently Asked Questions
Is this crochet spider anklet suitable for beginners?
Yes, adventurous beginners can try it if they are comfortable with chain stitches, single crochet, double crochet, and working with fine thread. The lace band and small spider charm require patience, but the project is manageable when completed in sections.
What yarn should I use for a crochet spider anklet?
Fine crochet cotton thread is a good choice because it creates a lightweight, detailed lace pattern. You can use a different thread weight, but you may need to adjust your hook and the number of foundation stitches.
Can I make this anklet without beads?
Absolutely! The lace band and spider charm look attractive on their own. You can also replace the beads with small crocheted drops.
How do I make the anklet adjustable?
Add a small jewelry extension chain or make longer tie strings at both ends. An adjustable closure helps accommodate slight differences in ankle size.
Can I sell anklets made from this pattern?
You can use your own finished handmade anklets for personal wear or gifting. If you plan to sell finished items, check the terms under which you obtained the pattern and make sure your materials and construction are suitable for sale.
How should I care for my crochet anklet?
Keep it away from excessive moisture, perfumes, and rough surfaces. Remove it before bathing, swimming, or sleeping. Store it flat in a small jewelry pouch to protect the lace and prevent tangling.
Final Thoughts
This crochet spider anklet is a creative way to bring handmade charm to your Halloween accessories. The combination of delicate black lace, tiny orange accents, and a playful spider pendant makes it a fun project for crochet lovers who enjoy making unique jewelry.
You can follow the basic design or experiment with your favorite colors, bead combinations, and spider details to create a version that feels uniquely yours.
If you make this project, save the pattern for later and share your finished anklet with other crochet lovers. Happy crocheting!