
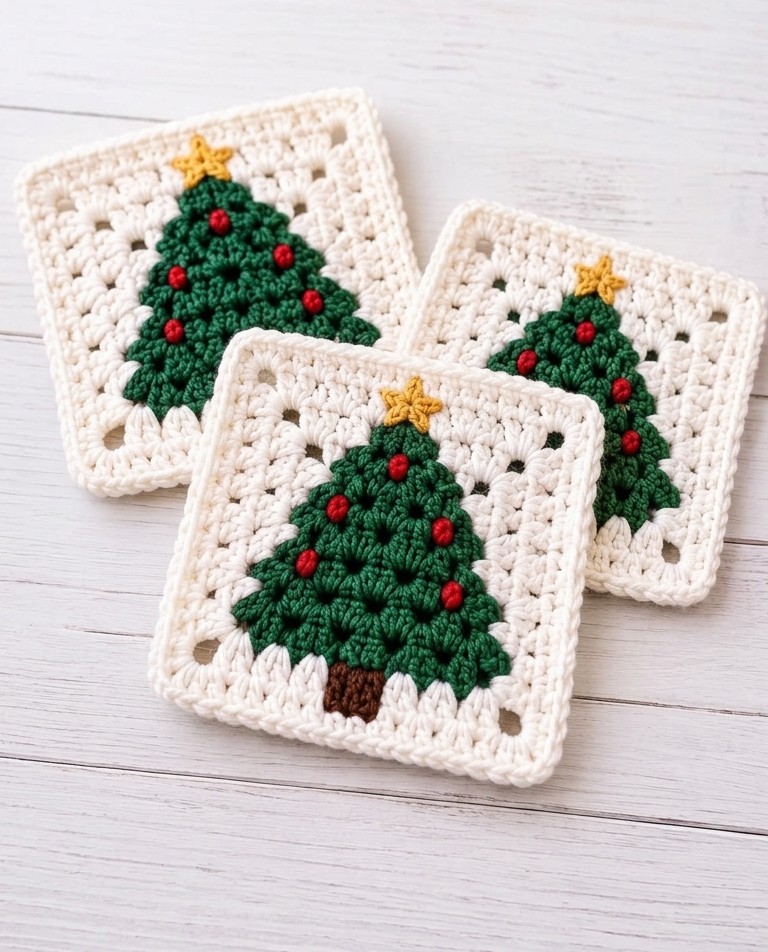
Bring a little handmade Christmas magic to your crochet projects with this beautiful Christmas Tree Crochet Granny Square! 🎄 This festive design features a textured green Christmas tree, tiny red ornaments, a golden star, and a cozy cream granny square background. It’s a lovely way to add a handmade touch to your holiday decorations.
Whether you’re making Christmas blankets, festive pillow covers, table decorations, or handmade gifts, this Christmas tree granny square is a fun project to add to your holiday crochet collection. You can make several squares in coordinating colors and join them together to create something truly special.
This pattern is suitable for adventurous beginners and intermediate crocheters who are comfortable working in the round and changing yarn colors. Follow the instructions below to create your own festive crochet square.
Why You’ll Love This Christmas Tree Crochet Square
- Festive design: A green Christmas tree decorated with red baubles and a golden star.
- Versatile project: Perfect for Christmas blankets, cushions, wall hangings, and seasonal accessories.
- Customizable colors: Use traditional Christmas colors or choose a modern winter palette.
- Great handmade gift: A thoughtful little project for friends and family who love crochet.
- Textured finish: Raised stitches help the Christmas tree stand out against the cream background.
Materials You’ll Need
- Cream or ivory worsted-weight yarn for the granny square background and border.
- Green worsted-weight yarn for the Christmas tree.
- Brown yarn for the tree trunk.
- Red yarn for the Christmas ornaments.
- Golden yellow yarn for the star.
- Crochet hook appropriate for your yarn, approximately 4 mm.
- Yarn needle for weaving in ends.
- Scissors.
- Stitch markers, if needed.
Skill level: Adventurous beginner to intermediate
Terminology: US crochet terms
Finished size: Approximately 5–7 inches square, depending on your yarn, hook, and tension.
Crochet Abbreviations
- ch – chain
- sl st – slip stitch
- sc – single crochet
- hdc – half double crochet
- dc – double crochet
- tr – treble crochet
- st – stitch
- sts – stitches
- sp – space
- ch-sp – chain space
- inc – increase
- rep – repeat
Pattern Notes
- The square is worked from the center outward in joined rounds.
- The Christmas tree is created with textured stitches in green yarn, with a brown trunk and small decorative details.
- The cream border is worked around the tree motif to form a classic granny-square shape.
- The exact stitch counts may vary depending on how you construct the tree and the thickness of your yarn.
- The instructions below provide a written construction guide. The photograph is a visual reference, so use it to guide the tree’s shape and placement.
Step-by-Step Christmas Tree Crochet Granny Square Pattern
Step 1: Make the Cream Granny Square Center
Using cream yarn, create a magic ring or chain 4 and join with a slip stitch to form a ring.
Round 1: Chain 3 (counts as the first dc). Work 2 dc into the ring, chain 2, and repeat the group of 3 dc followed by chain 2 three more times. Join with a slip stitch to the top of the beginning chain.
You should have four groups of double crochet separated by chain-2 corner spaces.
Round 2: Slip stitch to the nearest corner space. Chain 3, work 2 dc, chain 2, and 3 dc in the same corner. In each remaining corner space, work 3 dc, chain 2, and 3 dc. Join with a slip stitch.
Continue adding granny-square rounds as needed, keeping the corners consistent and the square flat. Leave enough space in the center for the Christmas tree motif, or work the tree separately and attach it to the square.
Step 2: Crochet the Christmas Tree
Using green yarn, create a small triangular tree motif.
Row 1: Chain 2. Work 2 sc into the second chain from the hook.
Row 2: Chain 1 and turn. Work 2 sc in the first stitch, then 1 sc in the next stitch, and 2 sc in the last stitch.
Row 3: Chain 1 and turn. Increase at the beginning and end of the row by working 2 sc into the first and last stitches. Work 1 sc in each stitch between them.
Following rows: Continue in the same way, increasing one stitch at each end of every row until the tree reaches the desired width for your square.
To create the layered evergreen look shown in the photograph, add small textured clusters or scalloped groups of stitches along the edges of the triangle. Work these clusters with green yarn, gradually increasing their width toward the bottom.
Fasten off and weave in the ends, or leave a long tail if you plan to sew the motif onto the background.
Tip: The photograph shows a fuller, layered tree rather than a plain triangle. Small groups of stitches worked along the edges help create that branch-like silhouette.
Step 3: Add the Brown Tree Trunk
Attach brown yarn to the bottom center of the green tree.
Chain 1 and work several sc stitches across the bottom center to create a small rectangular trunk. Work 2–4 rows, depending on the size of your tree.
Fasten off and weave in the ends neatly.
Step 4: Make the Golden Star
Using golden yellow yarn, crochet a small star to place at the top of the tree.
A simple embroidered star is an easy option: use a yarn needle to make five short points radiating from a central point. Alternatively, crochet a tiny star motif using chain stitches, slip stitches, and small picot-style points.
Position the star at the top center of the Christmas tree and secure it carefully.
Step 5: Add the Red Christmas Ornaments
Use red yarn to add small baubles across the green branches.
You can create the ornaments with tiny French knots, embroidered dots, or small surface-crochet stitches. Space them evenly from the upper branches to the lower branches, leaving enough room for the green texture to remain visible.
For a raised look similar to the photograph, make small, rounded red stitches rather than flat embroidered lines.
Secure the yarn ends on the back of the motif.
Step 6: Attach the Tree to the Granny Square
Center the finished tree on the cream granny square.
Pin or use stitch markers to hold it in place. With a yarn needle and matching green or cream yarn, sew around the edges of the tree, keeping the stitches small and even.
Make sure the trunk sits near the bottom center of the square and the star points toward the top.
If you prefer to crochet the tree directly onto the square, attach green yarn and work the motif in place using your chosen textured stitches.
Step 7: Complete the Cream Border
Attach cream yarn to a corner space of the square.
Work 3 dc, chain 2, and 3 dc into each corner space. Along each side, work granny clusters evenly into the available spaces. Adjust the spacing as needed so the square lies flat without curling or ruffling.
For a neat finishing round, work sc stitches evenly around the entire square. In each corner, work 3 sc into the corner space to maintain the square shape.
Join with a slip stitch, fasten off, and weave in all remaining ends.
Step 8: Block and Finish
Gently block your finished square to even out the edges and improve the shape.
Lightly dampen the crochet, arrange it into a square on a blocking mat, and let it dry completely. Follow the care instructions for your yarn.
Your Christmas tree crochet granny square is now ready to use in your favorite holiday project!
Tips for the Best Results
- Keep your tension consistent. This helps the square remain flat and gives the border a neat appearance.
- Use contrasting colors. Deep green, bright red, golden yellow, and warm cream make the Christmas tree easy to see.
- Secure the decorations well. Weave in the ends carefully, especially if the square will become a frequently used blanket or cushion.
- Check the corners as you work. If the square curls, you may need more stitches; if it becomes wavy, you may need fewer.
- Make matching squares. Create several trees with slightly different ornament placements for a coordinated Christmas blanket.
Ways to Use Your Christmas Tree Granny Squares
Once you have finished your squares, there are many ways to use them:
- Christmas crochet blanket: Join multiple squares together for a festive throw.
- Holiday cushion cover: Add a few squares to the front of a pillow.
- Christmas wall hanging: Display one or more squares as handmade seasonal decor.
- Festive table accessories: Use the design as inspiration for decorative mats or other seasonal pieces.
- Handmade gifts: Create a small collection for crochet-loving friends and family.
Frequently Asked Questions
Is this Christmas tree crochet square suitable for beginners?
It is best suited to adventurous beginners who know basic crochet stitches and how to work granny squares. The textured tree and decorative details may require a little extra practice.
What yarn is best for a Christmas tree granny square?
Worsted-weight acrylic or cotton yarn works well. Choose yarns with similar thickness so the finished square has an even texture.
Can I make the square in different colors?
Absolutely! Try a white tree on a dark green background, a pastel tree with gold decorations, or a traditional red-and-green design.
How do I join multiple Christmas granny squares?
You can join the squares using a slip-stitch seam, single-crochet join, or an invisible mattress stitch. Choose a method that complements the look of your project.
Can I use this motif for a Christmas blanket?
Yes! Make several squares, block them to a similar size, and join them into rows. Add a coordinating border around the completed blanket for a polished finish.
Final Thoughts
This Christmas Tree Crochet Granny Square is a festive way to celebrate the holiday season with handmade creativity. The textured green branches, cheerful red ornaments, golden star, and soft cream border create a timeless Christmas look that works beautifully in blankets, cushions, and seasonal decorations.
Gather your favorite Christmas yarn colors, enjoy the process, and make a little handmade holiday magic one stitch at a time!
Save this pattern for your Christmas crochet projects, and share your finished square with other crochet lovers.