
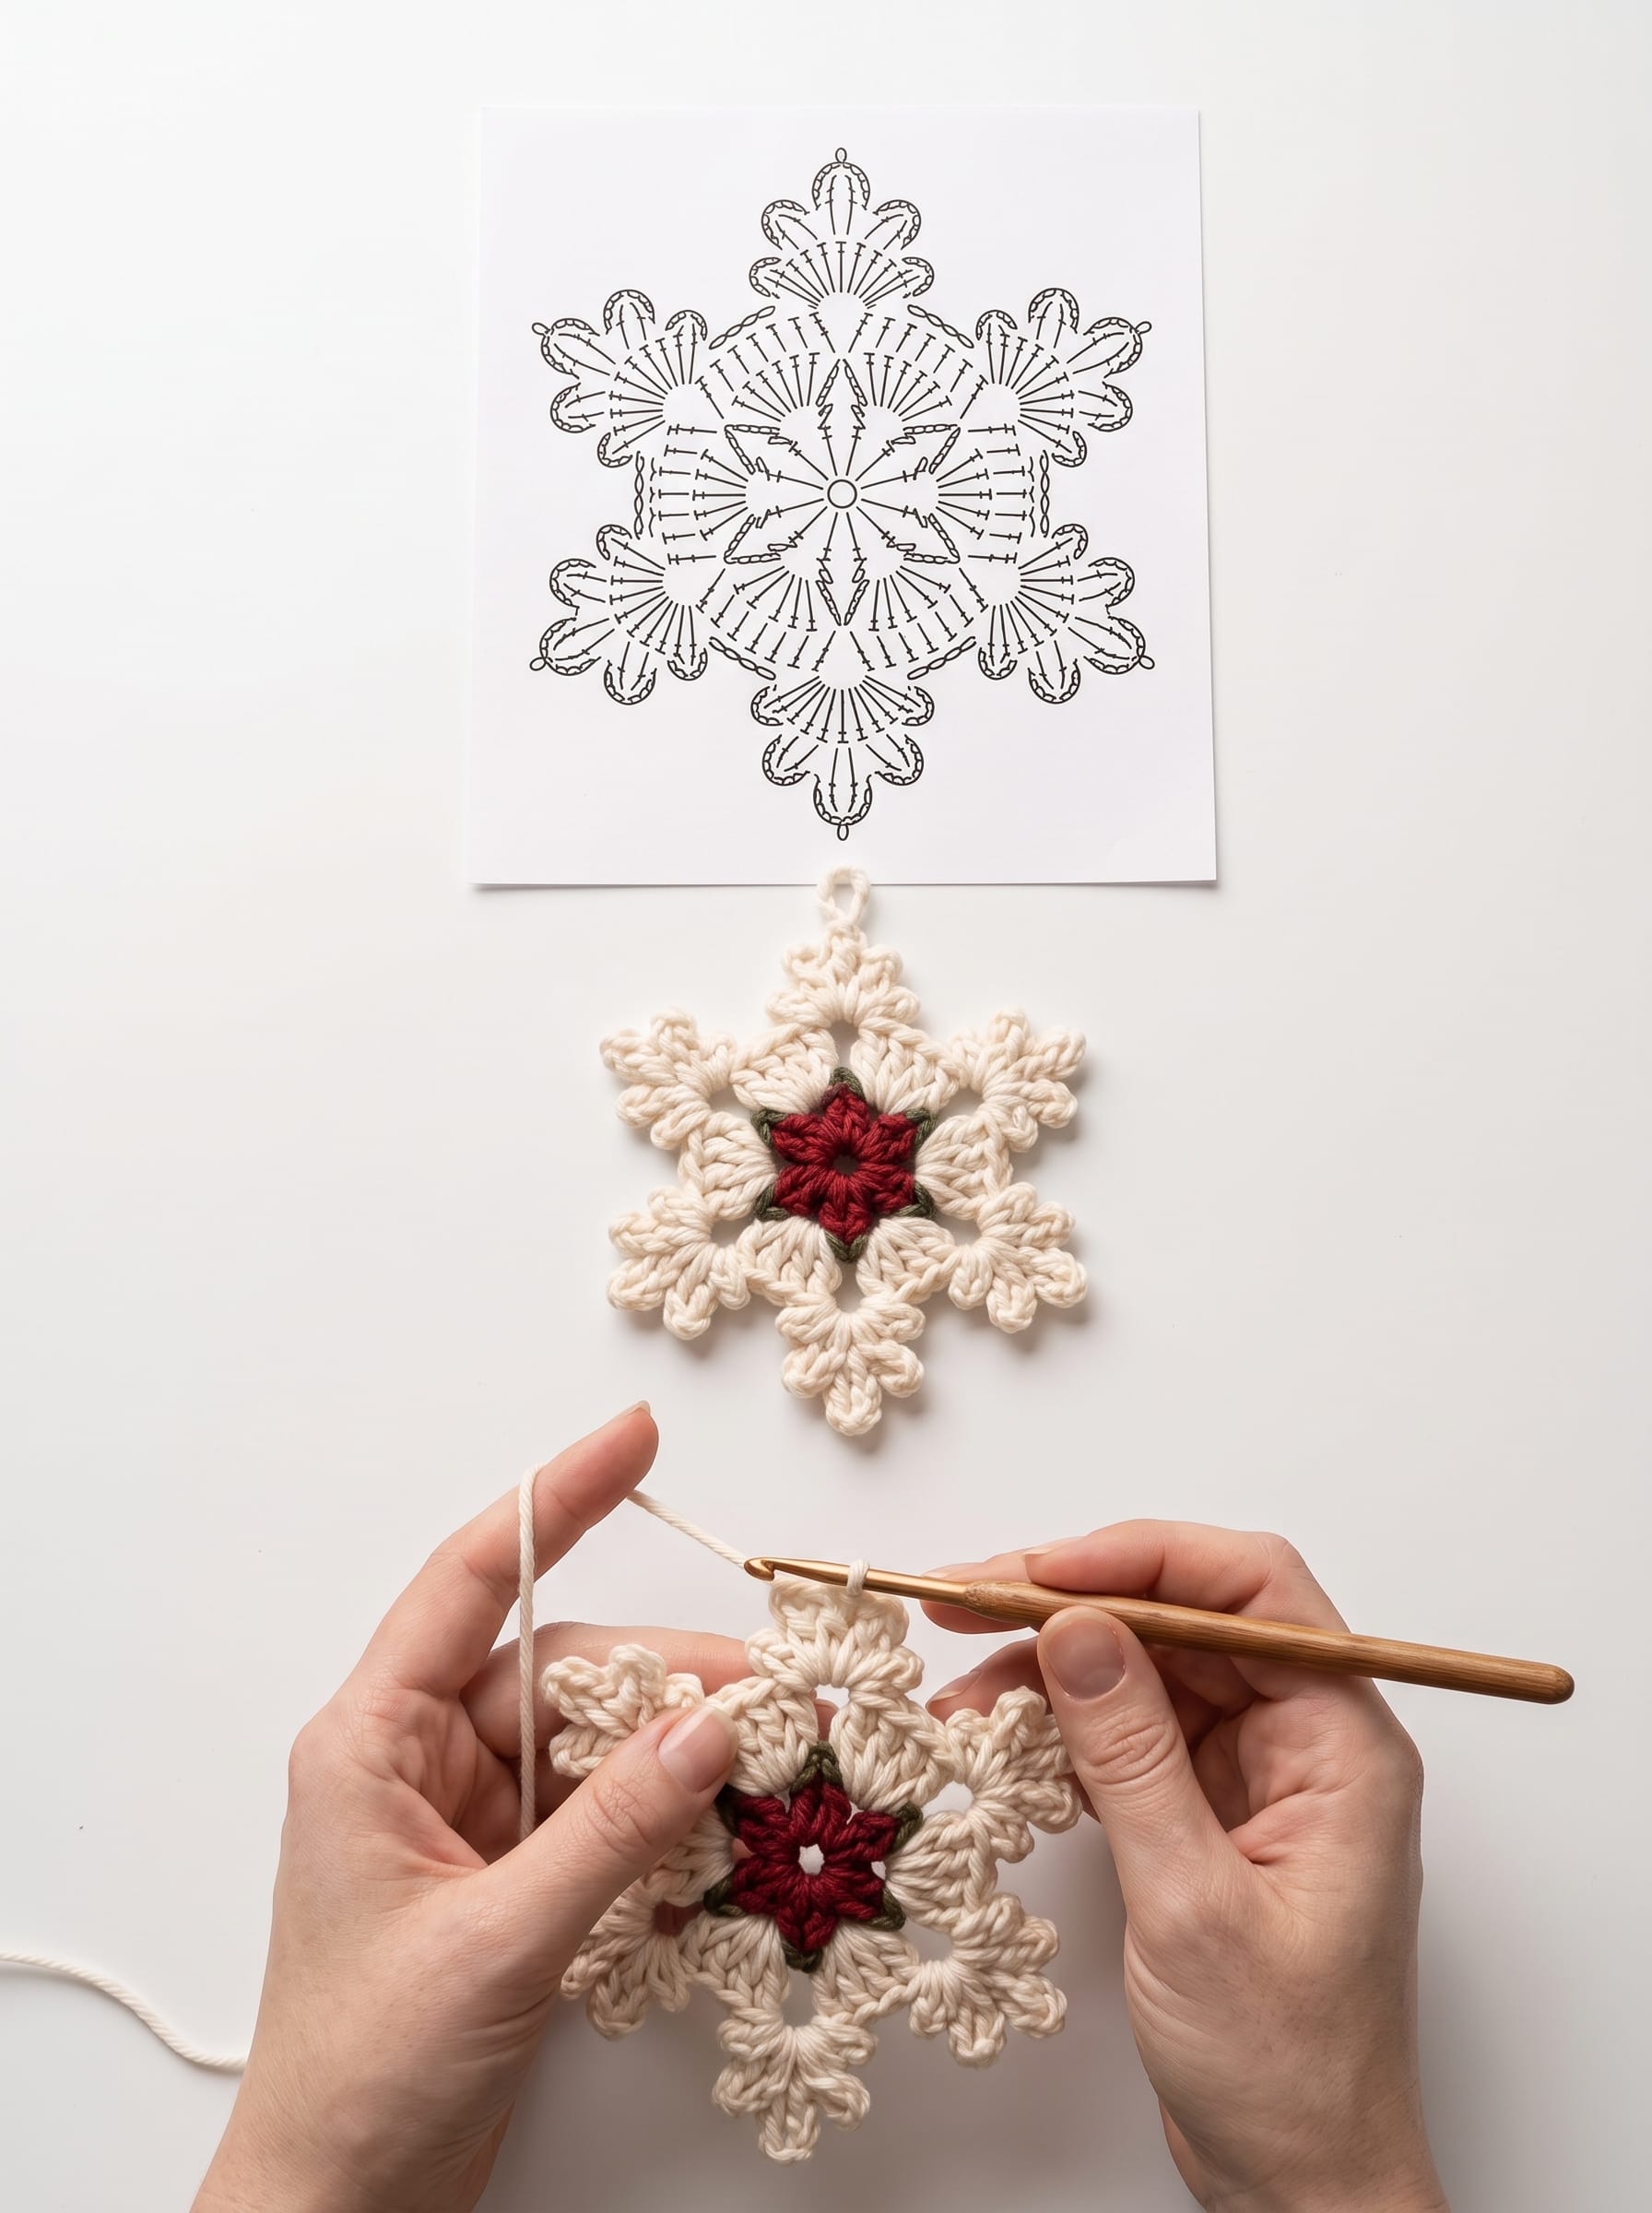
There is something magical about handmade Christmas decorations, and this crochet snowflake ornament is a beautiful little project to add to your holiday collection. With a deep red center and soft white petals, it has a delicate, wintry look while still being simple enough to make with basic crochet stitches.
This pattern is inspired by the snowflake shown in the photo and is designed as a similar written pattern rather than a transcription of the chart in the image.
You can make it as a Christmas tree ornament, gift topper, garland decoration, winter wall hanging, or handmade holiday gift.
Crochet Snowflake Ornament Pattern
Skill Level
Easy to Intermediate
You should be comfortable with:
- Magic ring
- Chain stitch
- Slip stitch
- Single crochet
- Double crochet
- Treble crochet
- Working several stitches into the same space
- Basic color changes
The pattern is worked from the center outward, creating a six-sided snowflake with a small red flower-like center.
Materials
For one crochet snowflake, you’ll need:
- White worsted-weight cotton yarn
- Red worsted-weight cotton yarn
- Crochet hook suitable for your yarn, approximately 3.5–4 mm
- Yarn needle
- Scissors
- Optional: fabric stiffener or diluted white glue for a firmer ornament
For the closest look to the photograph, choose a warm ivory or cream yarn instead of bright white.
Crochet Abbreviations
US crochet terminology:
| Abbreviation | Meaning |
|---|---|
| ch | Chain |
| sl st | Slip stitch |
| sc | Single crochet |
| hdc | Half double crochet |
| dc | Double crochet |
| tr | Treble crochet |
| st | Stitch |
| sp | Space |
| rep | Repeat |
| rnd | Round |
Note: The chain-2 or chain-3 at the beginning of a round does not count as a stitch unless specifically stated.
Step 1: Crochet the Red Center
Start with your red yarn.
Round 1
Make a magic ring.
Ch 3, then work 11 dc into the magic ring.
Pull the ring closed.
Sl st to the top of the beginning dc.
You should have 12 dc.
Round 2
Ch 1.
Work 2 sc into each stitch around.
Sl st to the first sc.
You should now have 24 stitches.
Fasten off the red yarn.
Don’t cut the tail too short—you can weave it in later.
Step 2: Attach the White Yarn
Join your white yarn to any stitch of the red center.
The white yarn will create the six snowflake points around the flower center.
Round 3
Ch 3.
In the same stitch, work:
2 dc, ch 2, 3 dc
Skip the next 3 stitches.
In the next stitch, work:
3 dc, ch 2, 3 dc
Repeat this pattern around.
You should have 6 groups.
Sl st to the beginning space.
This creates the foundation for the six snowflake arms.
Step 3: Create the Snowflake Points
Now we’ll begin forming the distinctive pointed shape.
Round 4
Sl st across to the first ch-2 space.
In the space, work:
sc, hdc, 3 dc, hdc, sc
This creates the first rounded point.
Ch 3.
In the next ch-2 space, repeat:
sc, hdc, 3 dc, hdc, sc
Continue around until all six points are completed.
Sl st to the first sc.
At this stage, your crochet should begin to resemble a small six-petal flower.
Step 4: Add the Decorative Petals
This is the round that gives the ornament its fuller, more dimensional appearance.
Join white yarn if necessary.
For each snowflake point:
- Sl st to the center of the point.
- Ch 4.
- Work 3 tr into the same space.
- Ch 3.
- Sl st into the same space.
- Ch 4.
- Work another 3 tr.
- Ch 3.
- Sl st into the same space.
Repeat around each of the six points.
This creates small loops and decorative clusters around the snowflake.
Step 5: Create the Outer Snowflake Shape
For a more pronounced snowflake silhouette, work along the outer edge.
Starting at one point:
sc in the next stitch, ch 3, skip 1 stitch, sc in the next stitch.
Continue along the first side of the point.
At the tip, work:
sc, ch 4, sc
in the same space.
Continue down the other side.
Repeat this detail around all six points.
The chain spaces create the little openings that make the snowflake look light and lacy.
Step 6: Add the Hanging Loop
To turn your crochet snowflake into a Christmas tree ornament, choose one of the six points as the top.
Join your white yarn at the tip.
Ch 18–22.
Sl st back into the same point.
Fasten off and weave in the ends.
You now have a simple hanging loop.
For a smaller ornament, use around 15 chains. For a larger loop, use 25 chains.
How to Shape the Snowflake
Crochet snowflakes often look much better after blocking.
Place your finished snowflake on a flat, protected surface.
Gently stretch the six points outward until they are evenly spaced.
Pin each point into position.
You can lightly spray the snowflake with water and allow it to dry completely.
For a stiffer Christmas ornament, you can use a small amount of fabric stiffener.
Once completely dry, remove the pins.
Your snowflake should hold its beautiful six-point shape.
Easy Color Variations
The red-and-cream combination gives this snowflake a cozy Christmas appearance, but there are many other possibilities.
Classic Christmas
- Red center
- Cream or white snowflake
Traditional Winter
- White center
- White snowflake
- Silver thread
Scandinavian Style
- Red center
- Natural cream yarn
Elegant Christmas
- White yarn
- Metallic gold or silver center
Rustic Farmhouse
- Burgundy center
- Ivory yarn
- Natural jute hanging loop
How to Make the Snowflake Larger
Want a larger crochet snowflake?
It’s easy to adjust the size.
Use:
- A larger crochet hook
- Thicker yarn
- An additional decorative round around the outside
For example, chunky yarn with a 5–6 mm hook can turn this small ornament into a beautiful Christmas wreath accent or winter wall decoration.
How to Make a Set of Crochet Snowflakes
One of the best things about this pattern is that you can make several snowflakes in different sizes.
Try making:
- 3 small snowflakes
- 3 medium snowflakes
- 2 large snowflakes
Hang them together at different lengths to create a beautiful crochet Christmas garland.
You could also attach them to a length of ribbon and use them as a mantel decoration.
What Can You Do With Crochet Snowflakes?
These handmade snowflakes aren’t only for Christmas trees.
Use them as:
🎄 Christmas tree ornaments
🎁 Gift toppers
🏠 Winter home decorations
✨ Garland decorations
❄️ Window decorations
🕯️ Table decorations
🎀 Holiday wreath embellishments
🎁 Handmade Christmas gifts
☕ Mug or cup decorations
🧶 Crochet market items
They are also a wonderful way to use leftover yarn.
Tips for Making a Beautiful Crochet Snowflake
1. Keep your tension consistent
If your stitches become too loose or too tight, the six points may not sit evenly.
2. Count your sections
A snowflake looks best when all six arms are approximately the same size.
3. Block the finished piece
Blocking makes a surprisingly big difference. It helps define the points and opens the lacework.
4. Choose cotton yarn
Cotton holds its shape well and gives the finished ornament a crisp, handmade appearance.
5. Hide your yarn ends carefully
Because snowflakes are open and lacy, weave the ends through several stitches before trimming them.
Free Crochet Snowflake Pattern at a Glance
Center: Red
Outer snowflake: Cream/white
Shape: Six-point snowflake
Hook: 3.5–4 mm
Yarn: Worsted-weight cotton
Skill: Easy–Intermediate
Finished size: Approximately 4–6 inches, depending on yarn and tension
Frequently Asked Questions
How long does it take to crochet a snowflake?
Once you’re familiar with the pattern, one snowflake can usually be completed fairly quickly. Your speed will depend on your yarn weight, hook size, and experience.
Can beginners make this crochet snowflake?
Yes. The basic shape uses common crochet stitches, although the decorative outer rounds require a little more concentration.
What yarn is best for crochet snowflakes?
Cotton yarn is an excellent choice because it produces defined stitches and blocks nicely. Acrylic yarn can also work if that’s what you have available.
Can I sell finished crochet snowflakes?
Yes, you can sell finished items you make from your own crochet work. If you’re publishing this pattern on a blog, however, it’s best to write your own instructions and photography rather than copying another designer’s pattern.
How do I make my snowflake stiff?
Blocking with fabric stiffener is one option. You can also use a suitable craft stiffening solution to help the snowflake maintain its shape.
Final Thoughts
This crochet snowflake ornament is a small project with a big holiday payoff. The combination of the deep red center and delicate cream snowflake petals gives it a warm handmade Christmas feeling that looks beautiful on a tree, gift package, wreath, or winter display.
Make one for yourself, or crochet a whole collection in different colors and sizes. They’re quick enough to make several while watching your favorite holiday movie—and they also make thoughtful handmade gifts.
Save this pattern for your Christmas crochet projects and share it with someone who loves handmade holiday decorations!