
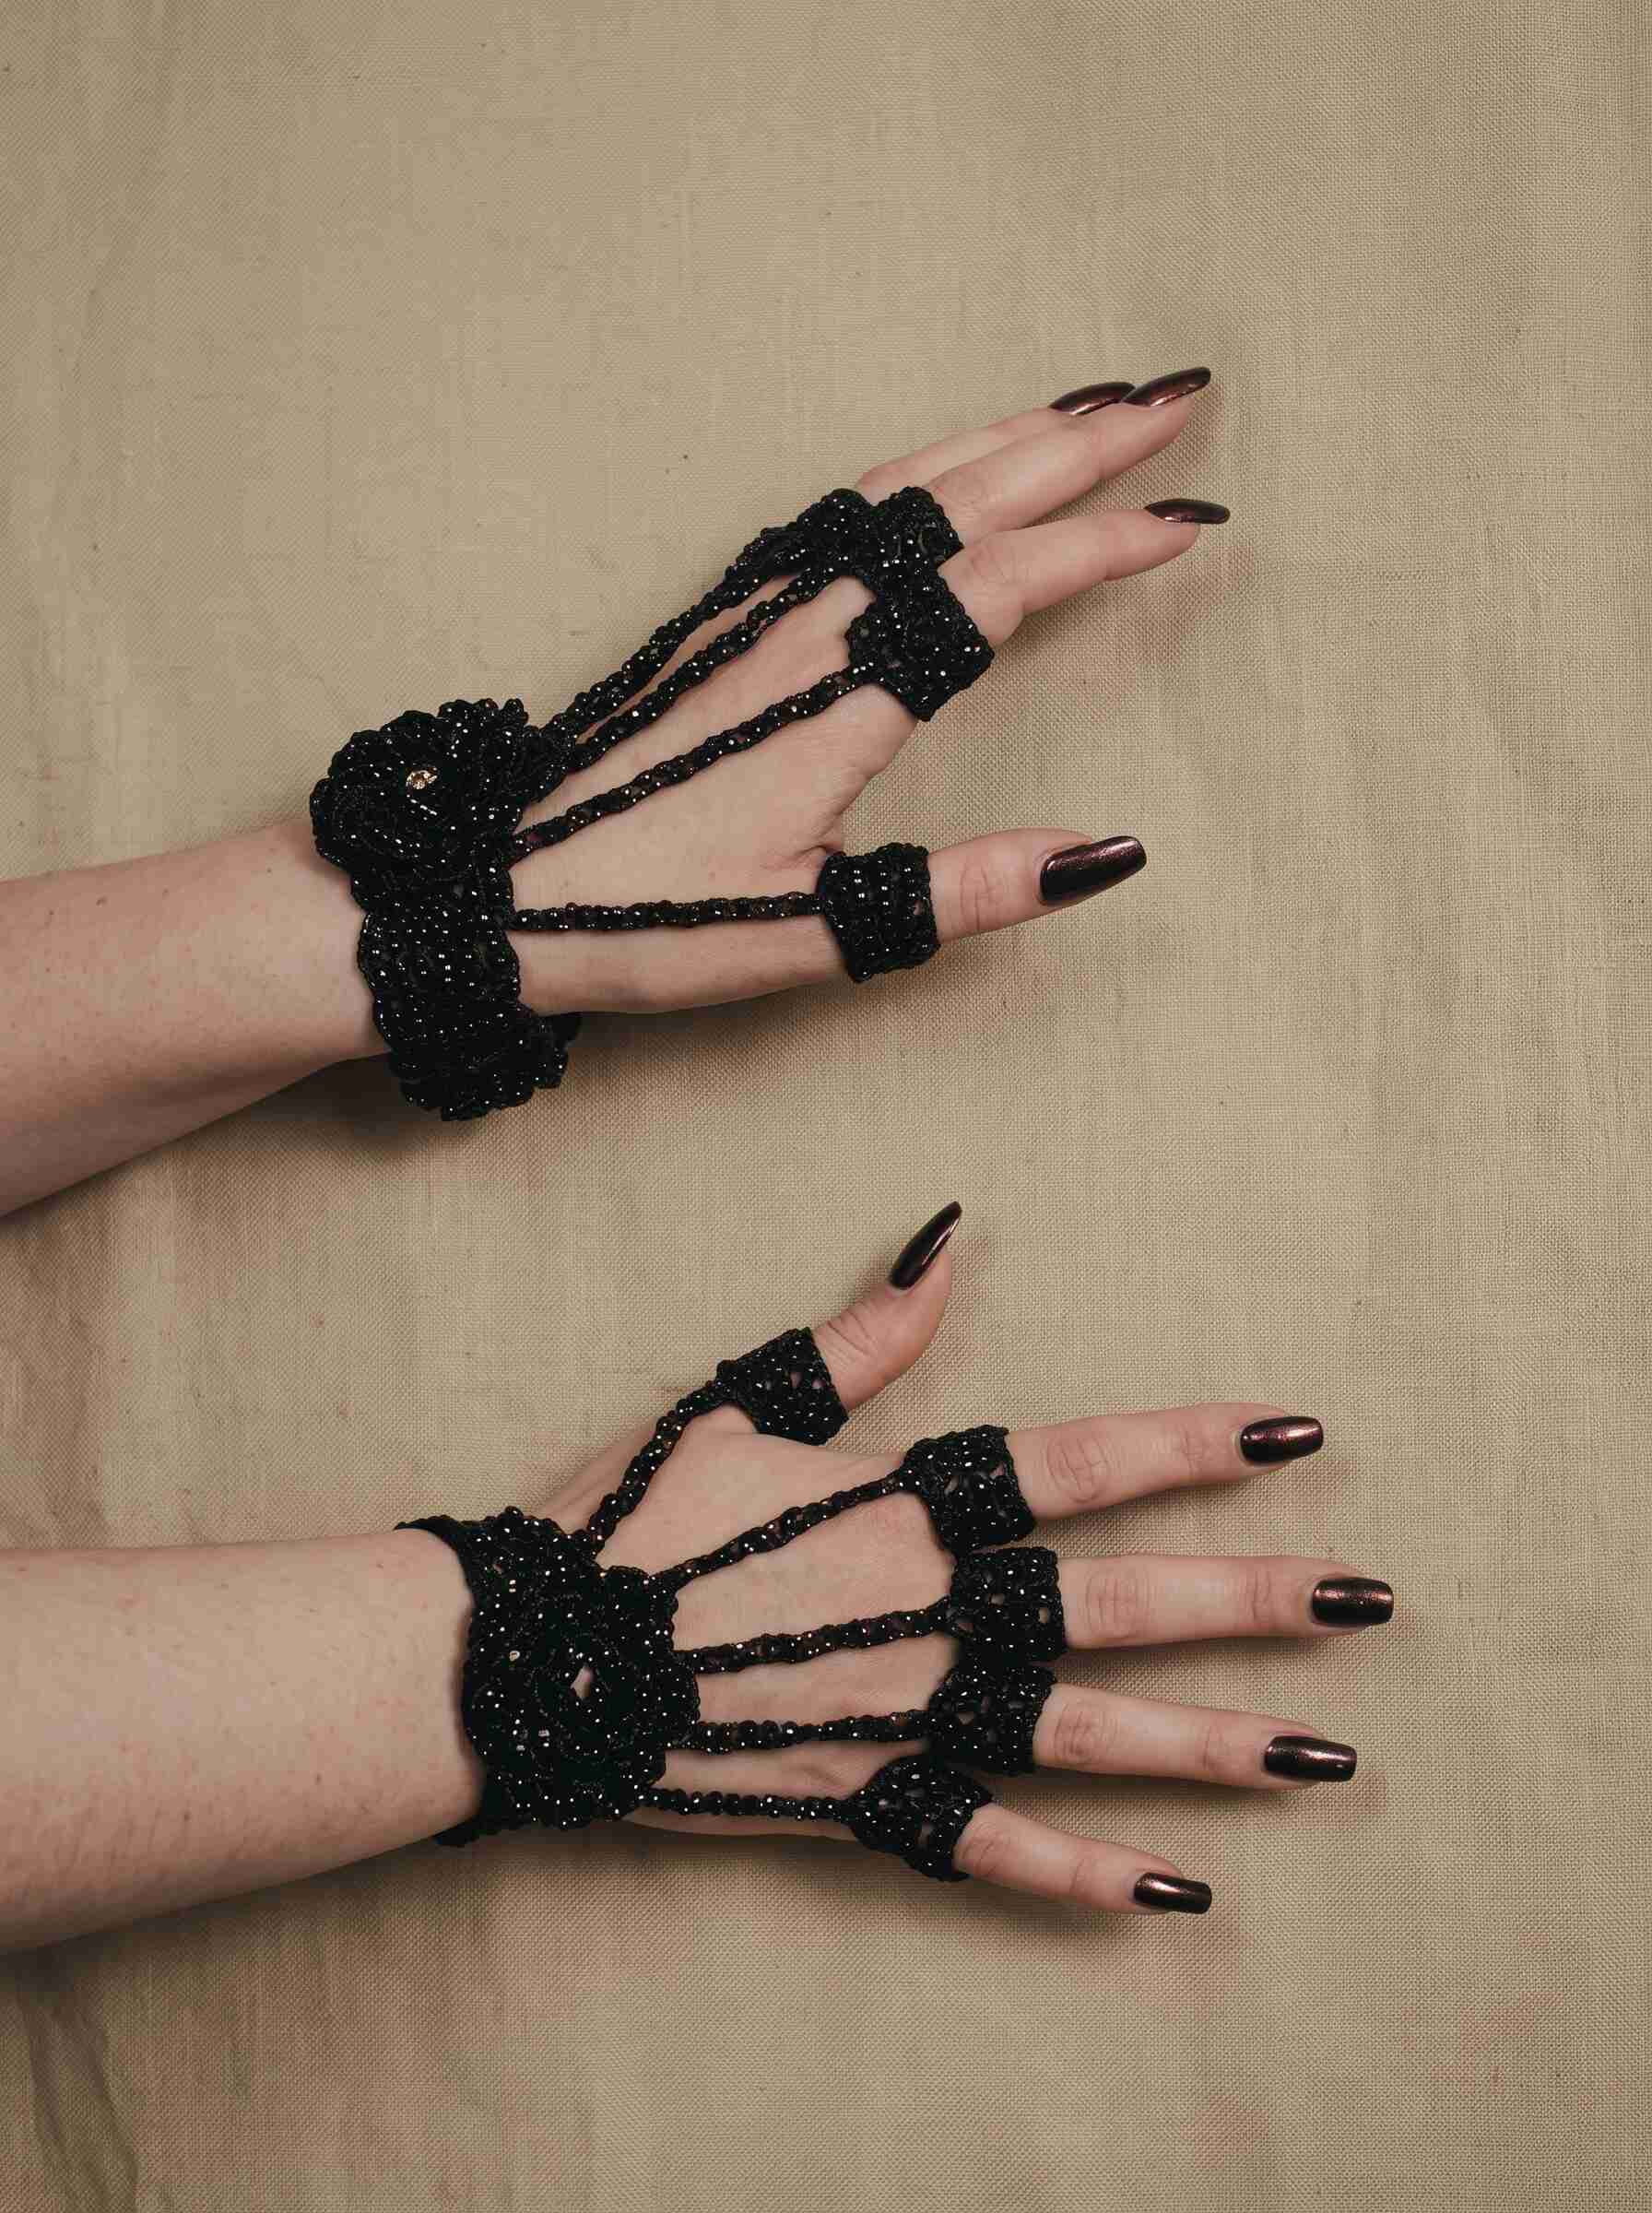
This crochet hand harness is a fun way to turn simple crochet stitches into a dramatic piece of wearable jewelry. It combines a crochet wrist cuff, decorative flower centerpiece, finger loops, and thin connecting chains to create the elegant hand-chain effect seen in the photo.
It is lightweight, adjustable, and can be customized with different colors, beads, or metallic threads.
The design is especially suitable for gothic outfits, alternative fashion, Halloween costumes, festivals, cosplay, dance costumes, and statement accessories.
Materials
- Black crochet thread, size 10 or similar
- 1.5–2.0 mm crochet hook
- Small black seed beads or faceted beads
- Beading needle
- Matching black sewing thread
- Stitch marker
- Scissors
- Yarn needle
- Measuring tape
Optional
For an especially sparkly finish, use:
- Black metallic crochet thread
- Black glass seed beads
- Small faceted crystal beads
- Silver or gunmetal beads for contrast
Finished Size
The pattern is designed to fit an average adult hand.
Approximate measurements:
- Wrist cuff: 6–7 inches circumference
- Cuff width: 1½–2 inches
- Finger loops: adjustable
- Connecting chains: approximately 2½–4½ inches, depending on finger size
For the best fit, measure your wrist and hand before beginning.
Crochet Abbreviations
- ch – chain
- sl st – slip stitch
- sc – single crochet
- hdc – half double crochet
- dc – double crochet
- st/sts – stitch/stitches
- rep – repeat
- sp – space
- MR – magic ring
US crochet terminology is used.
How to Add Beads
For the look shown in the photograph, small black beads can be added throughout the crochet.
The easiest method is to pre-string the beads onto the crochet thread before crocheting.
Basic beaded single crochet
- Slide one bead close to the hook.
- Insert your hook into the next stitch.
- Pull up a loop.
- Push the bead against the work.
- Complete the single crochet normally.
Repeat whenever you want a bead.
For the delicate straps, placing one bead approximately every chain or every second chain creates the sparkling appearance of the original design.
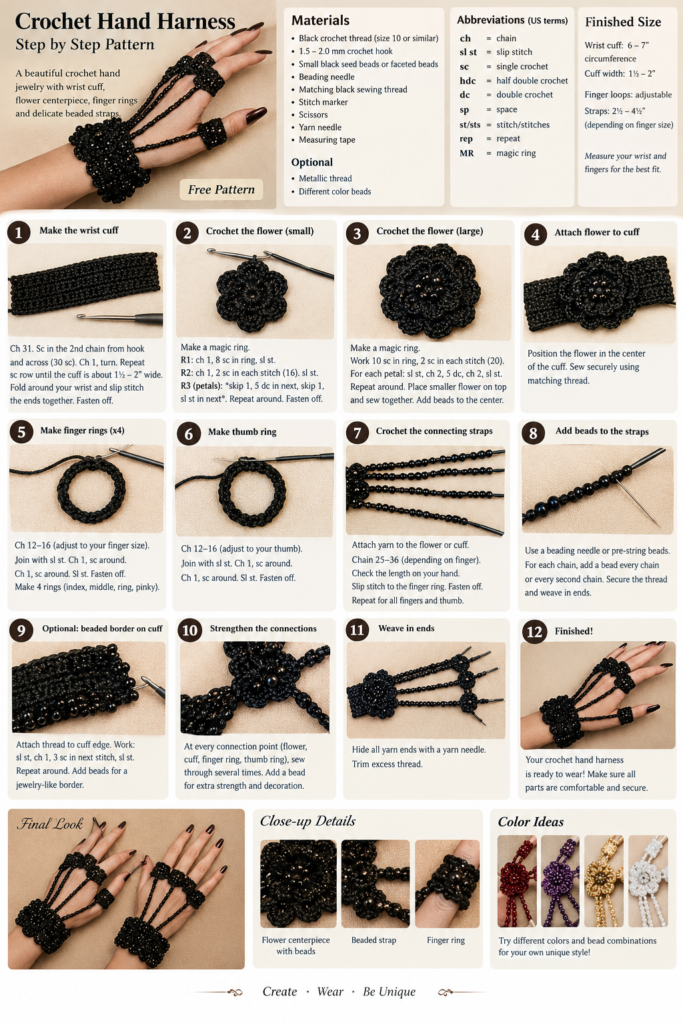
Part 1: Crochet Wrist Cuff
Begin with the wrist cuff.
Foundation
Chain 31.
Adjust the number of chains so the foundation fits comfortably around your wrist.
Remember that the cuff should be snug but not tight.
Row 1
Single crochet in the second chain from the hook.
Sc across.
You should have 30 sc.
Rows 2–10
Ch 1 and turn.
Sc in every stitch across.
Repeat until the cuff measures approximately 1½–2 inches wide.
For a wider cuff, continue adding rows.
Joining the Cuff
Fold the strip around your wrist.
Slip stitch the two short ends together, making sure the seam is secure.
Fasten off and weave in the end.
You now have a simple crochet wrist cuff.
Part 2: Decorative Flower Center
The flower is the focal point of the hand harness.
You can make a simple layered crochet flower and attach it to the top of the cuff.
Center
Make a magic ring.
Round 1:
- Ch 1
- Work 8 sc into the ring
- Sl st to the first sc
Pull the ring closed.
Round 2
Ch 1.
Work 2 sc into each stitch around.
You should have 16 stitches.
Sl st to join.
Round 3 – Petals
Skip the next stitch, work 5 dc into the next stitch, skip the next stitch, sl st into the following stitch.
Repeat around.
This creates approximately 8 small petals.
Fasten off.
Add a Second Layer
For a fuller flower like the one shown in the photograph, make another slightly larger flower.
Make a magic ring.
Work:
- 10 sc into the ring
- 2 sc in each stitch around
You should have 20 stitches.
For each petal:
Sl st into the next stitch, ch 2, 5 dc into the next stitch, ch 2, sl st into the next stitch.
Repeat around.
Place the smaller flower on top of the larger flower and sew the centers together.
For additional sparkle, sew several black beads into the center.
Part 3: Attach the Flower to the Cuff
Position the flower on top of the wrist cuff.
The flower should sit approximately in the center of the back of the hand when the cuff is worn.
Using matching thread, sew the flower securely to the cuff.
For the raised, textured appearance shown in the image, don’t flatten the petals completely. Allow them to overlap slightly.
Part 4: Finger Rings
The design uses small crochet bands around the fingers.
You can make four or five finger loops, depending on how you want your harness to look.
For each finger:
Chain enough stitches to comfortably fit around the finger.
For an average adult finger, start with approximately:
12–16 chains
Join with a slip stitch to form a ring.
Round 1
Ch 1.
Sc around.
Sl st to join.
Round 2
Ch 1.
Sc around.
Sl st to join.
Fasten off.
Weave in the end.
Repeat for each finger.
Important
Finger sizes vary considerably, so measure each finger individually rather than relying on a fixed stitch count.
The loops should slide comfortably over the finger without feeling tight.
Part 5: Crochet Hand Straps
This is what gives the project its distinctive hand-chain appearance.
The straps connect the flower/cuff area to the finger rings.
Use your smallest hook and the same black thread.
For each strap, crochet a narrow chain.
Index Finger Strap
Attach the yarn to the flower or cuff.
Chain approximately 25–30 chains.
Check the length across the back of the hand.
The chain should reach the base of the index-finger ring without pulling.
Adjust the length if necessary.
Slip stitch into the finger ring.
Fasten off.
Middle Finger Strap
Attach yarn to the center flower.
Chain approximately 28–34 chains.
Slip stitch into the middle-finger ring.
Fasten off.
Ring Finger Strap
Attach yarn to the flower or cuff.
Chain approximately 30–36 chains.
Connect to the ring-finger loop.
Fasten off.
Pinky Finger Strap
Make a slightly longer or shorter chain depending on your hand size.
Attach it between the central flower and the pinky loop.
Fasten securely.
Thumb Strap
The thumb connection is slightly different.
Attach the yarn to the side of the wrist cuff.
Chain approximately 25–30 chains.
Try the harness on your hand.
The chain should travel comfortably along the back of your hand toward the thumb.
Slip stitch into the thumb ring.
Fasten off.
Part 6: Add Beads to the Straps
This step gives the harness the beautiful sparkling appearance visible in the photograph.
If you have not pre-strung beads, sew individual beads onto the completed chains.
Using a beading needle and matching thread:
- Bring the needle through the crochet chain.
- Thread on one bead.
- Pass the needle back through the crochet.
- Secure the thread.
- Repeat along each strap.
Place the beads close together for a heavily embellished look.
For a more delicate design, leave approximately ¼ inch between beads.
Part 7: Strengthen the Connections
Because the straps are very thin, the connection points need to be reinforced.
At every point where a chain meets:
- the flower
- wrist cuff
- finger ring
- thumb ring
Sew through the connection several times.
Add a small bead over the connection if desired.
This both strengthens the harness and makes the attachment look decorative.
Optional Decorative Border
For a more elaborate gothic look, add a beaded border around the wrist cuff.
Attach black thread to the edge.
Work:
sl st, ch 1, 3 sc in the next stitch, sl st in the following stitch
Repeat around the cuff.
Add small beads to the outer edge as you crochet.
This creates a scalloped, jewelry-like border similar to the textured edges visible in the photograph.
Finishing
Carefully weave all yarn ends into the back of the work.
Trim excess thread.
Before wearing, gently stretch each finger loop and check that:
- The wrist cuff is comfortable.
- The finger rings aren’t too tight.
- The straps don’t restrict finger movement.
- The flower sits centrally on the back of the hand.
- All connections are securely sewn.
Do not make the finger loops or wrist cuff so tight that they restrict circulation.
Customizing Your Crochet Hand Harness
There are many ways to change this design.
Gothic Black
Use:
- Black crochet thread
- Black glass beads
- Black metallic thread
Romantic Version
Try:
- Burgundy
- Deep purple
- Black
- Small pearl beads
Fairy/Festival Version
Use:
- Metallic gold thread
- Silver beads
- Crystal beads
- Iridescent seed beads
Halloween Version
Use black thread with orange, purple, or dark red beads.
Tips for Getting the Look in the Photo
The distinctive appearance comes from several design details:
Thin straps: Use fine crochet thread rather than thick yarn.
Small beads: Tiny seed beads create the delicate sparkling effect.
Wide cuff: A wider wrist section provides a strong base for the centerpiece.
Layered flower: Two or three crochet layers make the center look fuller.
Small finger rings: Keep the finger bands relatively narrow so the straps remain the visual focus.
Black-on-black texture: Combining slightly different black threads or shiny beads creates depth even without changing colors.
Pattern Summary
The finished crochet hand harness consists of:
- One crochet wrist cuff
- One layered crochet flower
- Four or five finger rings
- One thumb ring
- Five or six narrow connecting straps
- Optional black beads
- A decorative cuff border
The great thing about this design is that it can be completely customized to your own hand. Measure the wrist and fingers first, then adjust the chain lengths rather than trying to force the pattern to a fixed size.
More Crochet Jewelry Ideas
If you love unusual crochet accessories, this hand harness can be adapted into a matching crochet bracelet, gothic choker, fingerless gloves, arm cuffs, anklets, or festival jewelry. Using metallic thread and beads can also transform the same basic construction into a completely different style.