
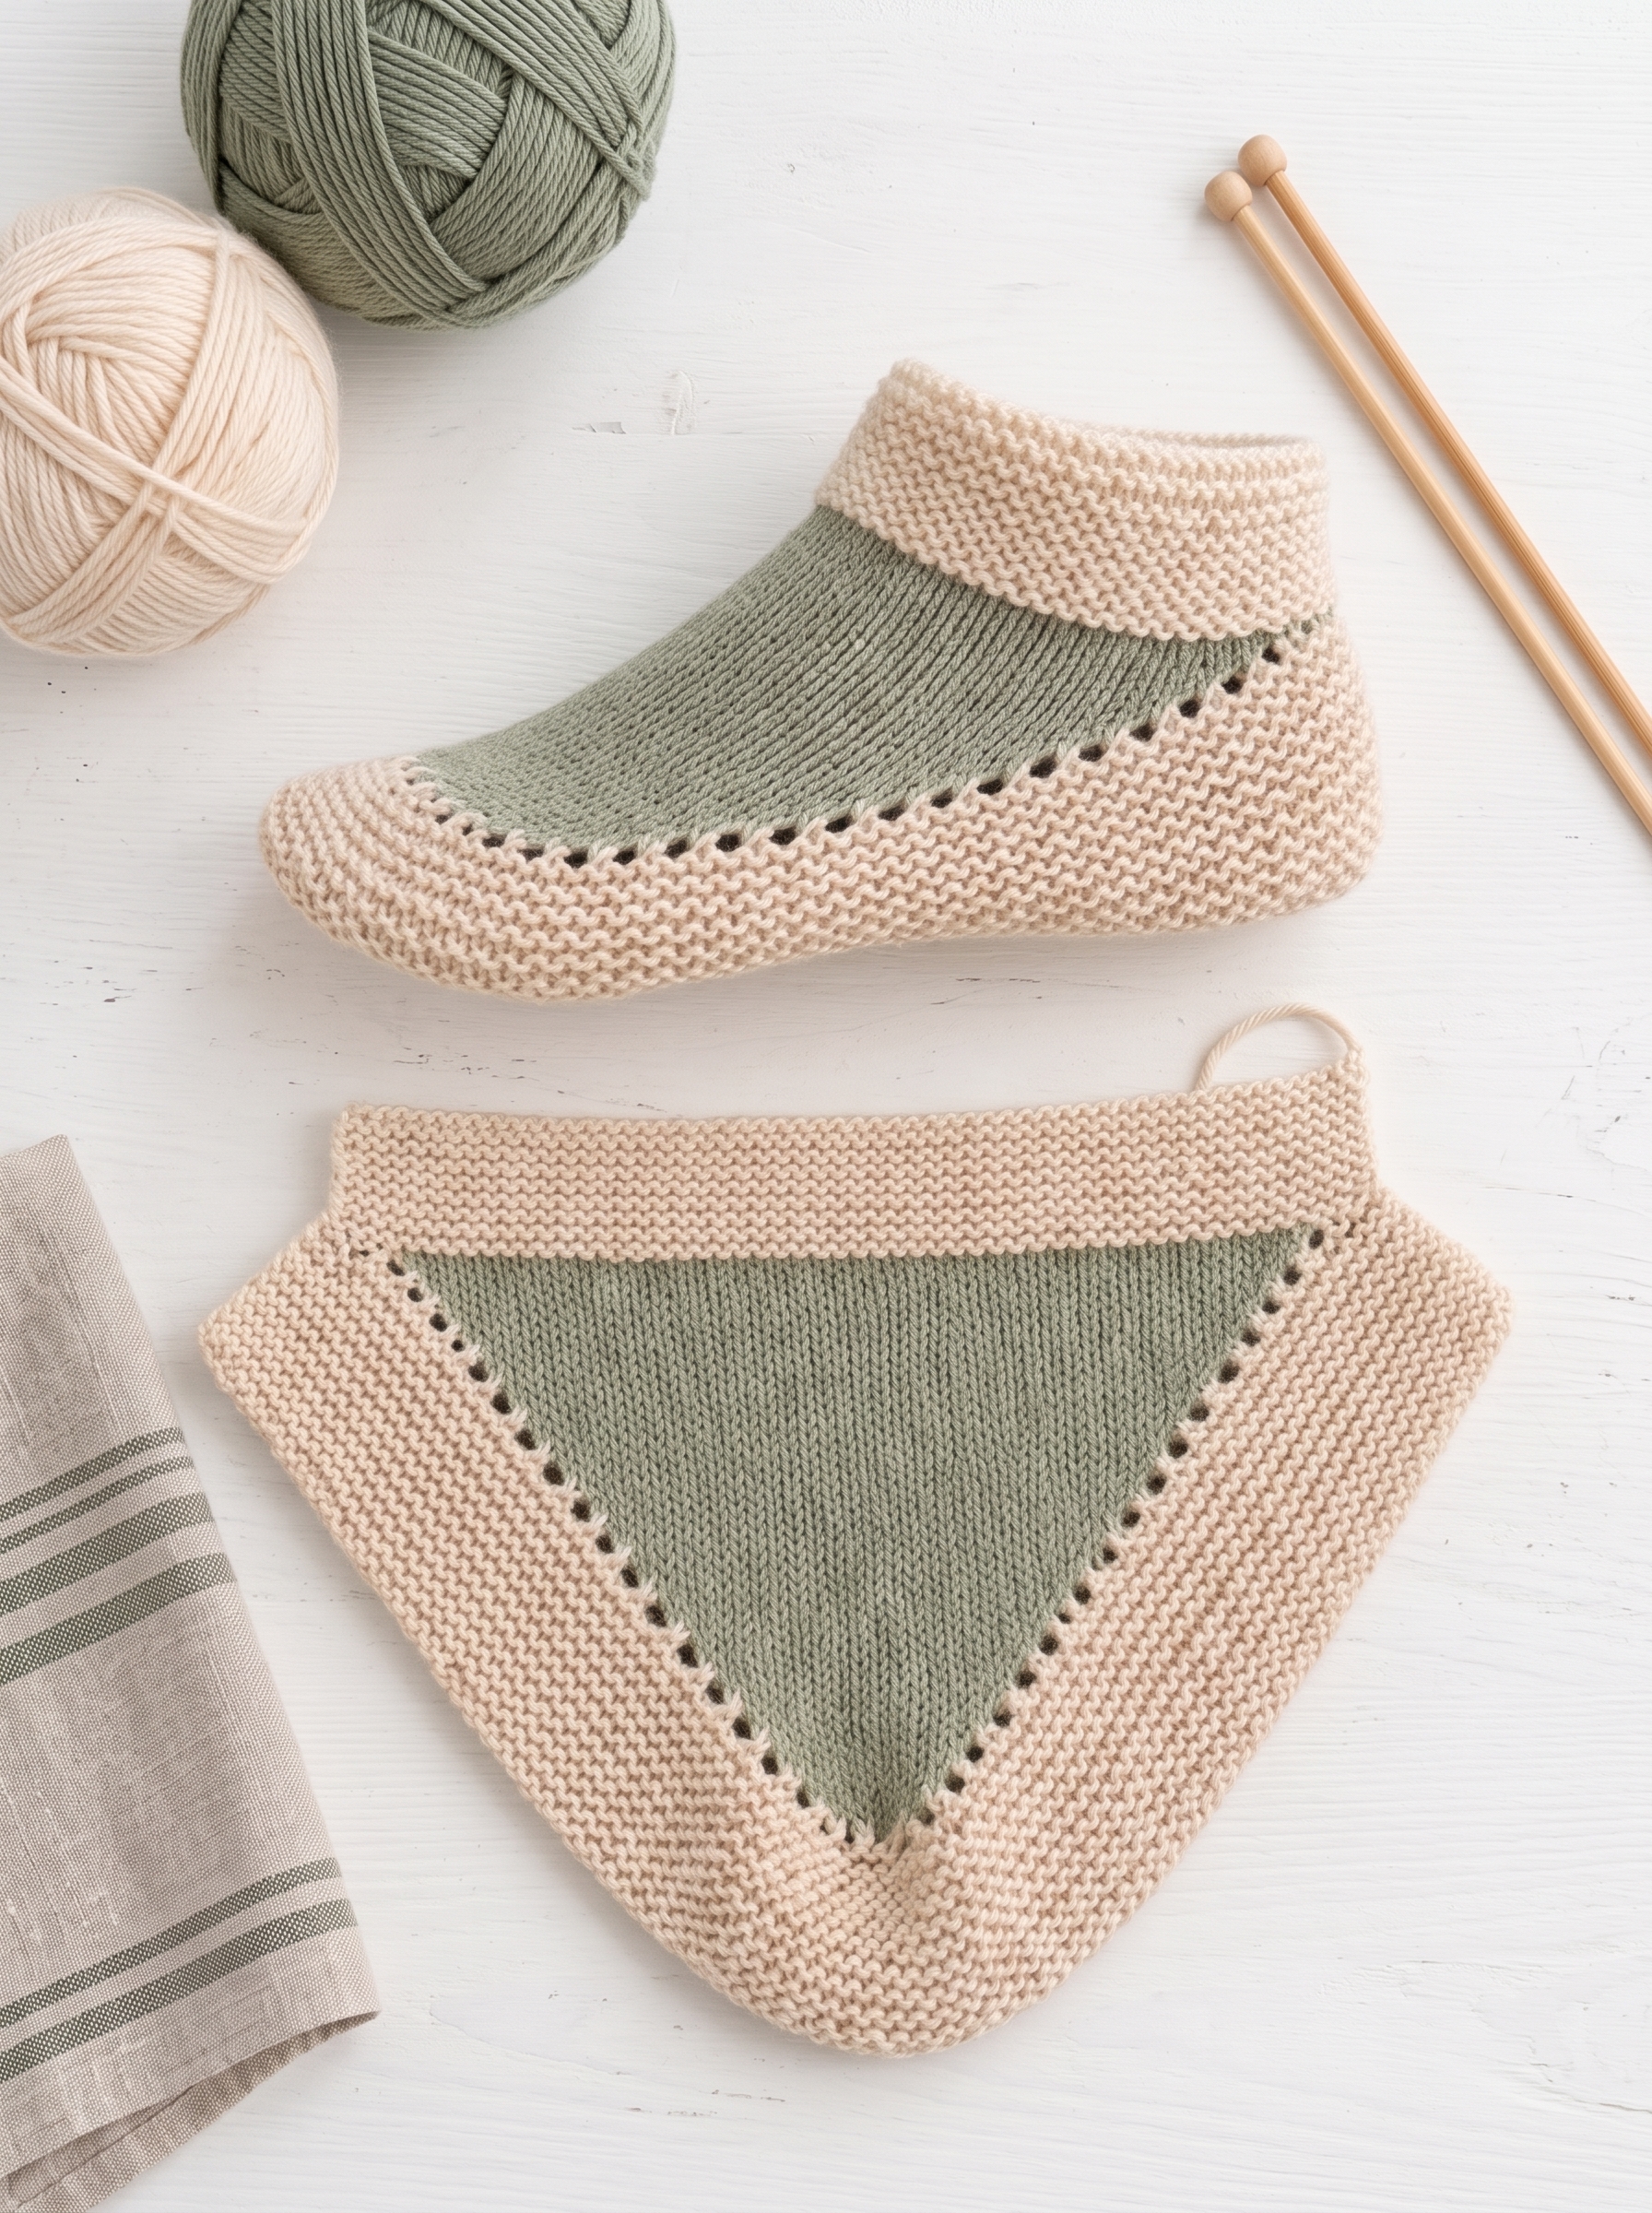
Looking for a cozy handmade project to keep your feet warm? These easy flat-knit slippers feature a beautiful combination of soft cream yarn and muted sage green. The textured garter-stitch edging gives them a charming handmade appearance, while the smooth green section adds a lovely contrast.
This beginner-friendly knitting project is worked flat with straight knitting needles, making it a wonderful option for knitters who prefer simple techniques over knitting in the round.
Whether you’re making a comfortable pair for yourself or creating a thoughtful handmade gift, these two-color knitted house slippers are a lovely addition to your knitting projects.
Pattern details
- Skill level: Beginner to easy intermediate
- Technique: Knitting flat with straight needles
- Construction: Knitted panels assembled with seams
- Main stitch: Garter stitch
- Accent stitch: Stockinette stitch
- Colors: Cream and sage green
- Size: Adult medium, approximately US women’s shoe sizes 7–9, depending on gauge and fit
- Customization: Instructions for adjusting the length and width
Note: This is an original, approximate pattern inspired by the appearance of the supplied photograph. It is not a verified stitch-for-stitch reproduction of the pictured slippers.
Materials You Will Need
- Worsted-weight yarn in cream (approximately 100–120 g)
- Worsted-weight yarn in sage green (approximately 40–50 g)
- Straight knitting needles, approximately 4.5–5 mm
- Tapestry needle for sewing seams
- Stitch markers
- Scissors
- Measuring tape
Choose soft, washable yarn for comfortable indoor slippers. For extra grip, consider adding a suitable non-slip sole treatment after finishing.
Abbreviations
- CO: Cast on
- BO: Bind off
- K: Knit
- P: Purl
- St(s): Stitch(es)
- RS: Right side of the work
- WS: Wrong side of the work
- K2tog: Knit two stitches together
- Rep: Repeat
Stitch Guide
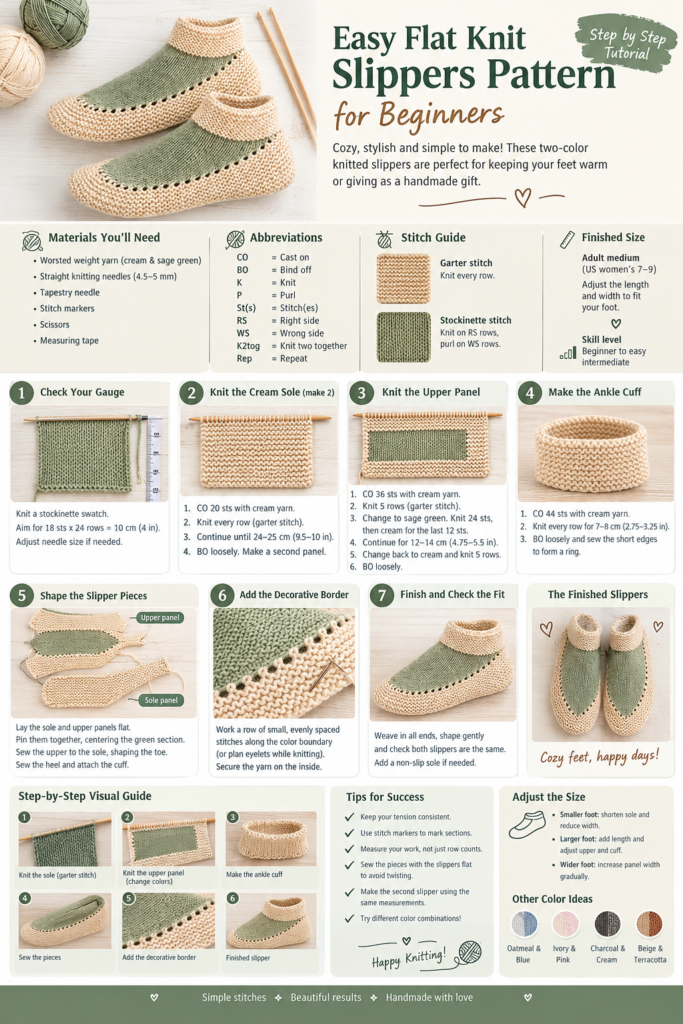
Garter stitch: Knit every stitch on every row. This creates the bumpy, textured fabric used for the cream border.
Stockinette stitch: Knit on the right-side rows and purl on the wrong-side rows. This creates the smooth fabric used for the sage-green panel.
Step 1: Check Your Gauge
Before starting, knit a small stockinette swatch.
Aim for approximately 18 stitches and 24 rows over 10 cm (4 inches), using your chosen yarn and needles.
Gauge may vary with yarn thickness and knitting tension. Adjust your needle size if necessary, and measure your work as you go.
Step 2: Knit the Cream Slipper Sole
The sole is worked flat in garter stitch.
- Using cream yarn, CO 20 stitches.
- Knit every stitch on every row.
- Continue until the panel measures approximately 24–25 cm (9.5–10 inches), or the length needed for your foot.
- BO all stitches loosely.
- Make a second sole panel using the same instructions.
These rectangular panels provide a simple base for the beginner construction. The finished slipper shape will depend on how the upper pieces are shaped and sewn.
Step 3: Knit the Sage-Green Upper Panel
This panel creates the smooth contrasting section visible on the top of the slipper.
- Using cream yarn, CO 36 stitches.
- Knit 5 rows in garter stitch to form the lower border.
- Change to sage-green yarn.
- On the RS, knit 24 stitches, then change to cream yarn and knit the remaining 12 stitches.
- On the WS, knit the cream border stitches and purl the green section, maintaining the established color sections.
- Continue in this manner for approximately 12–14 cm (4.75–5.5 inches), checking the panel against the foot as you work.
- Change back to cream yarn and knit 5 rows in garter stitch.
- BO loosely.
For a more symmetrical two-color design, keep the cream border stitches consistent on both sides and use stitch markers to identify the green section.
Important: This simple panel is a starting construction, not an exact replica of the triangular green inset in the photograph. To reproduce that inset, you would need additional shaping and a carefully planned colorwork or separate-panel construction.
Step 4: Shape and Prepare the Ankle Opening
To create a comfortable opening around the ankle, prepare a separate cream cuff.
- Using cream yarn, CO 44 stitches.
- Knit every stitch on every row.
- Continue until the cuff measures approximately 7–8 cm (2.75–3.25 inches).
- BO loosely, leaving enough stretch for the foot to pass through.
Fold the cuff in half and sew the short edges together to form a ring.
Try the cuff around your ankle before attaching it. If it feels too tight, add stitches; if it feels too loose, reduce the number of stitches.
Step 5: Assemble the Slipper
Lay one sole panel flat with the garter-stitch texture facing outward.
- Position the upper panel over the sole, centering the sage-green section.
- Pin the edges in place so the fabric does not shift while sewing.
- Using cream yarn and a tapestry needle, sew the upper panel to the sole around the sides.
- Shape the toe gently as you sew, easing any extra fabric evenly around the front.
- Sew the back edges together to form the heel.
- Attach the cream cuff around the ankle opening, distributing the stitches evenly.
- Repeat the process for the second slipper.
Use small, flexible seams so the slippers remain comfortable when worn. Avoid pulling the sewing yarn too tightly, as this can distort the shape.
Step 6: Add the Decorative Border
The photograph features a dotted-looking line between the cream and green sections.
You can recreate a similar effect by working a row of small, evenly spaced decorative stitches along the color boundary.
- Thread a tapestry needle with cream or contrasting yarn.
- Bring the needle through the fabric at regular intervals along the boundary.
- Keep each stitch approximately the same size.
- Secure the yarn neatly on the inside.
Alternatively, if you want small open eyelets, plan a yarn-over and decrease row when knitting the panel. Eyelets must be incorporated into the knitting itself; they cannot be reliably created simply by sewing decorative stitches afterward.
Step 7: Finish and Check the Fit
- Weave in all loose yarn ends.
- Gently shape the slippers by hand.
- Check that both slippers have similar dimensions.
- Try them on and check the toe, heel, and ankle opening.
- Add a non-slip finish to the soles if needed, following the product instructions.
Avoid aggressive stretching or blocking, particularly if you are using a yarn that can lose its shape when wet.
How to Customize Your Knitted Slippers
For a smaller foot: Shorten the sole panels and reduce the upper-panel width to suit the intended foot.
For a larger foot: Add length to the sole panels and adjust the upper panel and cuff accordingly.
For a wider foot: Increase the panel width gradually and check the fit before completing the seams.
For a different color combination: Try oatmeal and dusty blue, ivory and blush pink, or charcoal and cream.
For a warmer slipper: Choose a soft wool blend or a thicker yarn, then check the gauge and adjust the panel measurements.
Tips for Beginner Knitters
- Keep your tension consistent throughout both slippers.
- Count your stitches after changing colors.
- Use stitch markers to identify the border and center sections.
- Measure the fabric rather than relying only on row counts.
- Sew the pieces together with the slippers laid flat to prevent twisting.
- Make the second slipper using the same measurements as the first.
Frequently Asked Questions
Are these knitted slippers suitable for beginners?
Yes. The basic techniques are simple, including knitting, purling, changing colors, binding off, and sewing seams. The most challenging part is shaping and assembling the panels neatly.
Can I knit these slippers with straight needles?
Yes. The construction described here uses straight knitting needles and flat pieces of fabric.
Can I use a different yarn weight?
Yes, but changing the yarn weight will affect the finished size and texture. Make a gauge swatch and adjust the stitch counts and measurements as needed.
How do I make the slippers non-slip?
You can add a suitable non-slip product or sew on a compatible sole material. Test the finished sole on your floor before relying on it for traction.
Can I sell slippers made from this pattern?
You can generally sell finished handmade items you make yourself, subject to any applicable yarn-brand or pattern-specific terms. If you publish or sell your own written pattern, ensure the instructions and photographs are your own or that you have permission to use them.
Final Thoughts
These two-color flat-knit slippers are a cozy project for anyone who enjoys handmade accessories. The cream garter-stitch texture and sage-green accent create a timeless look that works beautifully with soft, neutral yarns.
Follow the measurements carefully, check the fit before sewing, and enjoy creating a handmade pair of house slippers for yourself or someone special.
Happy knitting!